A top-notch record player cleaning kit is what separates a decent listening session from a truly incredible one. That pop and crackle you hear isn't always the "warmth of vinyl" people talk about. More often than not, it's a clear signal that dust, static, and other gunk are literally getting in the way of the music.
Think of cleaning less as a chore and more as a ritual. It’s how you protect your investment and preserve the sound quality of your entire collection.
Why Pristine Vinyl Is The Heartbeat Of Great Audio
The magic of vinyl is its tangibility—you're holding the music in your hands. Each record is a physical map of sound, with tiny grooves holding an immense amount of audio information. But those same grooves that create such a rich, warm sound are also perfect little traps for all sorts of contaminants.
From the moment it's pressed, a record starts its fight against dust, fingerprints, and static. Even a brand-new, shrink-wrapped LP can have a thin film of mold-release agent left over from the factory. You can't see it, but that residue can dull the sound from the very first spin, preventing your stylus from tracking the grooves as it should.
This is exactly why a dedicated record player cleaning kit is a must-have for anyone who's serious about their sound. It’s your first and best defense for protecting not just your records, but your turntable and stylus, too.
The Science Of Sound And Silence
To get why cleaning is so critical, just picture your stylus. It's an incredibly sensitive diamond tip tracing the microscopic hills and valleys of a record groove, picking up subtle vibrations that get amplified into the music you love.
Now, imagine a particle of dust or a bit of grime in that groove. The stylus smacks right into it. The result? That all-too-familiar and unwelcome "pop" or "crackle" that pulls you right out of the moment. Over time, these little impacts don't just create noise; they can cause real, cumulative damage to both the record and your delicate stylus.
A clean record doesn't just sound better; it actively preserves the life of your phono cartridge. Dust and grime act like sandpaper at a microscopic level, slowly wearing down the stylus tip and degrading its ability to reproduce sound accurately.
This gradual wear and tear is why a once-vibrant album might start to sound muffled or distorted over the years. By regularly removing contaminants, you're not just aiming for silence between tracks—you're ensuring the long-term health of your entire setup.
More Than Just Dust
The enemies of clean audio are more than just visible dust. Static electricity is a massive problem, acting like a magnet for any airborne particles in the room. You've probably felt it yourself when pulling a record from its sleeve—that little crackle is the sound of it attracting dust right out of the air.
A good cleaning kit tackles this from two angles:
- Physical Removal: Brushes and cloths are designed to physically lift dirt, dust, and the oils from fingerprints off the record's surface.
- Static Neutralization: This is the secret weapon. Tools like carbon fiber brushes have conductive bristles that are specifically designed to dissipate static charge. This makes the record far less likely to attract new dust right after you've cleaned it.
If you don't manage static, you're fighting a losing battle. You can wipe a record perfectly clean, but if it stays charged, it will just pull new dust from the air before the needle even drops. This is why the different tools in a comprehensive record player cleaning kit are meant to work together as a complete system.
By making cleaning a regular routine, you turn a passive hobby into an active act of preservation. Every spin sounds better, and the ritual itself deepens your connection to the music and the artist. To really set the mood for your listening sessions, you might even enjoy a cool record player wallpaper that celebrates the gear bringing your favorite albums to life.
Choosing The Right Cleaning Kit For Your Collection
Stepping into the world of vinyl care can feel a bit overwhelming at first. There are so many products out there, and they all seem to promise a miracle cure for dusty, crackly records. But here's the secret: a great record player cleaning kit isn't about having the most expensive gear. It’s about having the right tools for the job.
The goal is to build a simple, effective system that tackles the three biggest enemies of clean audio: static, dust, and deep-seated grime.
And it seems like everyone is catching on. As vinyl has made its incredible comeback, the demand for proper cleaning tools has exploded. The market for these kits is now valued at a massive $272.8 million. That’s no surprise when you consider that over 43 million LPs were shipped in the US alone recently. Vinyl has been outselling CDs for years now, making a solid cleaning kit a must-have accessory for any serious listener. You can dive deeper into this trend in the full Dataintelo report on the record cleaning kit market.
This growth means you have more choices than ever, which is great! But it also makes it crucial to know what you’re actually looking for.
The Essential Tools Of The Trade
A truly effective manual cleaning kit, like the EVEO 4-in-1, is built around a few core components that each play a specific, vital role. Think of it as a specialist team working together to bring your records back to life.
Before we dive into how to use them, let's get familiar with what's in a typical high-quality kit.
Breaking Down Your Vinyl Cleaning Toolkit
This table breaks down the function and benefits of each tool typically found in a comprehensive manual cleaning kit.
| Tool | Primary Function | Best For |
|---|---|---|
| Carbon Fiber Brush | Dissipates static and removes light surface dust. | Quick, dry cleaning before every single play. Your daily go-to. |
| Velvet Brush | Lifts embedded grime and oils from deep within the grooves. | A thorough "wet" clean using a cleaning solution. |
| Cleaning Solution | Dissolves and lifts stubborn dirt, oils, and fingerprints. | Paired with the velvet brush for records that need a deep clean. |
| Stylus Brush | Safely removes accumulated dust and gunk from the needle. | Regular maintenance to ensure clear sound and protect your records. |
Each tool has its purpose, and using them together is what delivers those pristine, like-new results. A carbon fiber brush alone is great for daily upkeep, but it won't get rid of the gunk that causes those persistent pops and clicks—that's where the velvet brush and solution come in.
Manual Kits vs. Ultrasonic Machines
When you start shopping for a record player cleaning kit, you’ll see everything from simple manual kits to high-tech ultrasonic machines that can cost a small fortune. For the vast majority of us, a well-rounded manual kit offers the perfect blend of performance, affordability, and the simple satisfaction of caring for your collection yourself.
A manual kit puts you in complete control. You can apply just the right amount of pressure and fluid, focus on problem spots, and ensure a perfect, streak-free finish every time. It turns cleaning from a chore into a rewarding ritual.
So, what about those fancy ultrasonic cleaners? They work by using sound waves in a water bath to create microscopic bubbles that blast debris out of the grooves. While they are incredibly effective, they’re also a major investment and honestly, overkill for most home listeners.
Think of it this way: if you have a collection of 100 records, an all-in-one manual kit like the EVEO setup is everything you'll ever need to keep them in top shape. But if you’re a record store owner processing hundreds of used LPs every week, then the cost of an ultrasonic machine might be justified for its sheer speed and volume.
For everyday listening and collecting, the hands-on process and excellent results you get from a manual kit deliver unmatched value.
The Art Of The Deep Groove Wet Clean
While a quick dry sweep is your daily go-to for record maintenance, the deep groove wet clean is where the real magic happens. This is how you can turn a crackly, thrift-store find into a silent, immersive listening experience. It’s a rewarding ritual that goes far beyond simple dusting, using a dedicated cleaning solution and a velvet brush to lift years of embedded grime right out of the grooves.
Forget complicated manuals. This is a practical, hands-on guide to getting a wet clean right. Mastering this technique is what truly separates a casual listener from a serious vinyl enthusiast.
Preparing Your Workspace
Before a single drop of fluid touches your record, you need to set yourself up for success. Find a clean, flat, and stable surface. The most important thing is to have a soft, lint-free foundation to protect the side of the record you aren't currently cleaning. A large, clean microfiber cloth works perfectly for this.
Lay the record flat on your protective cloth. Make sure the area is well-lit so you can actually see the surface of the vinyl clearly—this helps you spot problem areas and check your work as you go.
Applying The Cleaning Solution
The goal here is precision, not saturation. Most quality kits come with a spray bottle for a good reason: it allows for controlled application. A few light spritzes are all you need.
Aim for a gentle mist across the grooved area of the record. Crucially, you must avoid spraying the record label. The paper label can be easily damaged by moisture, which can lead to bubbling or discoloration. If you accidentally get some solution on the label, just blot it dry immediately with a corner of your microfiber cloth.
The cleaning fluid is designed to act as a solvent, breaking down the oils and stubborn particles that a dry brush just can't lift. Letting it sit for just a moment—about 15 to 30 seconds—allows it to penetrate the grooves and start working before you even touch it with the brush.
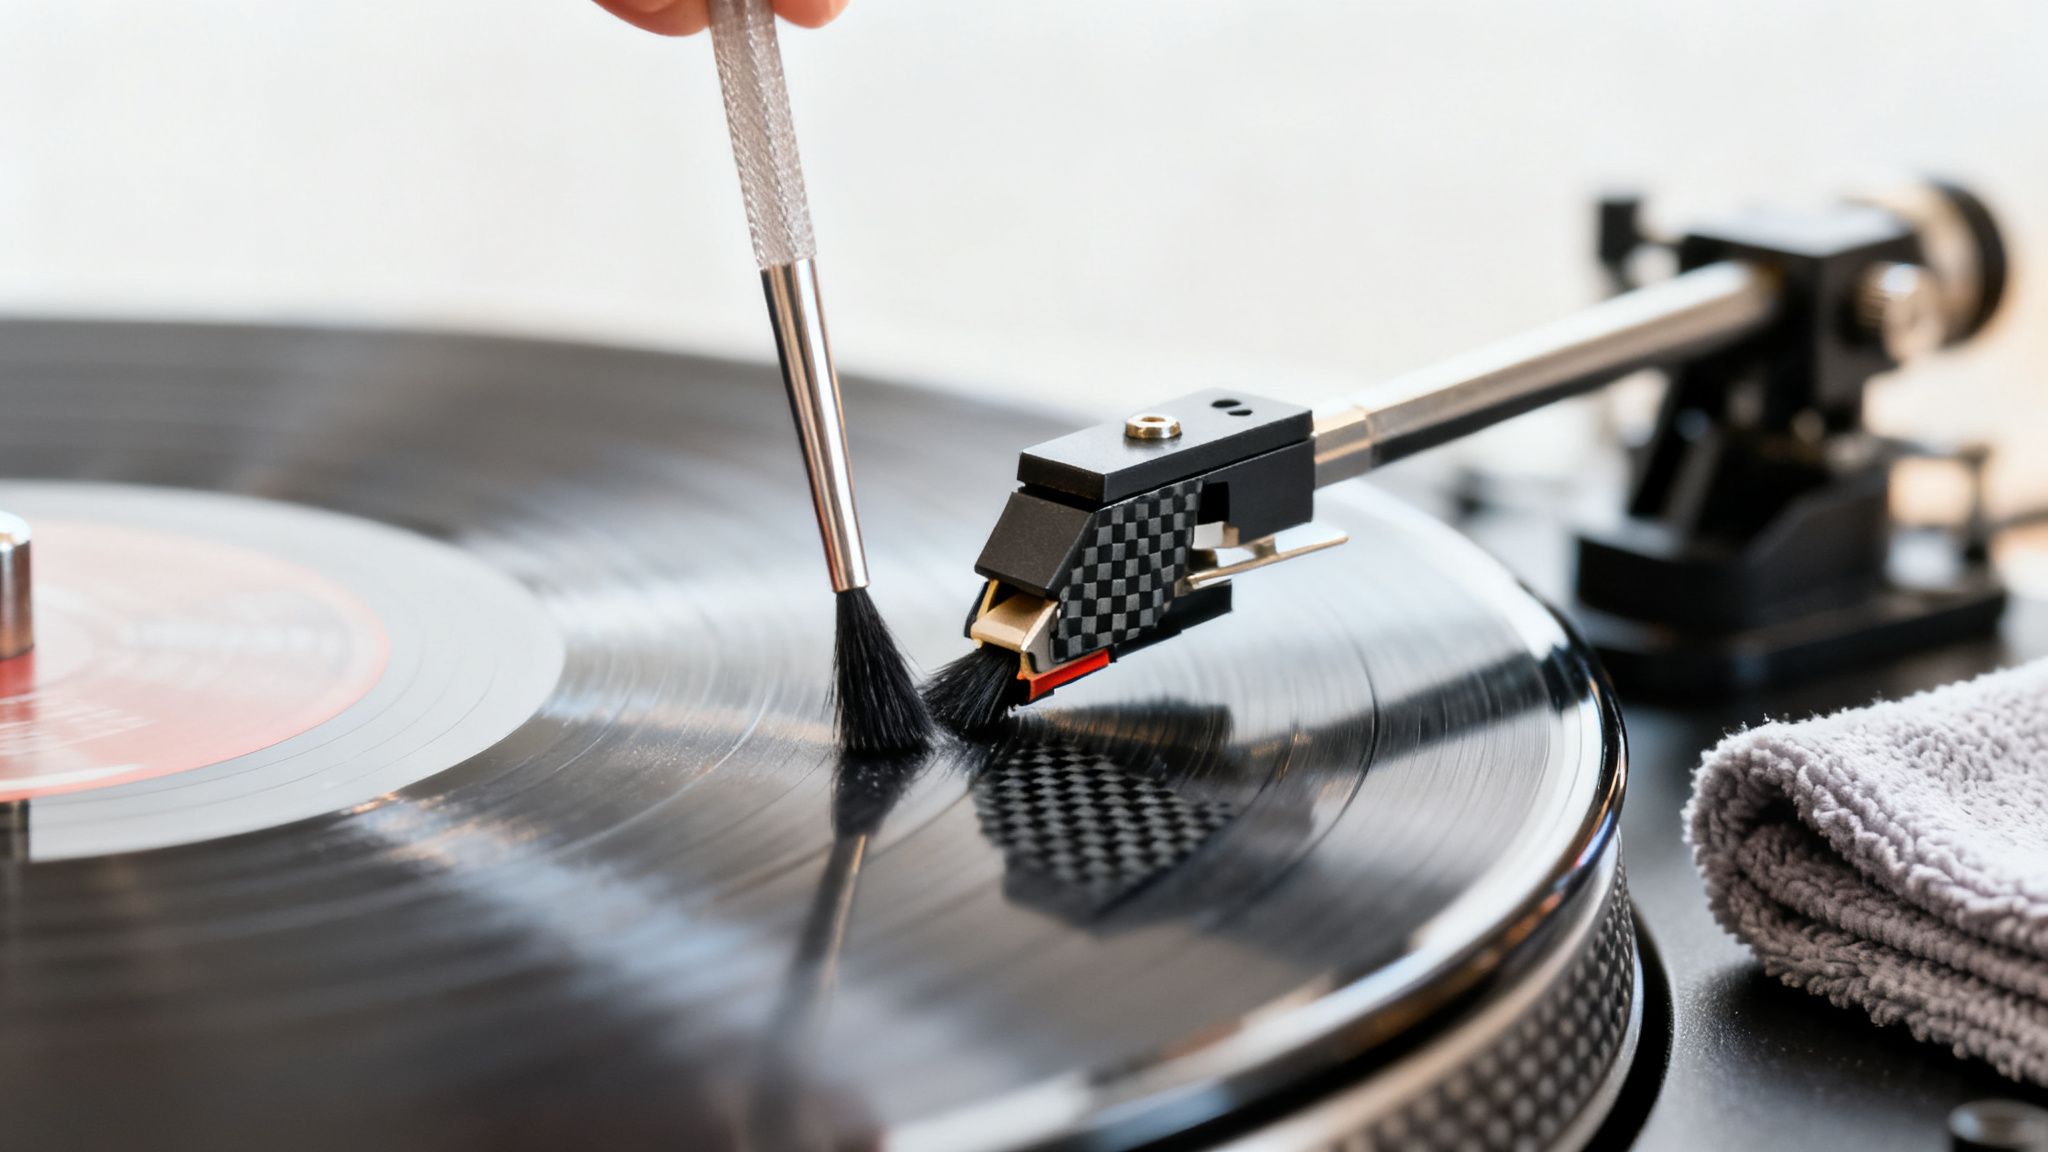
The Velvet Brush Technique
Now it's time for the star of the show: the velvet brush. This tool is specifically designed to get deep into the grooves without being abrasive. Hold the brush lightly and place it flat against the record's surface.
The motion is everything. Follow the direction of the grooves, moving in a smooth, circular motion along with the record's rotation. Let the brush do the work; there's no need to apply heavy pressure. A light, consistent touch is far more effective and, more importantly, safer for your vinyl. A few full rotations are usually all it takes to lift the loosened debris.
For a deeper dive into the nuances of different cleaning methods and why they matter, our comprehensive guide on how to clean vinyl records offers a ton of additional insights.
This flowchart breaks down the decision-making process, guiding you from identifying a problem like static or grime to selecting the right tool for the job.
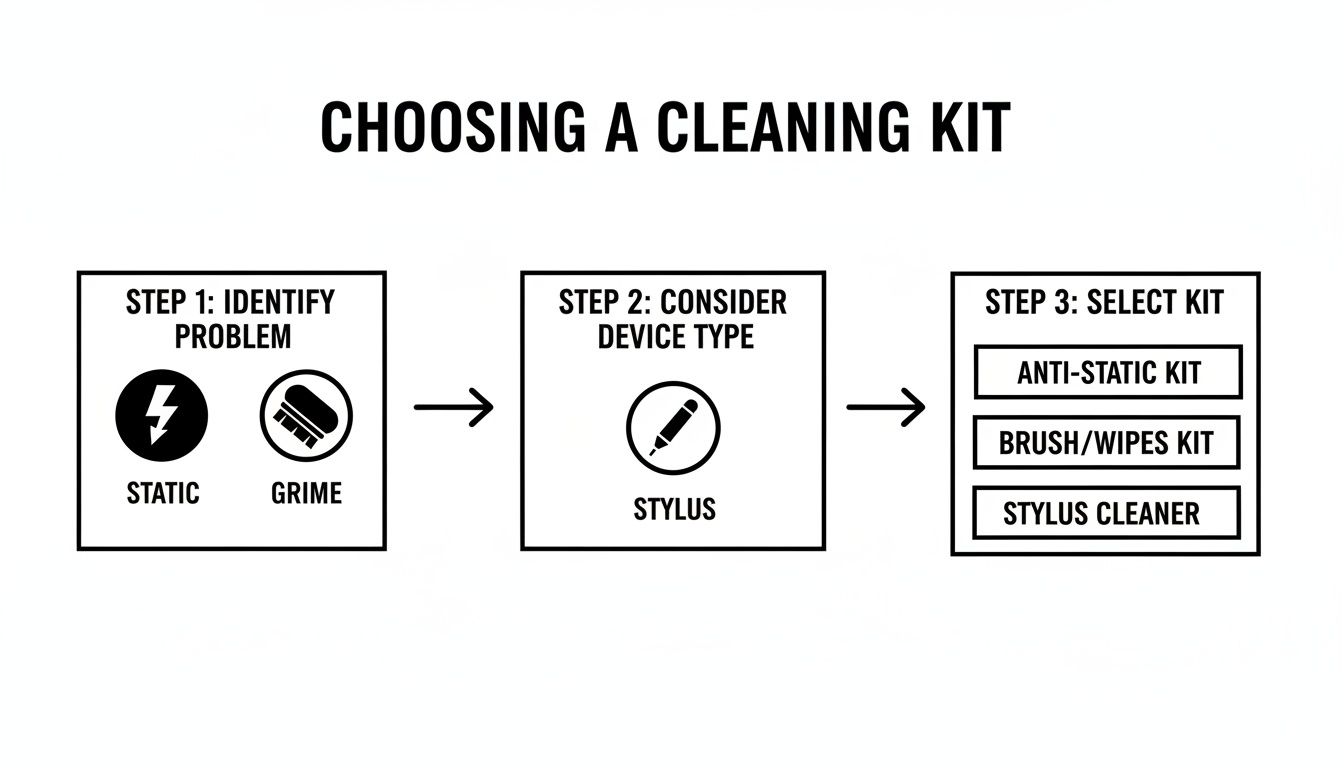
As you can see, a complete record player cleaning kit provides a systematic solution for pretty much every common vinyl issue you'll run into.
The Final Wipe Down
After you’ve worked the solution in with the velvet brush, it’s time to remove the liquid and all the dirt it's holding. This step is absolutely critical for a streak-free, silent finish.
Take your clean, dry microfiber cloth and gently wipe the record, again following the direction of the grooves. Your goal is to absorb all the moisture. Don't be surprised if the cloth picks up a lot of grime—that’s a great sign that the process is working.
Here’s a pro tip I picked up from a vinyl shop owner:
- Use two cloths: Use the first cloth for the initial, wetter pass to absorb the bulk of the solution and dirt.
- Follow with a second cloth: Use a completely dry, "polishing" cloth for a final pass to remove any remaining streaks or residue.
Once the first side is perfectly dry, carefully flip the record over onto your protective surface and repeat the entire process on the other side. Let the record air dry for a few minutes before placing it back into a clean, anti-static sleeve. This simple, satisfying process is the real secret to unlocking the full sonic potential hiding in your collection.
Mastering The Pre-Play Anti-Static Sweep
While a deep, wet clean has its place for bringing thrift-store finds back to life, the single best habit you can build for consistently great sound is the quick dry sweep before every single play. This isn't just about knocking off a bit of dust. It's about a specific technique that neutralizes the static electricity acting like a magnet for every speck floating in the air.
Think of that carbon fiber brush as a specialized tool, not just a duster. Its thousands of ultra-fine, conductive bristles are designed to do two jobs at once: gently lift away surface grit and, more importantly, dissipate the static charge that glues it to the vinyl. Getting the technique right is what unlocks its full potential.
The Right Way to Handle the Brush
Forget scrubbing. The secret to a perfect anti-static sweep is a light, almost weightless touch. You want the very tips of the carbon fiber bristles to do all the work without you applying any real pressure.
First, get your record spinning on the platter. Hold the brush by its handle, making sure your fingers are touching the metal part—this is what grounds the static and allows it to discharge through your body.
Now, gently lower the brush onto the spinning record. Hold it so it’s perfectly perpendicular to the grooves, and just let it rest there. The weight of the brush itself is more than enough. You're not trying to scrub anything, just make contact.
Keep it steady for two or three full rotations. This gives those conductive fibers the time they need to work their magic and neutralize the static buildup. On a really staticky day, you might even hear a faint crackle as the charge dissipates. That's a great sign!
After a few spins, slowly and smoothly pull the brush towards you, dragging it to the outer edge of the record. Once you're at the edge, lift it straight up and away. This little maneuver gathers all the loosened dust into a line and lifts it completely off the surface instead of just pushing it around.
Common Mistakes to Avoid
I see a lot of new collectors make a few simple mistakes that pretty much negate the whole point of using their record player cleaning kit. If you can sidestep these common pitfalls, you'll get much better results.
- Pressing Down Too Hard: This is the biggest one. Pushing down on the brush is just counterproductive. You risk grinding dust deeper into the grooves and could even cause micro-scratches over time. Just let the brush float.
- Using a Filthy Brush: A dirty brush doesn't clean; it just moves grime from one record to the next. Always clean your carbon fiber brush after you use it. Most have a handle that swings over to scrape the bristles clean—just rock it back and forth a few times.
- Wiping Against the Grain: Always move the brush with the record's rotation and then pull it straight off from the edge. A back-and-forth scrubbing motion is a surefire way to damage the delicate groove walls.
This pre-play ritual is non-negotiable, even for brand-new, sealed records. It’s a common misconception that they're clean. Research often shows new vinyl can be caked with residue from the pressing plant, which is what causes many of those initial pops and clicks. You can see how all-in-one kits address this in detailed analysis of the record cleaning kit market.
This simple step does more than just make your music sound better in the moment. It dramatically extends the life of your stylus. By getting rid of those tiny, abrasive dust particles before the needle ever touches down, you’re preventing the slow, grinding wear that permanently ruins both your records and your expensive cartridge.
And once a record is clean, the best thing you can do is keep it that way. Protecting your collection is just as important as cleaning it, so check out our guide on the benefits of using anti-static record sleeves.
Caring For Your Stylus And Cleaning Tools
It’s an easy detail to overlook, but your cleaning tools are only as good as they are clean. Wiping a record with a dirty velvet brush or a grimy microfiber cloth doesn’t actually accomplish much—you’re just pushing the gunk around. Keeping your record player cleaning kit in top shape is a simple but critical part of the process.
Think of it as the final piece of your vinyl care puzzle. When you take care of the tools that care for your records, you're protecting your entire audio investment for years to come.
Keeping Your Brushes And Cloths In Prime Condition
Let's talk about the workhorses: the velvet brush and microfiber cloth. After a good wet clean, they’re holding onto all the dust and oils they just lifted from your record's grooves. If you just put them away, you're setting yourself up to spread that same gunk onto the next record you play.
A quick and easy routine will keep them fresh.
- The Velvet Brush: Most kits, like EVEO’s, include a small nylon brush. After cleaning a record, just use this smaller brush to gently sweep the velvet pad in one direction. This lifts off all the trapped dust and fibers. For a deeper clean now and then, you can lightly dampen a separate clean cloth with your record solution, wipe the velvet pad, and let it air dry completely.
- The Microfiber Cloth: These are best hand-washed using a little bit of gentle, dye-free detergent in warm water. The key is to rinse it thoroughly until all the soap is gone, as any residue can leave a film on your vinyl. And never use fabric softener—it will clog the fibers and ruin the cloth's ability to absorb anything. Always let it air dry.
Starting each cleaning session with spotless tools ensures you get consistently great results every single time.
The Delicate Art Of Cleaning Your Stylus
The stylus, or needle, is the heart of your turntable. It's a microscopic diamond tip that has the incredibly precise job of tracing the record groove. As it works, it inevitably picks up a stubborn mix of dust particles and vinyl residue.
This buildup does more than just muddy the sound. It essentially turns the stylus into a tiny piece of sandpaper, which can cause permanent damage to your record collection and wear out the stylus itself much faster. Cleaning it isn't optional, but you absolutely have to do it with care.
Here’s the golden rule: When cleaning a stylus, you always brush from back to front. Always. This follows the same direction the record spins. Never go side-to-side or front-to-back, as you risk bending or snapping the fragile cantilever holding the diamond tip.
Your record player cleaning kit comes with a small, stiff-bristled brush made for this exact task. Simply lower the tonearm so you can get a clear view, then gently swipe the stylus tip from back to front. One or two light, deliberate passes is all it takes.
This tiny action makes a massive difference in audio clarity. For a deeper dive, check out our full guide on how to properly use a record player stylus brush and get the absolute best sound possible. It’s a precision task, but one that pays huge dividends for your gear and your ears.
Your Vinyl Cleaning Questions Answered
Let's wrap up by tackling some of the most common questions I hear from fellow vinyl lovers. Getting these basics down is the key to a lifetime of great-sounding records and will help you sidestep some of the classic mistakes many collectors make early on.
How Often Should I Actually Clean My Records?
This is the big one, and the answer really breaks down into two different cleaning routines. The most important thing is just being consistent.
First, there's your daily driver: the carbon fiber brush. You need to give every record a quick dry sweep with this before every single play. Seriously, don't skip this. It's the best way to get rid of surface dust and kill static right before the stylus hits the groove.
Then you have your deep clean, the wet-cleaning process. A good rule of thumb is to give any record—brand new or second-hand—a thorough wet clean the first time you play it. This gets rid of any factory residue or leftover grime from its previous life. After that, you only really need to do it again when you notice the surface noise creeping back in, or maybe every 5-10 plays for the albums you spin constantly.
Can I Just Use Windex or Alcohol?
Please don't. This is a hard "no" in the record community, and for good reason. Household cleaners, especially anything with ammonia, are far too harsh. They can literally eat away at the vinyl, permanently destroying the grooves that hold the music.
You'll see some DIY recipes online that call for isopropyl alcohol, but I'd steer clear of that, too. Over time, alcohol can leach essential compounds out of the PVC, making the record brittle and much more susceptible to damage.
It's always best to stick with a fluid made specifically for cleaning records, like the kind you'll find in a dedicated record player cleaning kit. These are formulated to break down grime and oils without harming the vinyl itself.
Will Cleaning Get Rid of Scratches?
Cleaning can do amazing things, but it's not magic. It's really important to know if you're dealing with a dirty record or a damaged one. A deep clean is fantastic for flushing out all the gunk—the microscopic dust, skin oils, and other particles—that settles into the grooves and causes all those pops and clicks.
In many cases, a record that sounds like a lost cause is just incredibly filthy. You'd be shocked at how quiet and dynamic a record can sound after a proper wet cleaning.
But a scratch is physical damage. It’s a gouge that has been carved into the wall of the groove. No amount of cleaning fluid can fill that back in. While cleaning the surrounding area might make a light scratch a little less noticeable, a deep one that causes a "tick" or a skip is there to stay.
What’s the Best Way to Store My Records After I Clean Them?
All your hard work cleaning will be for nothing if you don't store your records properly. This is the final and most critical step.
As soon as your record is clean and bone-dry, slide it into a fresh, anti-static inner sleeve. Ditch those cheap paper sleeves that many records come in; they just shed paper dust and create static, putting you right back where you started.
And finally, always store your records on their edge, vertically, like books on a shelf. Never, ever stack them flat on top of each other. The weight will eventually cause them to warp, and a warped record is a problem no record player cleaning kit can solve. Keep them somewhere cool and dry, away from direct sunlight, and they'll stay flat and playable for decades.
Ready to give your vinyl collection the care it deserves? The EVEO 4-in-1 Vinyl Record Cleaning Kit has everything you need to restore your records to their original glory and keep them sounding pristine. Shop the complete kit today and hear the difference for yourself at EVEO.store.
Finding the Best Record Cleaning Solution for Your Vinyl
How to Flatten Warped Vinyl Your Practical Guide