Before you even dream of getting a record clean, a little prep work is the difference between a pristine-sounding LP and one with a fresh, accidental scratch. The goal is to set up a clean, stable "operating table" for your vinyl, with all your tools—a soft mat, microfiber cloths, and your cleaning kit—ready to go. Getting this right makes the whole process smoother and safer.
Setting the Stage for a Perfect Clean
Properly cleaning a vinyl record starts long before any cleaning solution touches its grooves. Think of it as a pre-flight checklist for your listening session. Skipping these steps is just asking for trouble, and when you’re dealing with a prized collection, why take the risk? You want to create a controlled environment where your records are safe from the second they leave their sleeves.

This isn't just about being fussy; it's fundamental to preserving the sound quality. The recent vinyl boom has kicked off a massive market for cleaning gear, with the global record cleaning machine market hitting USD 121 million in 2024. That number tells a story: collectors know that dirt is the ultimate enemy. A single speck of dust can be 50-100 microns wide—more than big enough to carve a permanent gouge in the grooves as the stylus drags it along. That’s where those dreaded pops and skips are born. You can find more data on this growing market trend and its impact on record care.
Creating Your Cleaning Sanctuary
First things first, find a flat, steady surface. Make sure it's in a well-lit spot so you can actually see the dust and smudges you're trying to eliminate.
Lay down a soft, non-abrasive mat. A clean, lint-free microfiber towel is perfect for this. This simple step protects the side of the record you're not working on from getting scuffed up.
Next, get all your supplies together before you start. Having everything within arm's reach means you won’t be fumbling around or leaving a vulnerable record exposed.
Here's a quick rundown of what you'll need:
- A good carbon fiber anti-static brush for that first pass to lift loose dust.
- A couple of high-quality microfiber cloths that won’t shed and leave more lint behind.
- A reliable cleaning kit, like the EVEO 4-in-1, which has the right tools and a safe solution all in one place.
Before you start, a quick check of your gear can save you a lot of grief. Here’s a simple table to run through.
Your Pre-Cleaning Checklist
| Item or Action | Its Role in the Process | Why It Matters |
|---|---|---|
| Flat, Stable Surface | Your primary workspace. | Prevents records from rolling or falling, which can cause catastrophic damage. |
| Soft Mat or Towel | A protective layer for the record. | Protects the non-playing side from scratches and keeps it from sliding around. |
| Good Lighting | Visual aid for inspection. | Helps you spot fine dust, fingerprints, and smudges you might otherwise miss. |
| Carbon Fiber Brush | Initial dry-cleaning tool. | Lifts surface dust and discharges static, making the wet clean more effective. |
| Microfiber Cloths (2) | One for cleaning, one for drying. | Using separate cloths prevents you from re-applying dirty solution back onto the record. |
| Cleaning Solution | The active cleaning agent. | A purpose-made solution dissolves grime without leaving residue or damaging the vinyl. |
| Your Hands Are Clean | Personal prep. | Prevents transferring oils and dirt from your fingers directly onto the record surface. |
With everything laid out and ready to go, you're not just cleaning a record—you're performing a ritual that respects the music and the medium.
By methodically preparing your space, you turn what could be a chore into a rewarding process. This little bit of time upfront is your best insurance against accidental drops, spills, and scratches, making sure your collection sounds incredible for years to come.
The Everyday Ritual of Dry Brushing
Your first and best line of defense against those annoying pops and crackles is a simple ritual that should take place before every single spin. Dry brushing your records with a carbon fiber anti-static brush is easily the most effective habit you can build for preserving audio fidelity. It's also key to extending the life of both your vinyl and your stylus.
This isn't just a quick wipe-down; think of it as crucial preventative maintenance.
A spinning record on a turntable can generate a surprising amount of static charge, essentially turning its surface into a magnet for dust, pet hair, and all sorts of other airborne particles. This is what causes a lot of that distracting surface noise. And this is exactly where the magic of a good carbon fiber brush comes in.
Those thousands of tiny, conductive bristles do more than just sweep away dust. They actively neutralize the static on the record's surface, breaking the electrical "grip" that holds those particles in the grooves. This allows the debris to be lifted out, not just pushed around.
Mastering the Technique
Getting your dry brushing technique right only takes a few seconds to learn, but it pays off for years. The goal is a gentle but effective clean that never risks scratching the delicate vinyl. It’s all about letting the brush and the turntable’s own motion do the work for you.
- Angle the Brush: Hold the carbon fiber brush lightly, with the bristles angled just slightly against the direction of the grooves. No need to press down hard.
- Let the Record Spin: Gently place the brush onto the spinning record. Hold it steady for two or three full rotations and you'll see a fine line of dust begin to collect.
- Sweep Towards the Edge: After a couple of rotations, smoothly angle the brush toward the outer edge of the record, sweeping that line of collected debris completely off the vinyl.
This simple pre-play ritual is your daily maintenance. It dramatically reduces the amount of grit your stylus has to plow through, preventing premature wear on both the needle and the record grooves themselves.
This process is the absolute foundation of good vinyl hygiene. While a deeper wet clean is a must for thrift store finds or records with stubborn, caked-on grime, daily dry brushing is what keeps your already-clean records in pristine shape.
For a complete solution that includes a high-quality anti-static brush and other essential tools, you can explore the comprehensive EVEO 4-in-1 vinyl cleaning kit. It gives you everything you need for both daily upkeep and more intensive cleaning sessions. By making this a consistent habit, you're not just cleaning your records—you're actively preserving your collection for countless listens to come.
A Practical Guide to Manual Wet Cleaning
For those times when a quick dry brush just won't cut it, a manual wet clean is your secret weapon. Think about that dusty gem you found at a thrift store, covered in years of fingerprints, or a beloved album that's survived one too many parties. This hands-on approach is the best way to dissolve stubborn grime and lift it right out of the grooves, often unlocking a vibrant sound you never knew was there.
The idea of getting a record wet can feel a bit daunting, especially with that fragile paper label. But don't worry—with the right tools and a gentle touch, it's a simple and incredibly satisfying process. Using a dedicated kit makes all the difference, giving you a solution formulated to be tough on dirt but completely safe for your vinyl.
Applying the Cleaning Solution
The key here is precision. You want the cleaning fluid only on the grooved playing surface. Many collectors get nervous about wetting the label, but a little bit of care is all it takes to keep it perfectly dry.
A product like the EVEO 4-in-1 vinyl cleaning kit puts you in control. You'll typically apply just a few small drops or a light mist of the solution directly onto the record. Resist the urge to douse the surface; a little really does go a long way.
Pro Tip: Never spray directly toward the label. Instead, work your way around the record in a circular pattern, staying about an inch away from the label's edge. This creates a safe buffer and prevents any accidental water damage.
Once the solution is on, just let it sit for a moment—maybe 15-20 seconds. This gives the fluid time to penetrate and start breaking down any oils or hardened debris, making the next step much more effective.
The Gentle Art of Brushing
Now it's time to grab a soft brush and lift away all that loosened grime. Your technique is what really counts here. The goal isn’t to scrub, but to gently guide the brush along the path of the grooves.
- Follow the Grooves: Always move your brush in a circular motion, following the direction the needle would travel. Going against the grain can push dirt deeper or, even worse, cause micro-scratches.
- Use Light Pressure: Let the velvet or microfiber bristles do the work. The cleaning solution has already done the heavy lifting; your job is to simply sweep everything away.
This diagram illustrates the core idea of gentle, effective brushing, which is just as important for wet cleaning as it is for dry brushing.
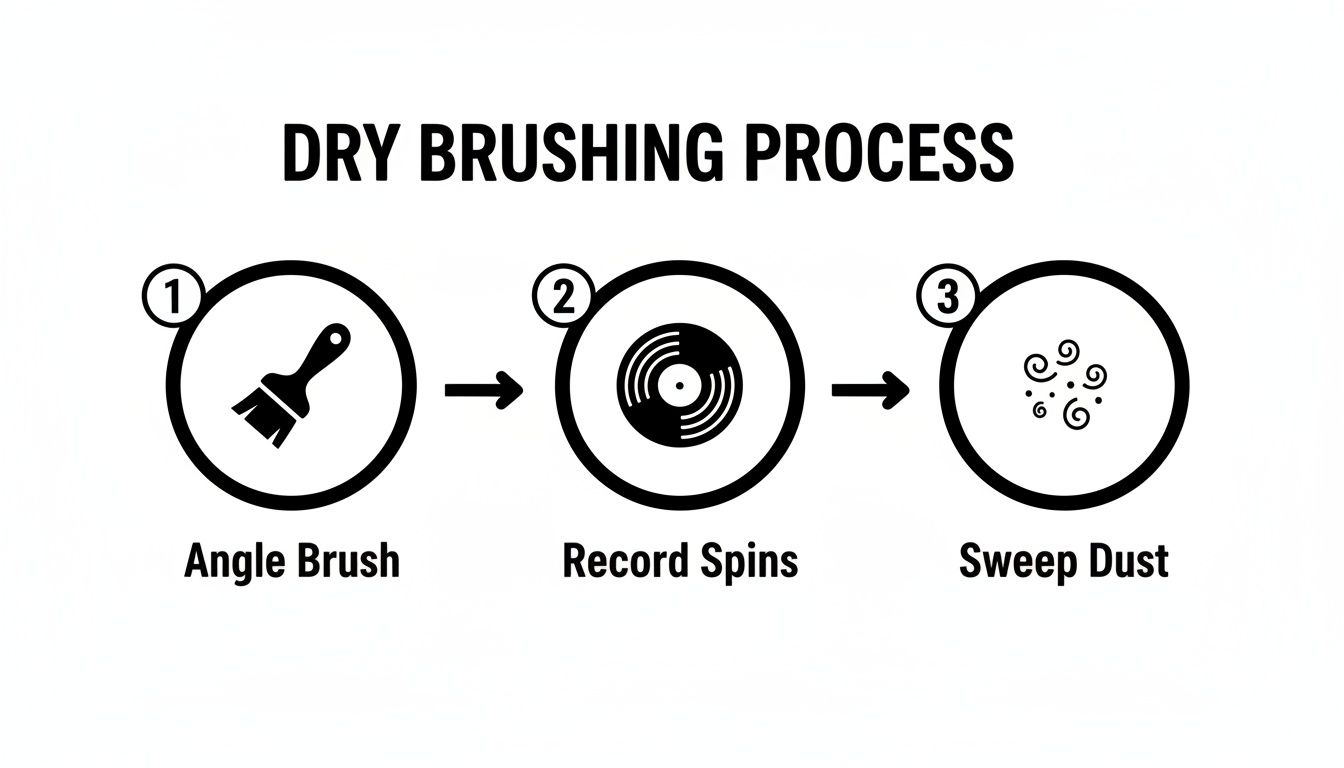
The main takeaway is to work with the record, not against it. The combination of angled bristles and the record's natural spin sweeps dust and debris outward and away from the playing surface.
Rinsing and Drying for a Flawless Finish
After a few spins with the brush, the final step is to get the solution—and all the dirt it’s holding—off the record. Grab a clean, lint-free microfiber cloth and gently wipe the surface, again following the direction of the grooves. Some kits might recommend a final rinse with distilled water to remove any lingering residue, ensuring a dead-silent background when you play it.
Once it's clean, pop the record in a drying rack and let it air dry completely before sliding it into a fresh anti-static sleeve. Mastering this hands-on method is the perfect way to learn how to clean your vinyl records properly. A little care can go a long way, potentially extending a record's life by 5-10 years and preventing the kind of groove wear that makes collectors cringe. You can find out more about the EVEO 4-in-1 professional vinyl cleaning kit and how it helps preserve collections for years to come.
Investing in a Record Cleaning Machine
For the serious enthusiast with a growing collection, there comes a point where manual cleaning just doesn't cut it anymore. When you’re ready for a level of clean that hand-washing simply can't match, a dedicated record cleaning machine is a game-changing investment. These devices offer a deeper, more consistent clean that can resurrect even the grimiest thrift-store find into something that sounds almost brand new.
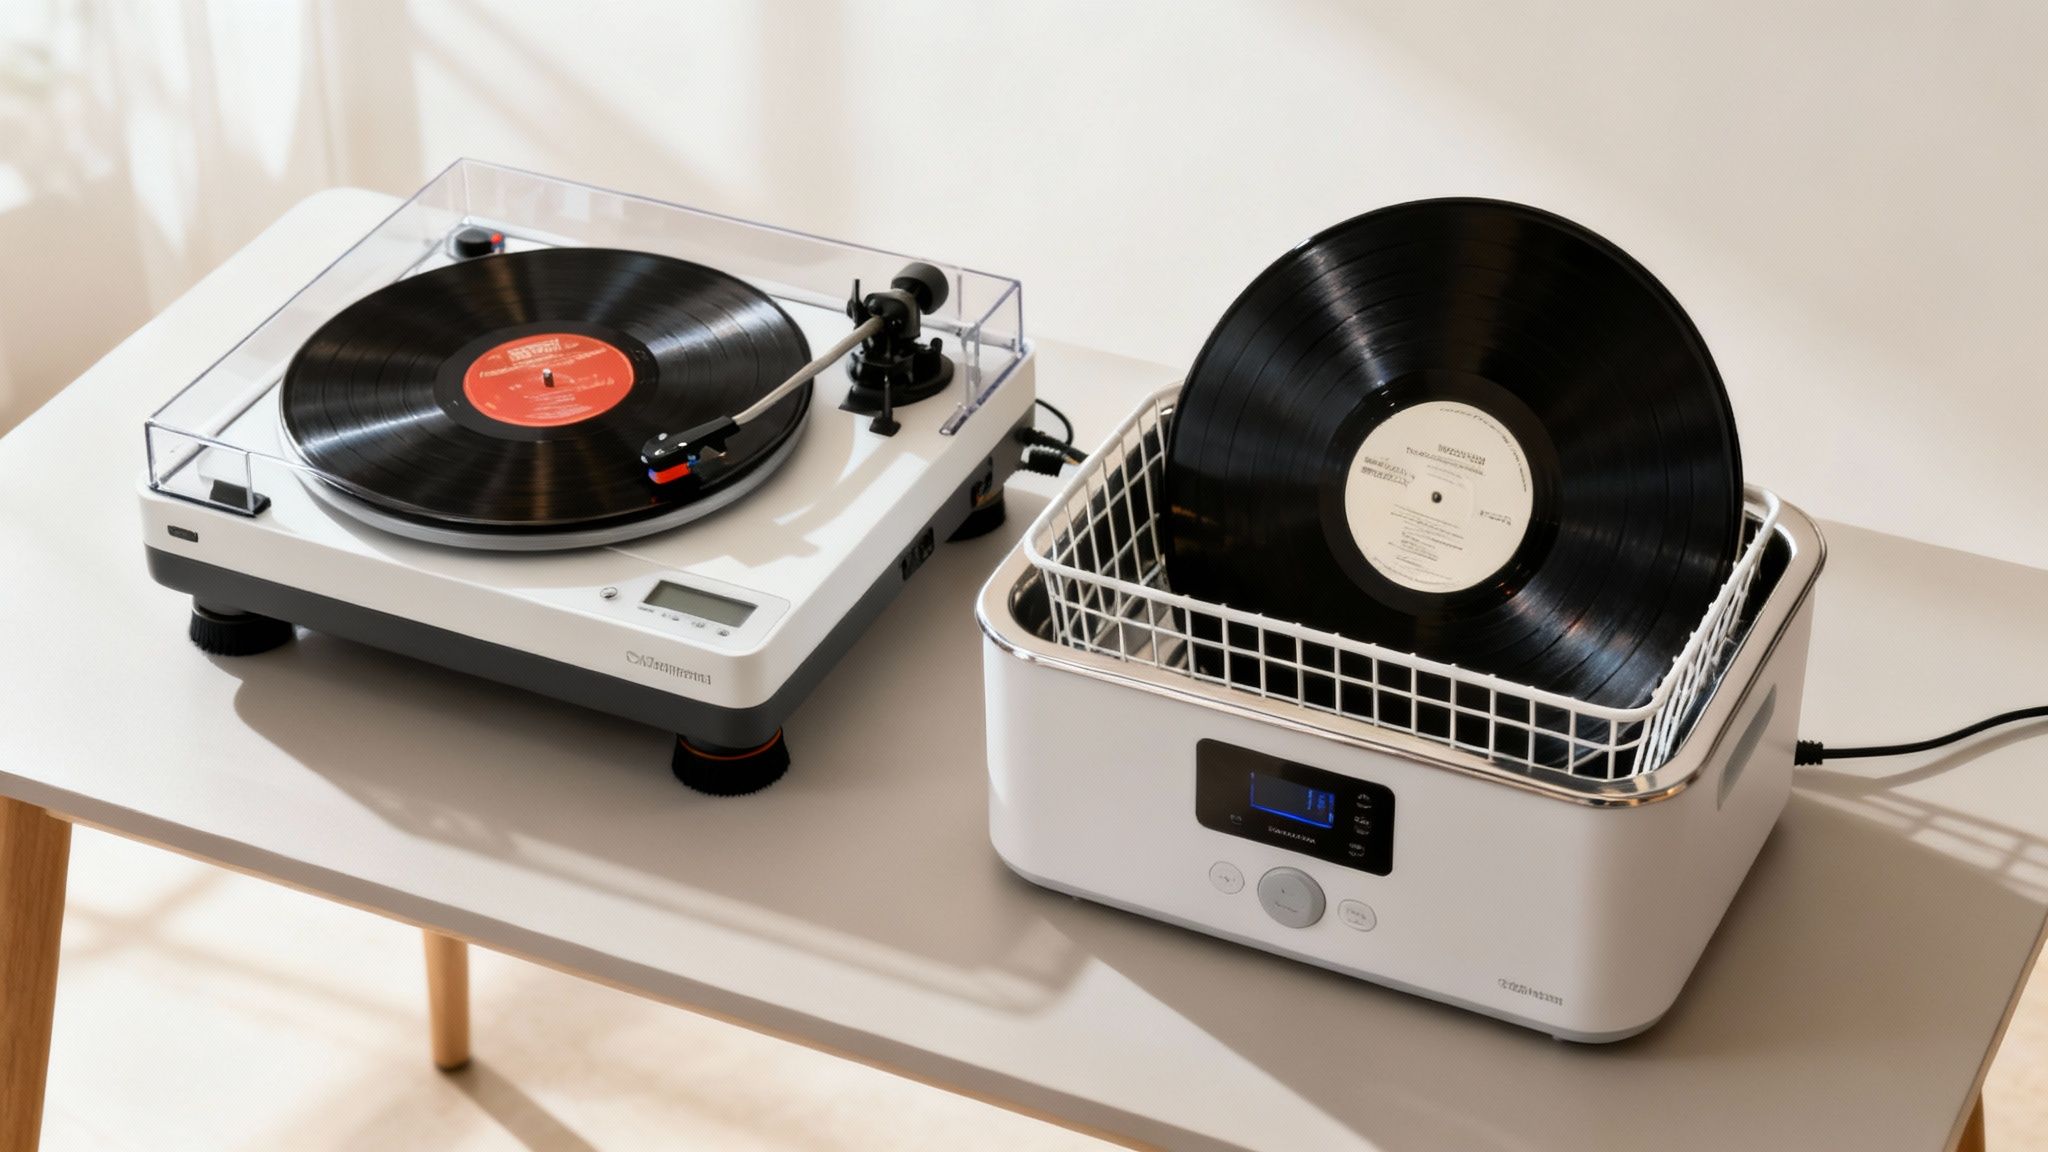
This leap from manual methods isn't just about convenience. It’s about getting deep into the microscopic trenches of the grooves, where the most stubborn, sound-dulling gunk loves to hide. The two main players in this space are vacuum and ultrasonic cleaners, and each has its own way of getting your records pristine.
The Power of Vacuum Cleaning
Vacuum-style record cleaners are a massively popular and effective choice. Think of them as a high-powered, purpose-built wet-dry vac for your vinyl. The process is pretty straightforward but incredibly thorough. First, you'll apply a specialized cleaning fluid to the record's surface, which gets to work dissolving fingerprints, oils, and embedded dust.
Then, a high-torque motor spins the record while a vacuum wand glides across its surface. This wand literally sucks the dirty fluid—and all the dissolved grime with it—right out of the grooves. What's left is a bone-dry, spotless surface in seconds, which totally eliminates any risk of leftover residue that could muddy the sound.
The Precision of Ultrasonic Cleaning
If you’re after the absolute ultimate deep clean, ultrasonic technology is the top of the mountain. These machines submerge your record in a bath of distilled water and a gentle cleaning solution. From there, they use high-frequency sound waves to create a wild phenomenon called cavitation.
This process generates millions of microscopic bubbles that form and then implode with incredible force. It’s like a tiny, targeted pressure-washing for your grooves. These implosions blast away contaminants from the deepest, most inaccessible parts of the groove—something no brush could ever hope to achieve.
Ultrasonic cleaners are really stealing the show in the archival and preservation game. Contaminants like fingerprints can slash playback fidelity by 25-35%, but ultrasonics hit them with 40,000 Hz waves, achieving a level of purity that manual methods can only dream of. You can find more insights on the rise of ultrasonic record cleaners on Salehoo.com.
Investing in a machine is about maximizing your audio fidelity and preserving the long-term value of your collection. While the initial cost is higher, the ability to restore neglected records and maintain a pristine library is priceless for any dedicated collector.
Deciding between a vacuum and an ultrasonic machine often comes down to your budget, the size of your collection, and how hands-on you want to be.
Choosing Your Cleaning Method
To help you decide, here’s a quick comparison of the different vinyl cleaning methods. Each has its place, from a quick daily dusting to a full-on archival-grade restoration.
| Cleaning Method | Ideal For | Overall Effectiveness | Typical Cost |
|---|---|---|---|
| Vacuum Cleaner | Collectors wanting a fast, dry, and deep clean for regular use. | Excellent at removing surface and embedded grime. | Mid-to-High |
| Ultrasonic Cleaner | Archivists and audiophiles seeking the absolute deepest clean possible. | Unmatched for microscopic-level contaminant removal. | High-End |
Ultimately, choosing either machine represents a serious step up in learning how to clean vinyl records the right way. They provide a level of care that ensures your collection will sound its absolute best for decades to come.
Common Cleaning Mistakes You Need to Avoid
We’ve all been there. You get a new record, or maybe unearth an old favorite, and you just want to get the dust off right now. But learning how to clean vinyl is often a process of trial and error, and some mistakes can cause irreversible damage.
Even with the best intentions, a simple misstep can leave your favorite album with permanent scratches, a ruined label, or dulled sound. This is the "what not to do" chapter that will save you from those common—and costly—errors.
The first major pitfall is simply using the wrong tools for the job. It’s so tempting to just grab a handy paper towel or an old t-shirt, but trust me, these materials are disastrous for vinyl.
They might feel soft to the touch, but on a microscopic level, they're abrasive. Wiping with them will create a web of fine scratches, often called micro-scratches, across the record's delicate surface. Worse yet, they shed fibers and lint, leaving behind more debris than you started with. These tiny particles get trapped deep within the grooves, leading to even more clicks and pops during playback. Always, always stick to purpose-made microfiber or velvet cloths designed specifically for records.
The Problem with Everyday Liquids
One of the most frequent and damaging mistakes is reaching for tap water for a wet clean. It seems harmless, right? But tap water is full of minerals like calcium and magnesium. When the water evaporates, those minerals get left behind as a chalky deposit deep in the grooves. This residue is nearly impossible to remove and will absolutely ruin the sound quality.
Household cleaners are another absolute no-go. Solutions containing alcohol or ammonia—think Windex or similar glass cleaners—are incredibly harsh. They can strip the protective coating right off the vinyl, permanently dulling its finish and degrading the plastic itself over time.
Using the wrong fluid isn't just ineffective; it can chemically alter the record's surface. Always use a specially formulated, pH-balanced record cleaning solution or, at a minimum, pure distilled water for rinsing to avoid introducing new contaminants.
Pressure and Technique Go a Long Way
Finally, a common error is simply being too aggressive. Applying too much pressure when brushing or wiping can actually grind existing dirt deeper into the grooves instead of lifting it out. This kind of brute-force approach is a surefire way to cause scratches.
Likewise, using too much cleaning fluid is a recipe for disaster. Excess liquid can easily seep onto the paper label, causing it to bubble, stain, or even peel away entirely. A few drops or a light mist is all you need for an effective clean that keeps the label perfectly safe and dry. When it comes to vinyl, gentleness is key.
Protecting Your Records With Proper Storage
After all that careful work getting your records clean, how you store them is what truly locks in that pristine sound for the long haul. Proper storage isn't just about being tidy; it's a conscious strategy to prevent the very dust, static, and physical damage you just worked so hard to remove. An impeccable cleaning job can be undone in weeks if a record goes right back into a hostile environment.
The first, and honestly most impactful, upgrade you can make is swapping out those old inner sleeves. The standard paper sleeves many records come in are notorious for shedding tiny paper fibers into the grooves. They also build up static every single time you slide the record in or out.
Choosing the Right Sleeves and Position
Upgrading to anti-static, archival-quality inner sleeves is a small investment that pays off big time. These soft, non-abrasive sleeves create a nearly frictionless home for your vinyl, which dramatically cuts down on the static charge that turns your records into dust magnets. This simple change keeps your LPs cleaner for much longer between plays.
Protecting the album art is just as important. High-quality outer sleeves shield your record jackets from shelf wear, scuffs, and even moisture. For a tough but crystal-clear option, you can learn more about EVEO’s vinyl protective sleeves for 12" LP albums, which are designed to give you archival-level protection without hiding the artwork.
The golden rule of vinyl storage is non-negotiable: always store your records vertically. Stacking them horizontally, one on top of the other, puts a crushing amount of pressure on the records at the bottom. Over time, that uneven weight will cause permanent warping and groove damage.
Creating the Ideal Storage Environment
Finally, where you keep your collection is critical. Vinyl is surprisingly sensitive to its surroundings, so you need to find a spot in your home that is cool, dry, and dark.
- Avoid Heat and Sunlight: Keep your records far away from radiators, heating vents, and direct sunlight. Heat can easily warp vinyl, while UV rays will fade your precious album covers in no time.
- Control Humidity: A stable relative humidity of around 35-40% is the sweet spot. Too much humidity can encourage mold growth on sleeves and even within the grooves themselves.
- Ensure Proper Support: Whether you use a shelf or a crate, make sure your records are standing straight up and are packed snugly enough that they don’t lean. Leaning at an angle is one of the main causes of warping.
By following these storage principles, you’re creating a safe haven for your collection, ensuring every record is perfectly preserved and ready for its next spin.
Of course. Here is the rewritten section, crafted to sound like an experienced human expert, following all the provided guidelines and examples.
Your Vinyl Cleaning Questions, Answered
Even after you've got the basics down, a few questions always seem to surface. It's totally normal. Here are some quick, no-nonsense answers to the things I get asked most often by fellow collectors trying to keep their vinyl in mint condition.
How Often Should I Really Clean My Records?
This is probably the #1 question, and the answer has two parts.
Think of a quick pass with a carbon fiber brush as daily maintenance. Doing this before each spin is the single best habit you can build. It takes two seconds and stops loose dust from getting ground into the grooves.
A deeper, wet clean is a different beast. You should absolutely deep clean any used record the second it comes through your door—you never know where it's been. For the records already in your collection, you only need to break out the wet cleaning gear when you see visible grime, fingerprints, or hear that persistent crackle that a dry brush just won't fix.
Is a DIY Cleaning Solution a Good Idea?
I get the temptation to mix your own fluid—it seems easy enough. But honestly, it’s a risky move. Most homemade recipes call for isopropyl alcohol, and getting the concentration wrong can slowly strip the protective coating right off your vinyl. It's the kind of subtle, long-term damage you won't notice until it's too late.
Commercially formulated solutions are a much safer bet. They're pH-balanced and tested to be tough on dirt but gentle on the record itself. It’s a small price to pay for total peace of mind.
My Record Is Warped. Can Cleaning Fix It?
Unfortunately, no. Cleaning is all about what’s happening on the surface—the gunk and grime inside the grooves. A warp is physical damage to the actual shape of the record, usually from heat exposure or bad storage habits (like stacking records flat).
Prevention is the only real fix here. Always, always store your records upright in a cool, dry spot. It's the only way to keep them flat and true.
Ready to give your collection the care it deserves? The EVEO 4-in-1 Vinyl Record Cleaner Kit has everything you need for both daily upkeep and those essential deep cleans, making sure your records sound incredible for years to come. Explore the complete cleaning solution at eveo.store.
How to Clean Your Laptop Screen Without Causing Damage
Anti Static Record Sleeves a Guide to Preserving Your Vinyl