That layer of dust, smudges, and fingerprints on your laptop screen isn't just an eyesore. It's a genuine barrier to your productivity and, believe it or not, can even shorten the life of your device over time. The safest way to tackle it involves a quality microfiber cloth and an alcohol-free screen cleaner—just remember to never spray anything directly onto the display itself.
Why a Clean Screen Matters More Than You Think
A smudged, dusty screen does more than just look unprofessional on your video calls. It actively gets in the way of your work and can even be a sneaky cause of eye strain.
Think about it: fighting against glare, fingerprints, and grime forces your eyes to work harder. This can quickly lead to fatigue and headaches after a long day of staring at spreadsheets or reports. In today's remote and hybrid work world, clarity is everything.
Imagine trying to edit a detailed design or review a complex document when smudges are obscuring critical details. It’s frustrating and just plain inefficient. A clean screen, on the other hand, keeps colors vibrant, text sharp, and your focus exactly where it needs to be—on the task at hand, not on the distracting marks all over your display.
Here’s a look at the kind of buildup a modern laptop screen collects from just daily use.
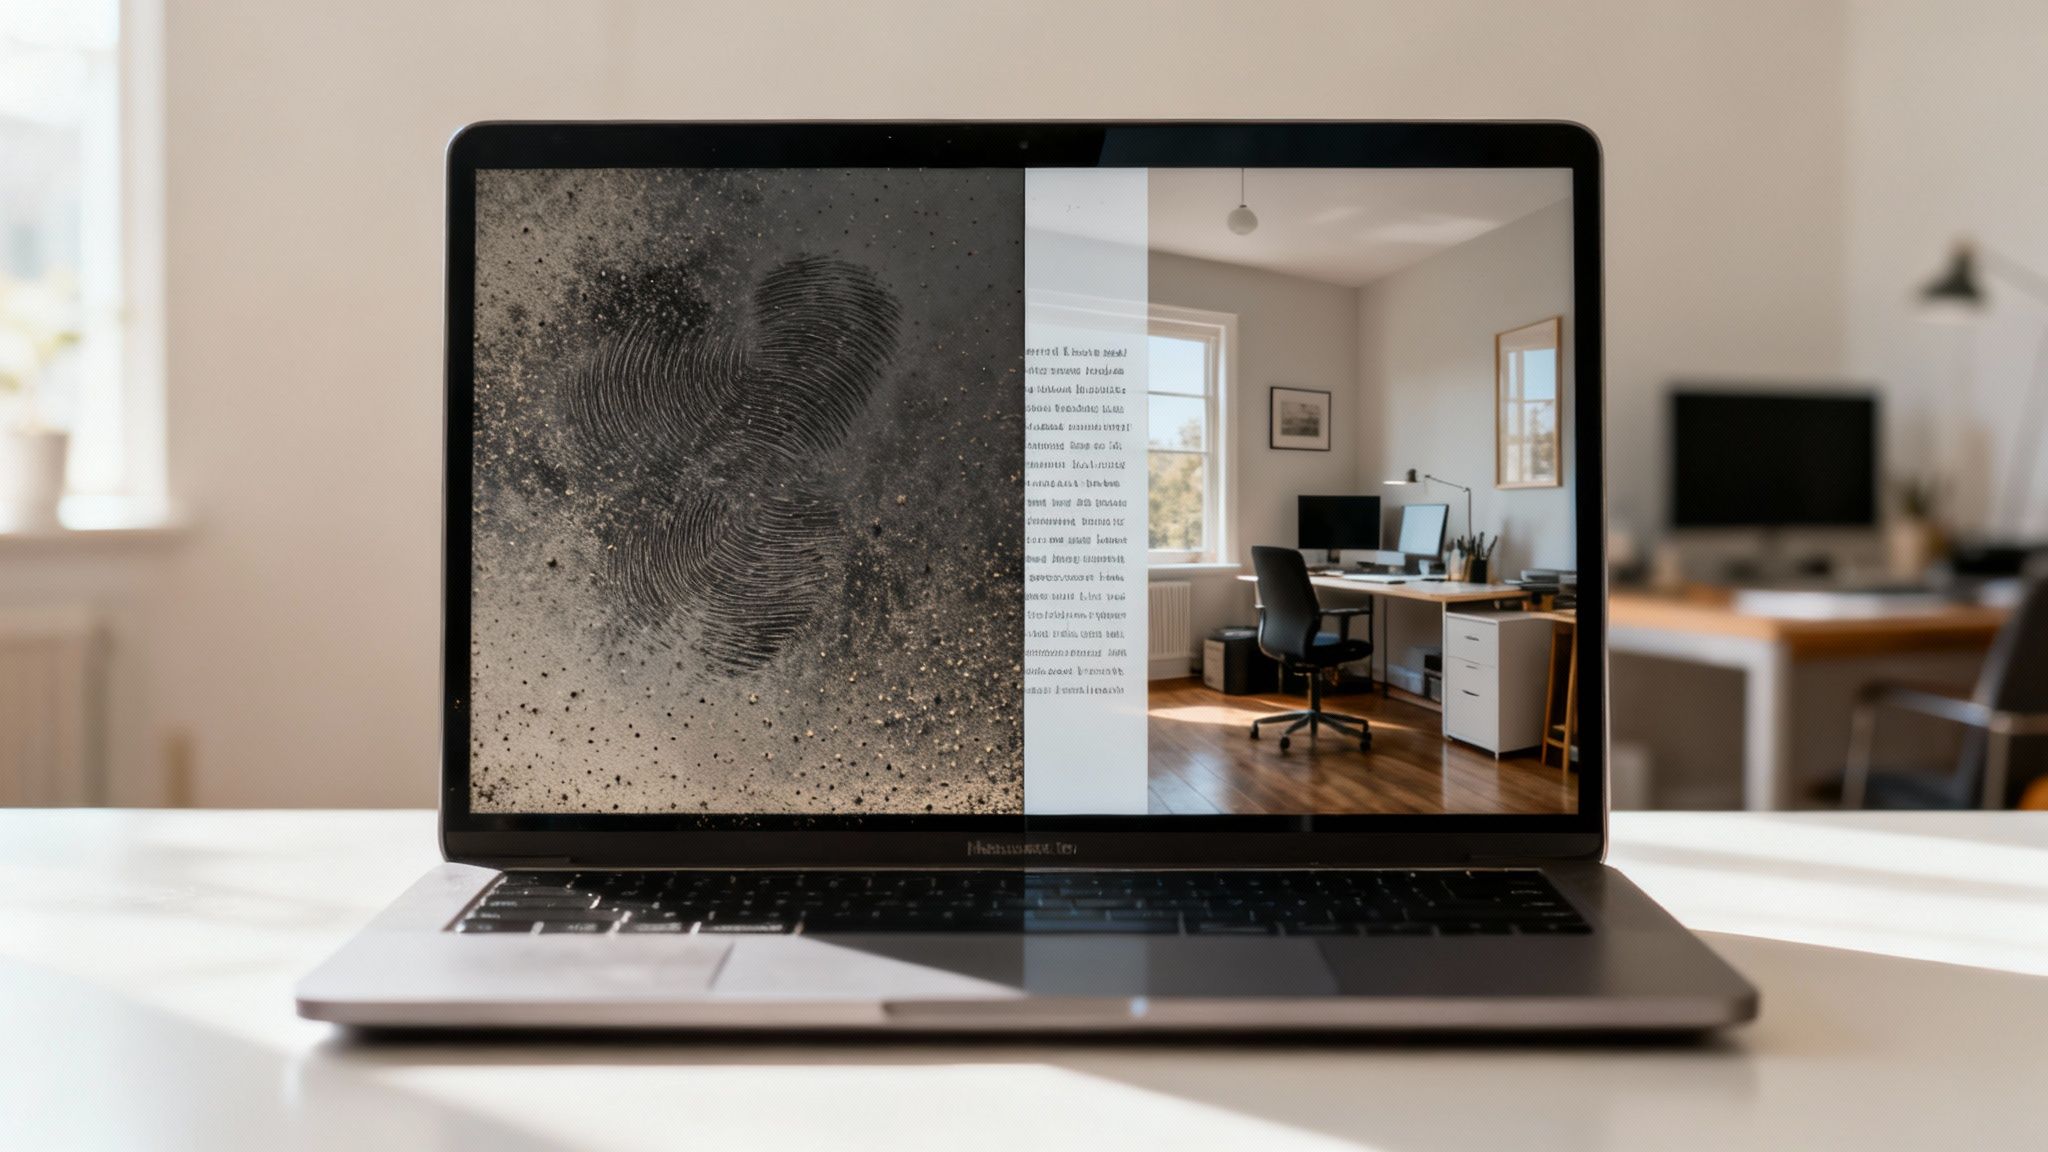
This really highlights how easily oils and dust can dull the crisp display you paid for, impacting everything from your video calls to your creative work.
The Hidden Costs of a Dirty Display
Beyond just looking bad, neglecting your screen has real consequences. Did you know that a buildup of grime can slash your screen's visibility by up to 30% in just a few months?
Device maintenance experts have even found that the average laptop screen collects over 1,000 unique touch points every single day for remote workers. This rapid accumulation is a big reason why the global screen cleaner market was valued at a whopping USD 3.5 billion in 2023, with projections soaring to USD 5.8 billion by 2032. More and more professionals are recognizing the direct link between a clean screen and their own peak performance.
A clean screen is a small but critical component of a productive workspace. It reduces physical eye strain and removes a significant mental distraction, allowing for deeper focus and a more professional presentation.
Ultimately, keeping your screen pristine is a small investment that protects your valuable tech. It's a foundational part of creating an efficient, ergonomic workspace that works for you. For more ideas on that, check out our guide on how to build a desk setup that works for you.
Assembling Your Screen Cleaning Toolkit
Before you even think about touching your laptop screen, let's talk tools. Having the right supplies on hand is the difference between a crystal-clear display and a costly, irreversible mistake. Putting together a dedicated cleaning kit is simple, but every single item plays a crucial role. You don't need much, but what you choose matters.
The absolute foundation of any screen cleaning toolkit is a pair of high-quality microfiber cloths. Why two? It's a pro-tip: one is for applying your cleaning solution, and the second, completely dry one is for buffing away any last bit of moisture for that perfect, streak-free finish.
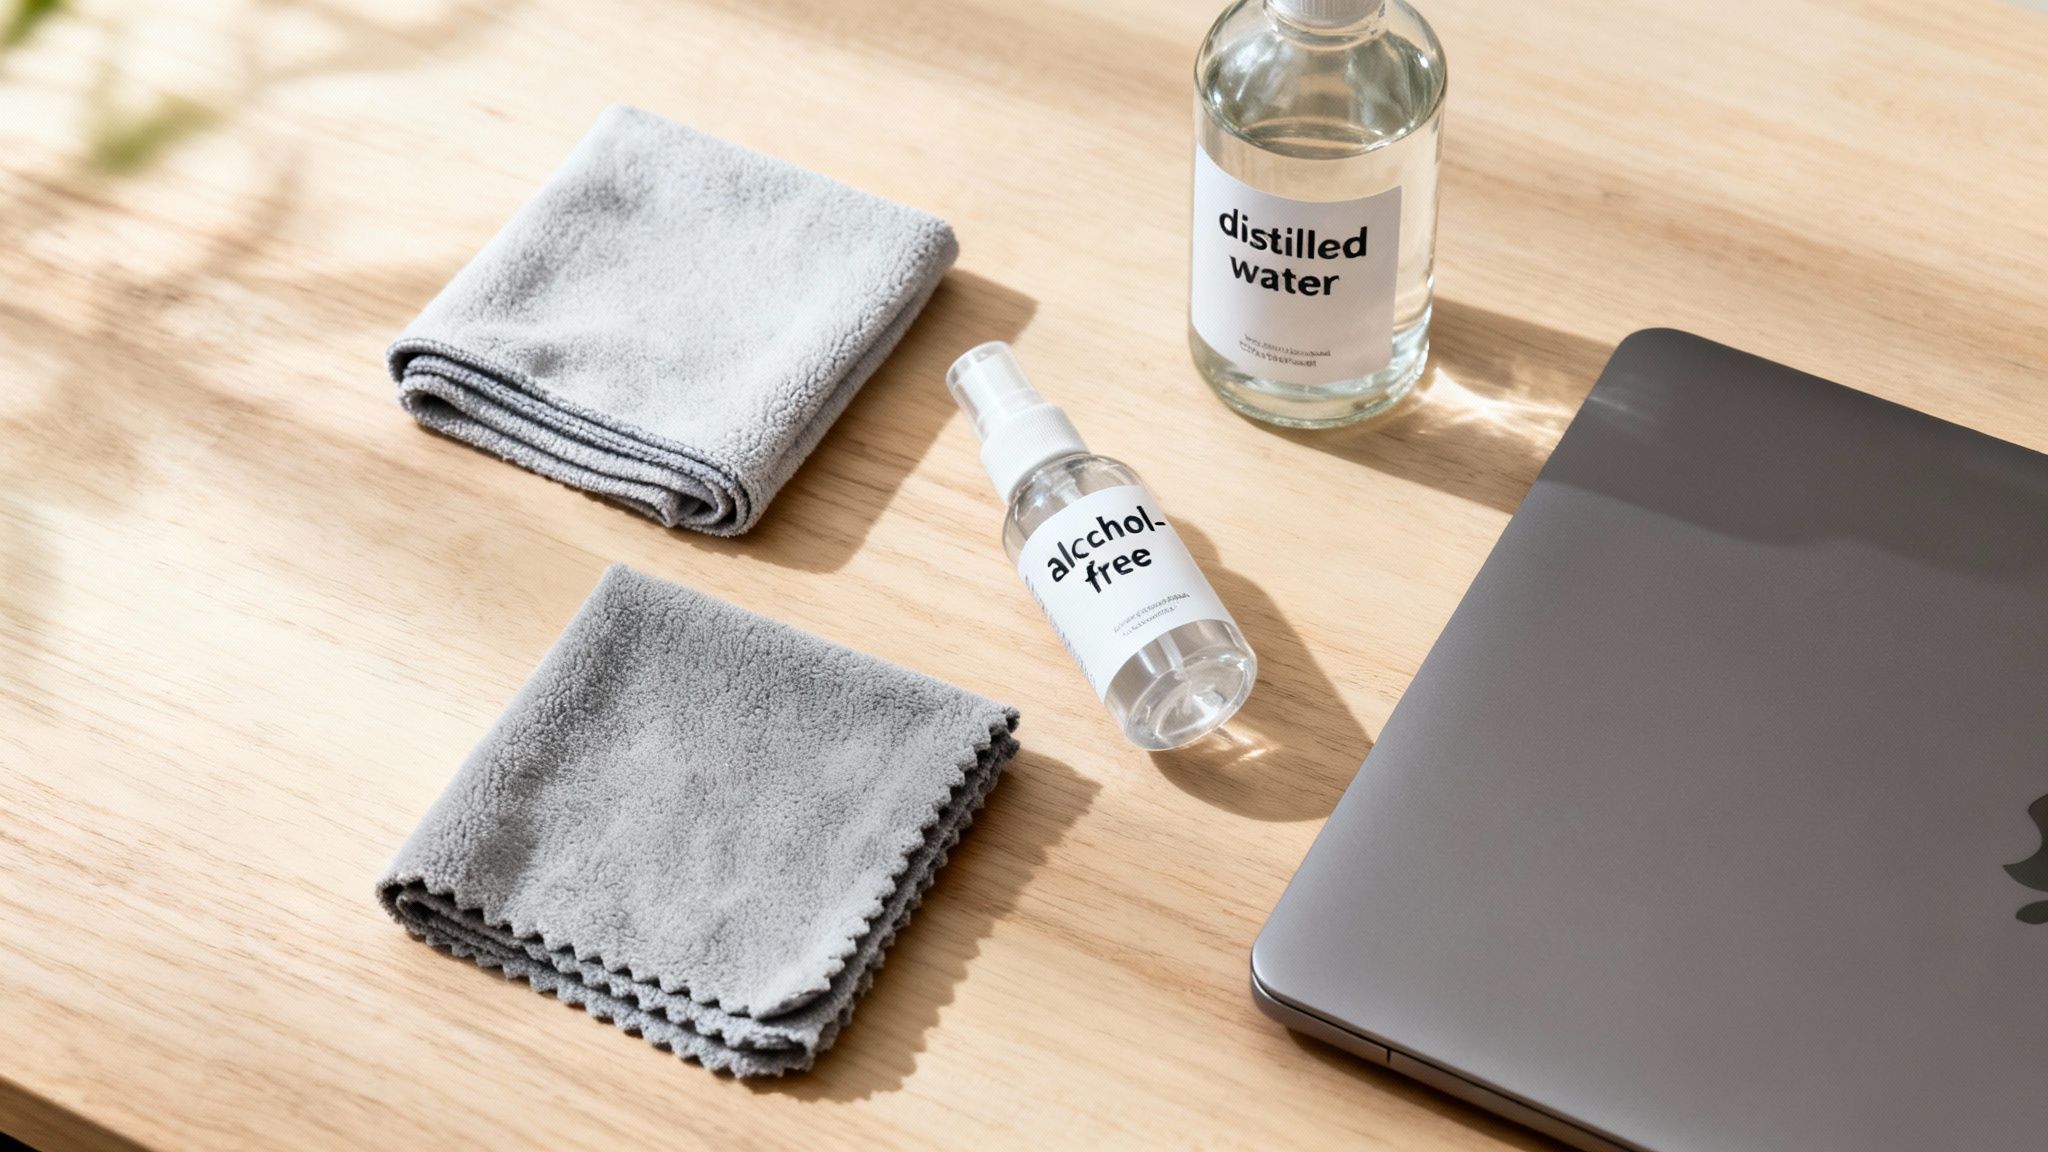
These cloths are non-negotiable. Their ultra-fine fibers are specifically designed to trap dust and lift oils without scratching the delicate surface of your screen. That’s something a paper towel or an old t-shirt simply can't do safely.
Choosing Your Cleaning Solution
Next up, you need a cleaning liquid. By far, the safest and most effective option is a specially formulated, alcohol-free and ammonia-free screen cleaner. Products like the EVEO Screen Cleaner Spray are engineered to dissolve grime without harming the sensitive anti-glare and oleophobic coatings that modern screens rely on.
If you're in a pinch, a simple DIY solution can be made with distilled water. Just make sure it’s distilled, not tap water. The minerals lurking in your tap water can leave behind a chalky residue and stubborn streaks. If you want to dive deeper into what makes a great cleaner, check out the ultimate screen cleaner buying guide.
The importance of a proper liquid cleaner can't be overstated. Research shows that dust alone contributes to 75% of screen degradation within the first year. Liquid-based cleaners hold a dominant 35.2% market share for a good reason—they outperform wipes by 40% in residue removal on high-definition displays.
The golden rule of screen cleaning is to protect the coatings. Harsh chemicals like window cleaner, alcohol, or all-purpose sprays will strip these protective layers, leading to permanent cloudiness, haze, or even screen failure.
Screen Cleaning Supplies Do's and Don'ts
To make sure you don't accidentally grab the wrong thing and cause damage, here’s a quick-reference guide to what belongs in your kit and what should stay far, far away from your expensive laptop.
| What to Use (Safe Options) | Why It Works | What to Avoid (Unsafe Options) | Why It's Harmful |
|---|---|---|---|
| Microfiber Cloths | Traps dust and oils without scratching or leaving lint. | Paper Towels or Tissues | Wood fibers are abrasive and can cause micro-scratches. |
| Alcohol-Free Cleaner | Safely removes grime without damaging screen coatings. | Window Cleaner / Ammonia | Strips away anti-glare and oleophobic layers permanently. |
| Distilled Water | Mineral-free, preventing white residue and streaks. | Isopropyl Alcohol | Can cause discoloration, brittleness, and screen haze. |
| Compressed Air (Used Gently) | Removes loose debris from crevices before wiping. | Tap Water | Contains minerals that leave behind a streaky film. |
Keeping this simple list in mind will help you clean confidently every time, knowing you're protecting your investment, not putting it at risk.
Getting That Perfect Streak-Free Finish
Alright, you’ve got your supplies. Now for the part that really matters. The goal here isn't just to wipe away smudges; it's about a careful, methodical approach that leaves your screen looking like it just came out of the box. Cleaning a laptop screen is less about elbow grease and more about deliberate, gentle motions.
First up, let’s talk safety. Before any cloth or cleaner comes near your laptop, you have to power it down completely. Don't just close the lid or put it to sleep—do a full shutdown. Once it's off, unplug the power adapter and anything else connected to it. This simple step prevents any risk of electrical shorts and makes it way easier to see every speck of dust on that dark screen.
Start with a Dry Wipe
Your first pass should always be dry. Grab one of your clean microfiber cloths and give the screen a gentle wipe. You're just trying to lift off any loose particles like dust, hair, or little bits of debris without grinding them into the display. Think of it like dusting a delicate photo frame.
Use light, sweeping motions. I find it’s best to go from top to bottom or side to side—just pick one direction and stick with it. This keeps you from just pushing dust around in circles. Whatever you do, don't use a circular buffing motion at this stage. That’s a surefire way to drag a stray particle across the screen and cause a tiny scratch. Honestly, this simple step alone often gets rid of 80% of the visible grime.
How to Use Your Cleaning Solution the Right Way
This is where most people go wrong, and it can be a costly mistake. The golden rule of screen cleaning is simple: never, ever spray any liquid directly onto the screen. Your laptop isn't sealed like a window. Liquid can easily seep down into the bezel, get behind the panel, and cause permanent damage.
Instead, lightly dampen a corner of your microfiber cloth with your alcohol-free screen cleaner. And I mean dampen, not soak. If the cloth is dripping, you’ve used way too much. A spritz or two onto the cloth itself is all you need for the whole screen.
Now, using that dampened part of the cloth, clean the screen with the same gentle, consistent motions from before.
- For a vertical wipe: Start at the top left and wipe straight down. Move over a little and repeat until you've covered the whole screen.
- For a horizontal wipe: Start at the top left and wipe straight across to the right. Move down a bit and repeat until you hit the bottom.
Sticking to one uniform direction is the secret to preventing streaks. It ensures even coverage and stops those annoying swirls from showing up when you power the screen back on. Proper screen care isn't just for looks; it's essential maintenance. In fact, a surprising 62% of device failures are caused by preventable dust and contaminant buildup, a problem that costs consumers a staggering $200 billion a year in repairs. This is exactly why the laptop cleaning tools market is expected to reach USD 39.6 billion by 2033. You can read more about this trend on Data Insights Market.
The secret to a perfect clean is less pressure and more patience. Let the microfiber cloth and the cleaning solution do the work. Pressing harder doesn't clean better; it just increases the risk of damaging the pixels underneath.
Finally, take your second, completely dry microfiber cloth and go over the screen one last time. Use that same top-to-bottom or side-to-side motion to pick up any leftover moisture. This final buff is what polishes the display, gets rid of any faint streaks, and leaves your screen looking brand new.
Adapting Your Method for Different Screen Types
Treating every laptop screen the same is one of the most common—and riskiest—mistakes you can make. Not all displays are created equal. What works perfectly fine on an older, workhorse LCD might cause irreversible damage to a brand-new OLED panel. The key to cleaning your screen safely is knowing what you're working with.
For most people, the most obvious difference is between a matte and a glossy screen. Those vibrant, contrast-heavy glossy screens look amazing, but they're absolute fingerprint magnets. The good news is their smooth surface makes them pretty straightforward to clean with a good microfiber cloth and a screen-safe spray.
Matte screens, however, demand a bit more finesse.
Caring for Matte and Anti-Glare Displays
That frosted look on a matte screen comes from a special anti-glare coating etched right onto the surface. It’s brilliant for cutting down reflections in a bright room, but that coating is also porous and much more sensitive to pressure and liquids than a standard glossy finish.
When you're cleaning a matte screen, your mantra should be minimal moisture. Drenching the cloth can let liquid seep into the micro-etches of the coating, which can lead to hazy spots or even discoloration over time. Always, always spray the cleaner onto your cloth—never directly onto the screen—and make sure the cloth is just barely damp.
The Difference Between LCD and OLED Screens
Beyond just the surface finish, the technology underneath makes a huge difference. For years, most laptops have used Liquid Crystal Displays (LCDs). These are pretty tough, built with several layers including a backlight and color filters. Generally, they can handle a gentle cleaning without any drama.
But the game is changing. Organic Light Emitting Diode (OLED) screens are showing up in more and more high-end laptops, and they are a completely different beast. Each pixel on an OLED screen creates its own light, which is how they achieve those perfect blacks and jaw-dropping contrast ratios. That tech is also incredibly thin and flexible, but it comes at the cost of durability.
OLED panels are way more sensitive to pressure than their LCD cousins. If you press too hard while cleaning, you can permanently kill the organic compounds in the pixels. That means dead spots or burn-in. You have to use practically zero pressure—just let the weight of the cloth do the work.
This flowchart gives a great visual breakdown of the basic decisions you'll make when cleaning.
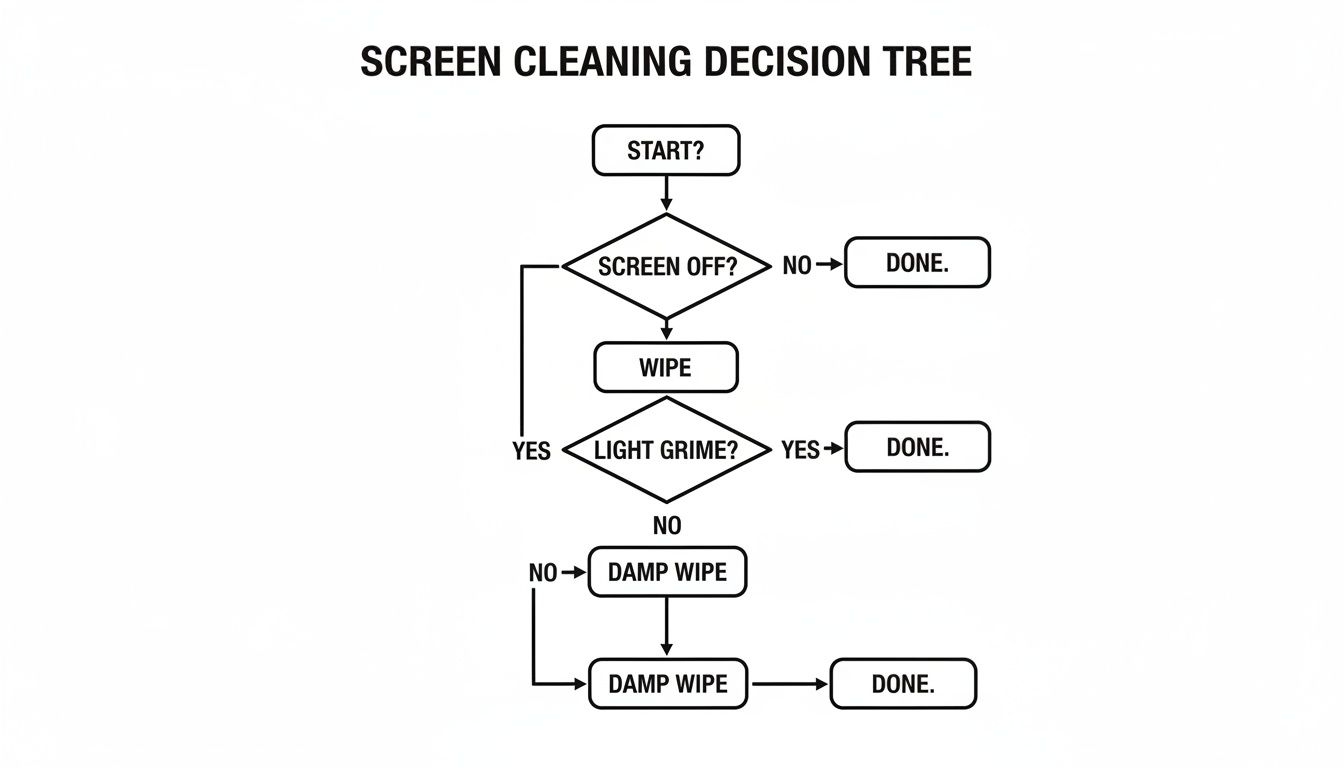
As you can see, the process always starts with powering down the device and trying a dry wipe first, long before you even think about introducing moisture.
To put it all together, here’s a quick cheat sheet:
- Glossy LCD: This is your standard screen. Focus on buffing away fingerprints with a quality microfiber cloth and a trusted cleaner like the EVEO Screen Cleaner Spray for a streak-free shine.
- Matte LCD: Go easy on the liquid. Never scrub. Use gentle, even wipes to protect that delicate anti-glare coating.
- OLED (Glossy or Matte): This is the fragile one. Use absolutely no pressure. Just glide a very lightly dampened cloth over the surface. OLED tech is the easiest to damage with the wrong technique.
By tailoring your cleaning method to your screen type, you're not just cleaning—you're protecting your investment and keeping your display looking as crisp as the day you bought it.
You've followed all the steps, been as gentle as possible, and yet… there it is. A faint streak that only shows up when the light hits it just right, or a stubborn little spot that refuses to budge. It’s frustrating, but don’t worry—these common issues are almost always fixable. The solution isn't more pressure or harsh chemicals, but a little finesse.
The most frequent complaint I hear is about those lingering streaks. You’ve cleaned the screen, but it looks like you left faint lines behind from your wiping motion. This usually means one of two things: either your cloth was a tad too damp, or the cleaning solution didn't fully evaporate before you finished.
The fix is surprisingly simple and doesn't require another drop of cleaning spray. Just grab your second, completely dry microfiber cloth and gently buff the screen. I find that long, light, and straight motions from one side to the other work best. This final pass is all about picking up that microscopic moisture residue that causes streaks, leaving you with a perfectly clear finish.
Tackling Tough Spots and Grime
Sometimes you’re up against more than just dust and fingerprints. That dried splash of coffee or some other sticky mystery won't always lift with a standard wipe. Your first instinct might be to scrub harder, but please don't—that’s a one-way ticket to a damaged screen.
Instead, let's try a targeted approach.
Lightly dampen a small corner of your microfiber cloth with your screen-safe solution. Don't drench it. Gently press the damp area onto the spot for a few seconds. This helps rehydrate and loosen the grime. Then, using a tiny circular motion with almost no pressure, work on just that spot until it lifts away.
Whatever you do, never resort to scraping or picking at it.
Using a fingernail or any other sharp object to pick at a stubborn spot is one of the worst things you can do. It can easily create a permanent scratch or, even worse, damage the pixels underneath. That creates a dead spot on your screen that simply can't be fixed.
What to Do About Lint and Fibers
Ever finish cleaning only to find tiny fibers clinging to the screen? It happens. This is often a sign that your microfiber cloths are getting old or weren't the highest quality to begin with. After many washes, even good microfiber can start to break down and shed.
If you find yourself in this situation, you have a couple of options:
- Use a Can of Compressed Air: Hold the can upright and keep it several inches away from the screen. Use short, controlled bursts to blow the lint off without ever touching the display. Easy.
- Invest in New Cloths: Honestly, this is the best long-term solution. High-quality microfiber cloths are an inexpensive but critical part of learning how to clean your laptop screen properly. Look for ones with a dense, tight weave—the kind specifically designed for electronics or camera lenses. They make all the difference.
By tackling these minor issues with a bit of patience and the right technique, you can easily correct these common cleaning hiccups and get that perfectly clear, spotless display you were aiming for.
A Few Common Questions About Screen Cleaning
Even with the best techniques down, you're bound to have a few lingering questions. It's totally normal. Getting those nagging doubts cleared up is what gives you the confidence to make screen care a simple, stress-free part of your routine.
Let’s quickly run through some of the most common things people ask when they're figuring out how to keep their laptop screens looking brand new.
How Often Should I Really Be Cleaning My Laptop Screen?
This is probably the number one question, and honestly, the answer is: it depends on you. There isn't a single magic number, but finding a good rhythm is easy.
For basic upkeep, a quick, dry wipe-down with a quality microfiber cloth every 2-3 days is fantastic for keeping dust at bay. When you need a more thorough clean with a spray solution, think about doing it once a week.
Of course, you might want to clean it more often if you:
- Have a touchscreen—those fingerprints build up fast.
- Work in a dusty space or share your home with furry friends.
- Tend to eat or drink while you work (we've all been there).
Here's the key takeaway: Consistent, gentle cleaning is always better than letting grime build up until you feel like you have to scrub it off. A little maintenance goes a long way for your screen's lifespan.
Can I Just Use Tap Water? It Seems Harmless Enough.
It's tempting to reach for the tap, but this is one shortcut you'll want to avoid. Tap water is full of minerals like calcium and magnesium. While they’re fine to drink, they leave behind a streaky, chalky residue on your screen after the water evaporates.
If you're in a pinch and need to make a DIY spray, always use distilled water. It's been purified, so it won’t leave those annoying mineral spots behind. That said, a professionally made, alcohol-free screen cleaner is always going to give you a safer, more reliable, and perfectly streak-free finish.
What About Disinfecting Wipes? Are They Safe for Screens?
This is a hard no. Your average household disinfecting wipe is an absolute nightmare for a laptop screen. They are soaked in harsh chemicals like alcohol and ammonia, which are designed to kill germs by stripping surfaces—and they'll do the same thing to the delicate anti-glare and oleophobic coatings on your display.
Using them even once can cause permanent damage, leaving your screen looking cloudy or discolored. It’s just not worth the risk. Stick to cleaners made specifically for electronics.
Help! I Cleaned My Screen and Now I See a Scratch. What Do I Do?
This is a gut-sinking moment, but it’s important to understand what likely happened. The cleaning process itself almost never creates scratches. What it does do is remove the layer of dirt and oil that was hiding a scratch that was already there.
If you find one, the absolute worst thing you can do is try to "buff it out" by rubbing harder or applying more pressure. You’ll only make it worse. Unfortunately, cleaning can’t fix physical damage like scratches or dead pixels. The best move is to just accept the cosmetic flaw or, if it really bothers you, talk to a professional repair shop about a screen replacement.
For a reliable, streak-free shine every time, trust EVEO to provide the tools you need to protect your tech. Check out our Screen Cleaner Spray and other accessories.
Your Guide to Choosing the Perfect Desk Mount VESA
How to clean vinyl records: Restore sound and protect your collection