When it comes to getting that perfect, high-fidelity sound from your vinyl, a clean stylus is absolutely non-negotiable. This isn't just a minor chore for audiophiles; using a phono stylus cleaner is a critical ritual that protects your records, your turntable, and your entire audio investment from permanent damage.
If you neglect this simple step, microscopic grime and dust will cake onto that tiny diamond tip, distorting the sound and, even worse, physically grinding away at your precious LPs.
Why a Clean Stylus Is the Secret to Great Vinyl Sound
Think of your turntable’s stylus as the narrator of your record collection. It's a tiny, precision-engineered diamond, and it's the only thing that makes physical contact with the delicate grooves of your vinyl. It’s tasked with the incredible job of translating those microscopic ridges into the music you love.
When it's clean, the story is told with absolute clarity and depth. But when it's dirty, the narrative becomes muffled, distorted, and ultimately, destructive.
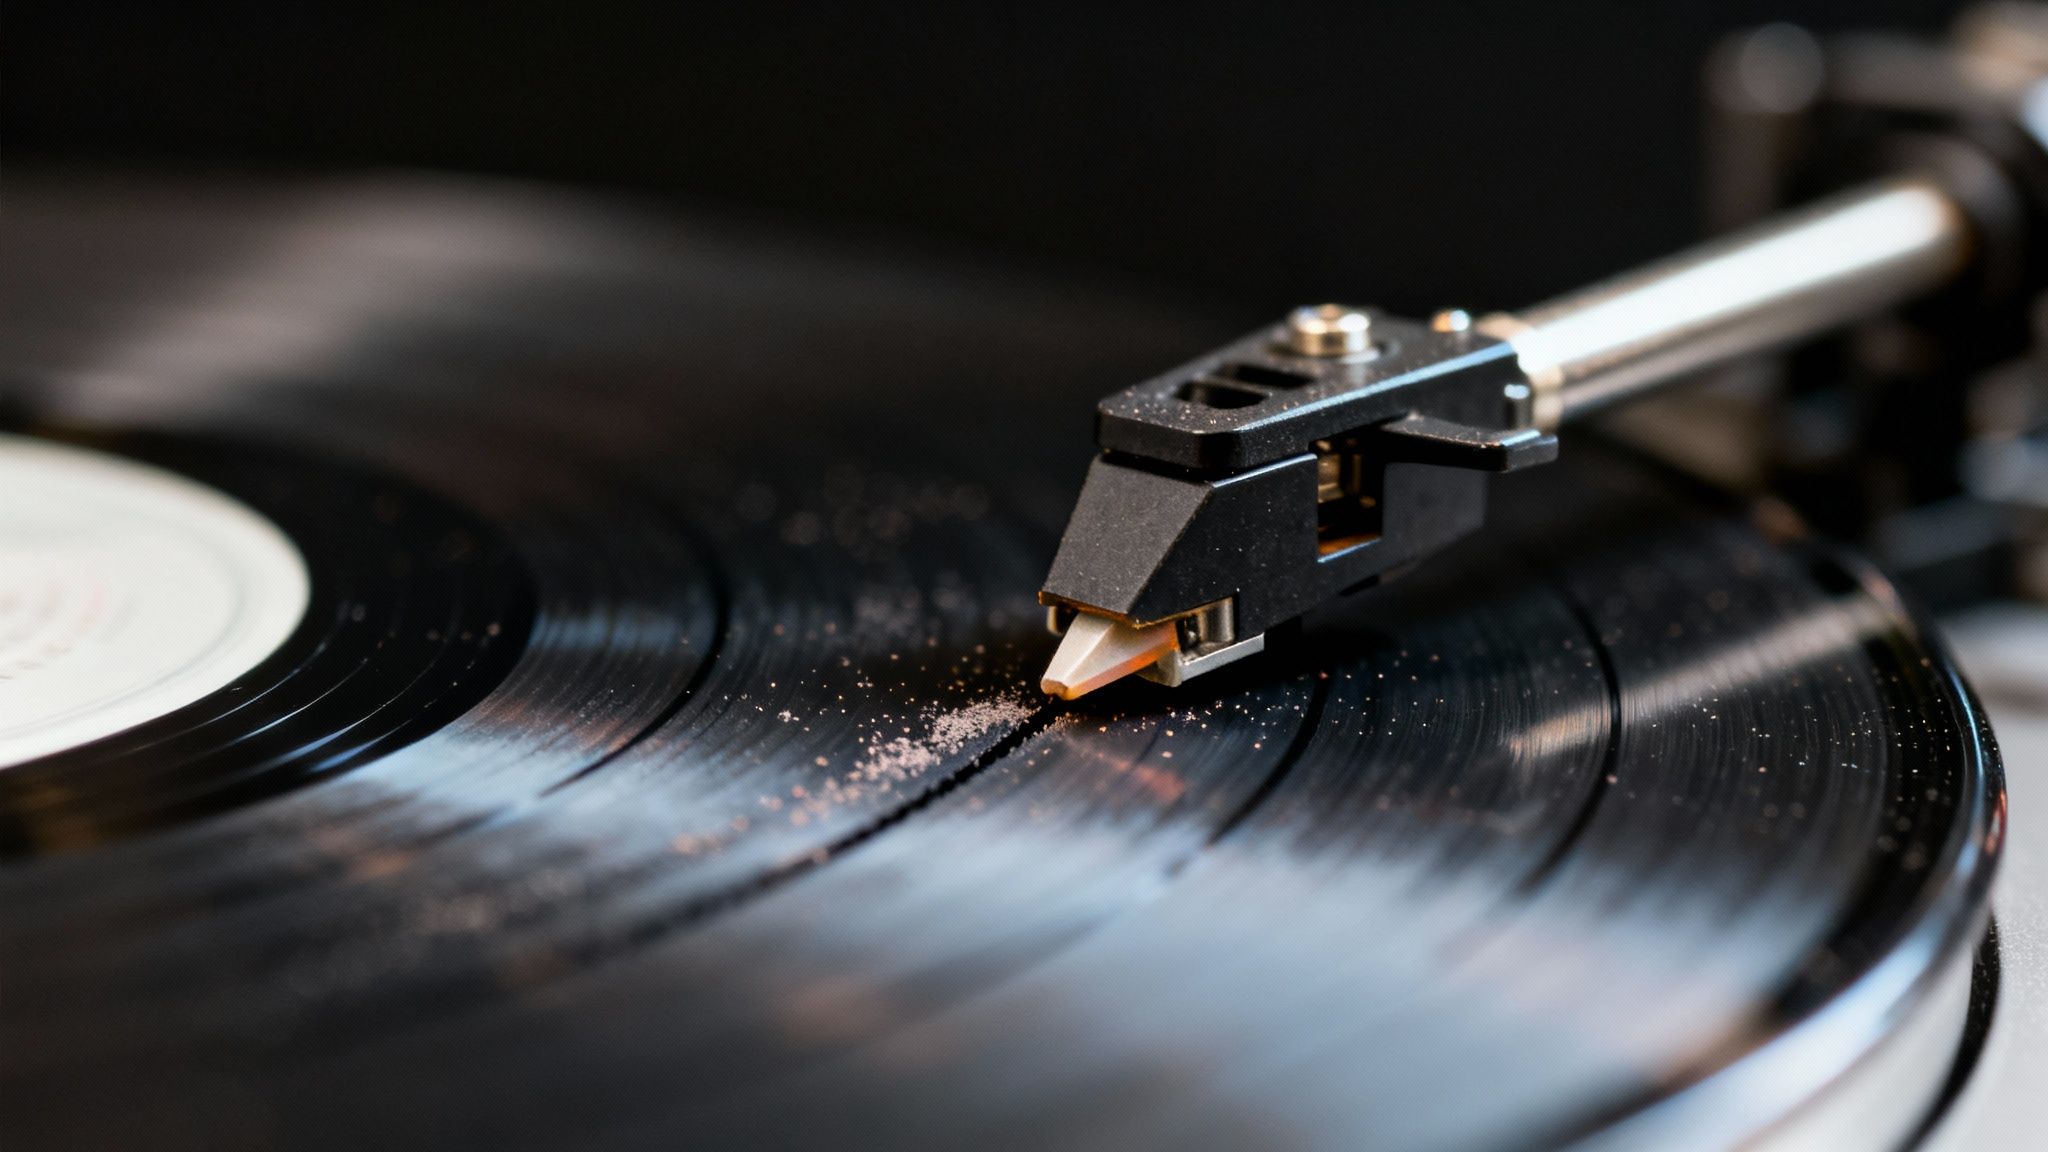
With every single play, a combination of dust, oils from fingerprints, and even leftover vinyl release agents accumulates on the stylus. This build-up doesn’t just sit there—it hardens into a stubborn crust that gets in the way of proper tracking.
The Real Consequences of a Dirty Stylus
A dirty stylus is a recipe for a whole host of playback problems that will seriously degrade your listening experience and harm your gear. The most common issues I see are:
- Muffled Audio & Distortion: That caked-on grime physically prevents the diamond from tracing the groove walls accurately. The result? Muffled sound, a frustrating increase in sibilance (those harsh "s" sounds), and a general lack of detail and sparkle.
- Weird Channel Imbalance: If dirt builds up unevenly on one side of the stylus, you'll start to notice the sound is louder or clearer in one speaker. This completely throws off the stereo image the artist worked so hard to create.
- Permanent Record Damage: This is the big one. A dirty stylus essentially becomes a tiny, abrasive ball being dragged through your records. It grinds dust and debris directly into the groove walls, causing permanent scratches and clicks that no amount of cleaning can ever fix.
For a lot of people, stylus maintenance is an afterthought, but it should be the very first step in any vinyl care routine. A clean stylus ensures you're hearing the music exactly as the artist intended, free from that frustrating veil of preventable distortion.
You're Protecting a Serious Investment
This isn't just about sound quality; it's about protecting a collection that is often quite valuable. The vinyl record market has seen an incredible comeback, reaching a global market size of USD 2,254.2 million in 2024.
This boom reflects a deep appreciation for the hands-on experience of analog music, and collectors are investing heavily in their libraries. You can find more details on the vinyl market's growth and what it means for collectors. When you look at it that way, taking two minutes to use a phono stylus cleaner is a tiny price to pay to safeguard that investment.
Ultimately, you have to reframe stylus cleaning from a tedious task into an essential ritual. It is, without a doubt, the most impactful and cost-effective maintenance you can perform. Consistent cleaning with the right tools ensures every record you play sounds its absolute best and will last a lifetime, making it the highest return on investment for any vinyl enthusiast.
Getting Your Stylus Cleaning Toolkit Ready
Before you even think about touching that delicate stylus, the first and most important job is to gather the right tools. Seriously, this isn't the time to improvise. Using the wrong stuff is a surefire way to permanently damage your cartridge, and that’s a costly mistake nobody wants to make. A proper phono stylus cleaner toolkit isn't complicated, but every single item plays a crucial role.
The absolute cornerstone of your kit should be a high-quality carbon fiber stylus brush. You're looking for one with short, dense bristles—they need to be just stiff enough to flick away stubborn gunk without being abrasive. This will be your daily driver for quick, routine dry cleaning before you drop the needle.
Next up is a purpose-made stylus cleaning fluid. And no, this isn't the same stuff you use on your records. Stylus fluid is specifically formulated to dissolve residue without messing with the fragile adhesive that holds the diamond tip to the cantilever. When you're putting together your kit, remember that these essential items also make fantastic gifts for vinyl collectors, helping them get the best sound possible.
Taking It to the Next Level
For those moments when a simple brush-off won't cut it, many audiophiles (myself included) swear by a polymer or gel-based cleaner. This is a neat little trick: you gently lower the stylus onto the tacky surface, and when you lift the tonearm, the gel grabs onto all the dirt, leaving the diamond tip pristine. No scrubbing, no fluid, just pure, clean contact.
Here's a pro-tip that's often overlooked: get yourself a small magnifying glass or a jeweler's loupe. It’s the only way you can actually see what you're doing and confirm that every last speck of debris is gone from the stylus tip.
Tools That Will Absolutely Ruin Your Stylus
Just as important as knowing what to use is knowing what to avoid. The internet is a minefield of bad advice that can lead to some very expensive regrets. Whatever you do, keep these items far, far away from your stylus:
- Magic Erasers: On a microscopic level, these things are incredibly abrasive. They will literally sand down your diamond stylus, dramatically shortening its life.
- Your Fingers: Your skin has oils and dirt that will instantly transfer to the stylus, creating a sticky mess that’s a magnet for even more dust. Just don't.
- Harsh Alcohols: Isopropyl or rubbing alcohol can eat away at the bonding agent holding the stylus tip in place. Use it, and you risk watching your diamond tip fall right off.
Having the right gear on hand gives you the confidence to maintain your turntable correctly and safely. You can also find an all-in-one vinyl records cleaning kit which often bundles the essential tools you need for both your stylus and your records, making it a simple way to get started.
Mastering Wet and Dry Cleaning Techniques
So, when it comes to keeping your stylus pristine, which path do you take? It really boils down to one simple question: are you doing a quick, pre-spin dust-off, or is it time for a more serious deep clean?
Both dry and wet techniques are essential parts of a good maintenance routine. Think of them as two different tools for two different jobs. One is for daily upkeep, and the other is for when you need to bring back that crystal-clear sound that’s been lost to stubborn grime.
It's no surprise that the market for vinyl record cleaners is booming, expected to hit USD 379 million in 2024. This isn't just some niche trend; it shows that vinyl lovers everywhere are serious about finding the right tools to protect their prized collections.
This simple flow chart gives you a quick visual of the core tools you'll be working with.
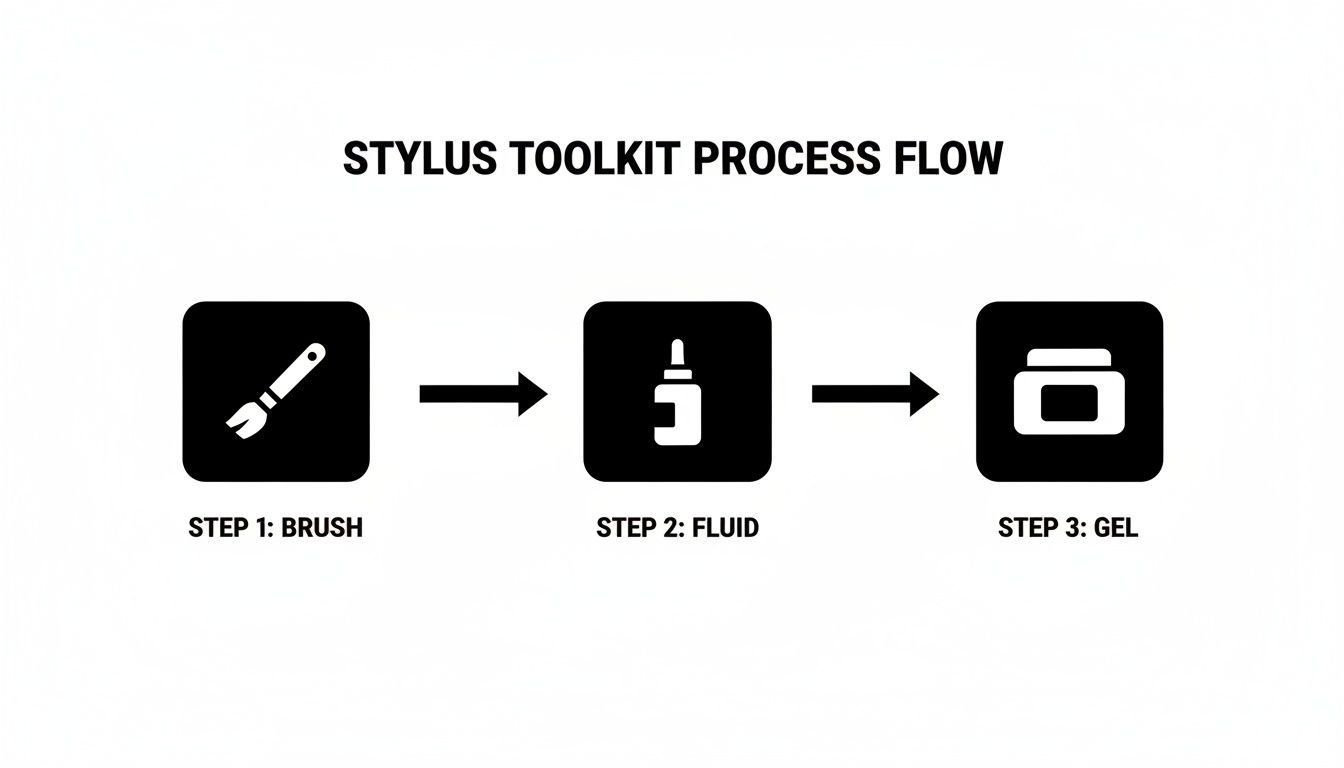
As you can see, it all comes down to the basics: a brush, fluid, and gel. Each offers a different way to tackle the dust and gunk that can kill your vibe.
The Everyday Dry Method
Your dry method is your first line of defense against the daily buildup of dust and fluff. I highly recommend making this a non-negotiable ritual before every single listening session. It’s fast, simple, and incredibly effective. Your main tools here will be a carbon fiber stylus brush or one of those neat polymer gel cleaners.
Technique is everything when using a brush. Always brush from back to front, mimicking the direction the record plays. Whatever you do, don't scrub side-to-side or front-to-back—you risk putting serious strain on the delicate cantilever. A couple of gentle passes is all it takes to flick away any loose debris. If you want a deeper dive, we have a whole guide on the proper use of a record player stylus brush.
Gel cleaners are a fantastic, almost foolproof alternative. You just gently lower the stylus tip onto the tacky gel surface, then lift it straight back up. The gel grabs onto the dirt without any need for brushing, which makes it an incredibly safe option for your stylus.
The Deeper Wet Method
There comes a time when a simple dry brush just won't cut it. For the caked-on, stubborn residue that muffles your sound, it's time to bring in a wet clean. This method uses a specially designed cleaning fluid to dissolve the grime a dry brush leaves behind.
Crucial Tip: Never, ever apply cleaning fluid directly onto the stylus. The liquid can easily travel up the cantilever and seep into the cartridge's internal mechanics, causing damage that you can't undo.
The right way to do it is to apply just one or two tiny drops of fluid to the bristles of your stylus brush. Let it absorb for a second, then use the same gentle back-to-front motion you’d use for a dry clean. The slightly damp bristles will get to work, lifting away the gunk that was killing your soundstage.
A quick note on solutions: when you're dealing with wet cleaning, the purity of the water in the formula matters more than you’d think. Using tap water can leave behind mineral deposits, so formulations that use the purest form of water are always superior.
After you're done, allow at least a minute for the stylus to air dry completely before you drop the needle. Playing a record with a damp stylus is just asking for more dust to get trapped in the groove. A quick look with a magnifying glass will confirm your stylus is sparkling clean and ready to go.
Dry vs Wet Stylus Cleaning At A Glance
Still on the fence about which method to use and when? This table breaks it down to help you make a quick decision, whether you're doing routine upkeep or a full-on restoration.
| Method | Best For | Frequency | Risk Level |
|---|---|---|---|
| Dry Cleaning | Removing loose dust, daily maintenance before each play. | Before every record. | Low: Safe when proper technique is used. |
| Wet Cleaning | Dissolving stubborn, caked-on grime and residue. | As needed, or every 10-15 records played. | Medium: Requires care to avoid fluid damage to the cartridge. |
Ultimately, both methods have their place. A quick dry clean should be part of your daily ritual, with a wet clean reserved for when you notice a drop in audio quality that a simple brushing can't fix. It's all about listening to your records and giving your gear the care it deserves.
Figuring Out Your Perfect Stylus Cleaning Routine
This is probably the number one question I get from fellow vinyl lovers: "How often should I really be cleaning my stylus?" And honestly, there's no single right answer. It’s less about a strict schedule and more about building a habit that fits your listening style.
The needs of someone who only spins a few records on a Sunday are completely different from a crate-digger who's playing pre-loved vinyl every day. The goal is to make it intuitive, not just another date on the calendar.
Match Your Routine to Your Listening Habits
Let's get practical. Your habits will tell you when it’s time to grab your phono stylus cleaner.
- The Casual Weekend Listener: If you’re playing maybe three to five LPs a week, a quick dry brush before each listening session will probably do the trick. A deeper wet clean? You might only need to do that every couple of months, or whenever you notice the sound getting a bit fuzzy.
- The Daily Audiophile: For those of us who have a record on the platter almost every day, things get a bit more demanding. A dry clean before spinning each side is non-negotiable. I’d plan on a wet clean roughly every 15-20 hours of playtime to dissolve any gunk that the brush can’t get.
- The Crate Digger and Collector: This is where things get serious. If you’re constantly playing older, second-hand vinyl, your stylus is picking up a lot more grime. Those records can have decades of dust embedded in their grooves. Cleaning is absolutely crucial here. A dry clean is mandatory before every single play, and a wet clean after every five to seven used records is a smart move to stop gunk from building up in the first place.
Your ears are your best tool. The real goal is to get a feel for when your stylus needs a little TLC. When the music starts to lose its sparkle, that’s your signal to act before it gets any worse.
Learn to Hear (and See) a Dirty Stylus
More important than any schedule is learning to spot the signs that your stylus is crying out for help. Your sound system will tell you everything you need to know.
Listen for those classic tell-tale signs. Is there a sudden spike in sibilance—those harsh "s" and "t" sounds? Are you noticing a bit of distortion, maybe just in one channel? Or does the music suddenly sound "veiled," like it's distant and lacking that crisp detail?
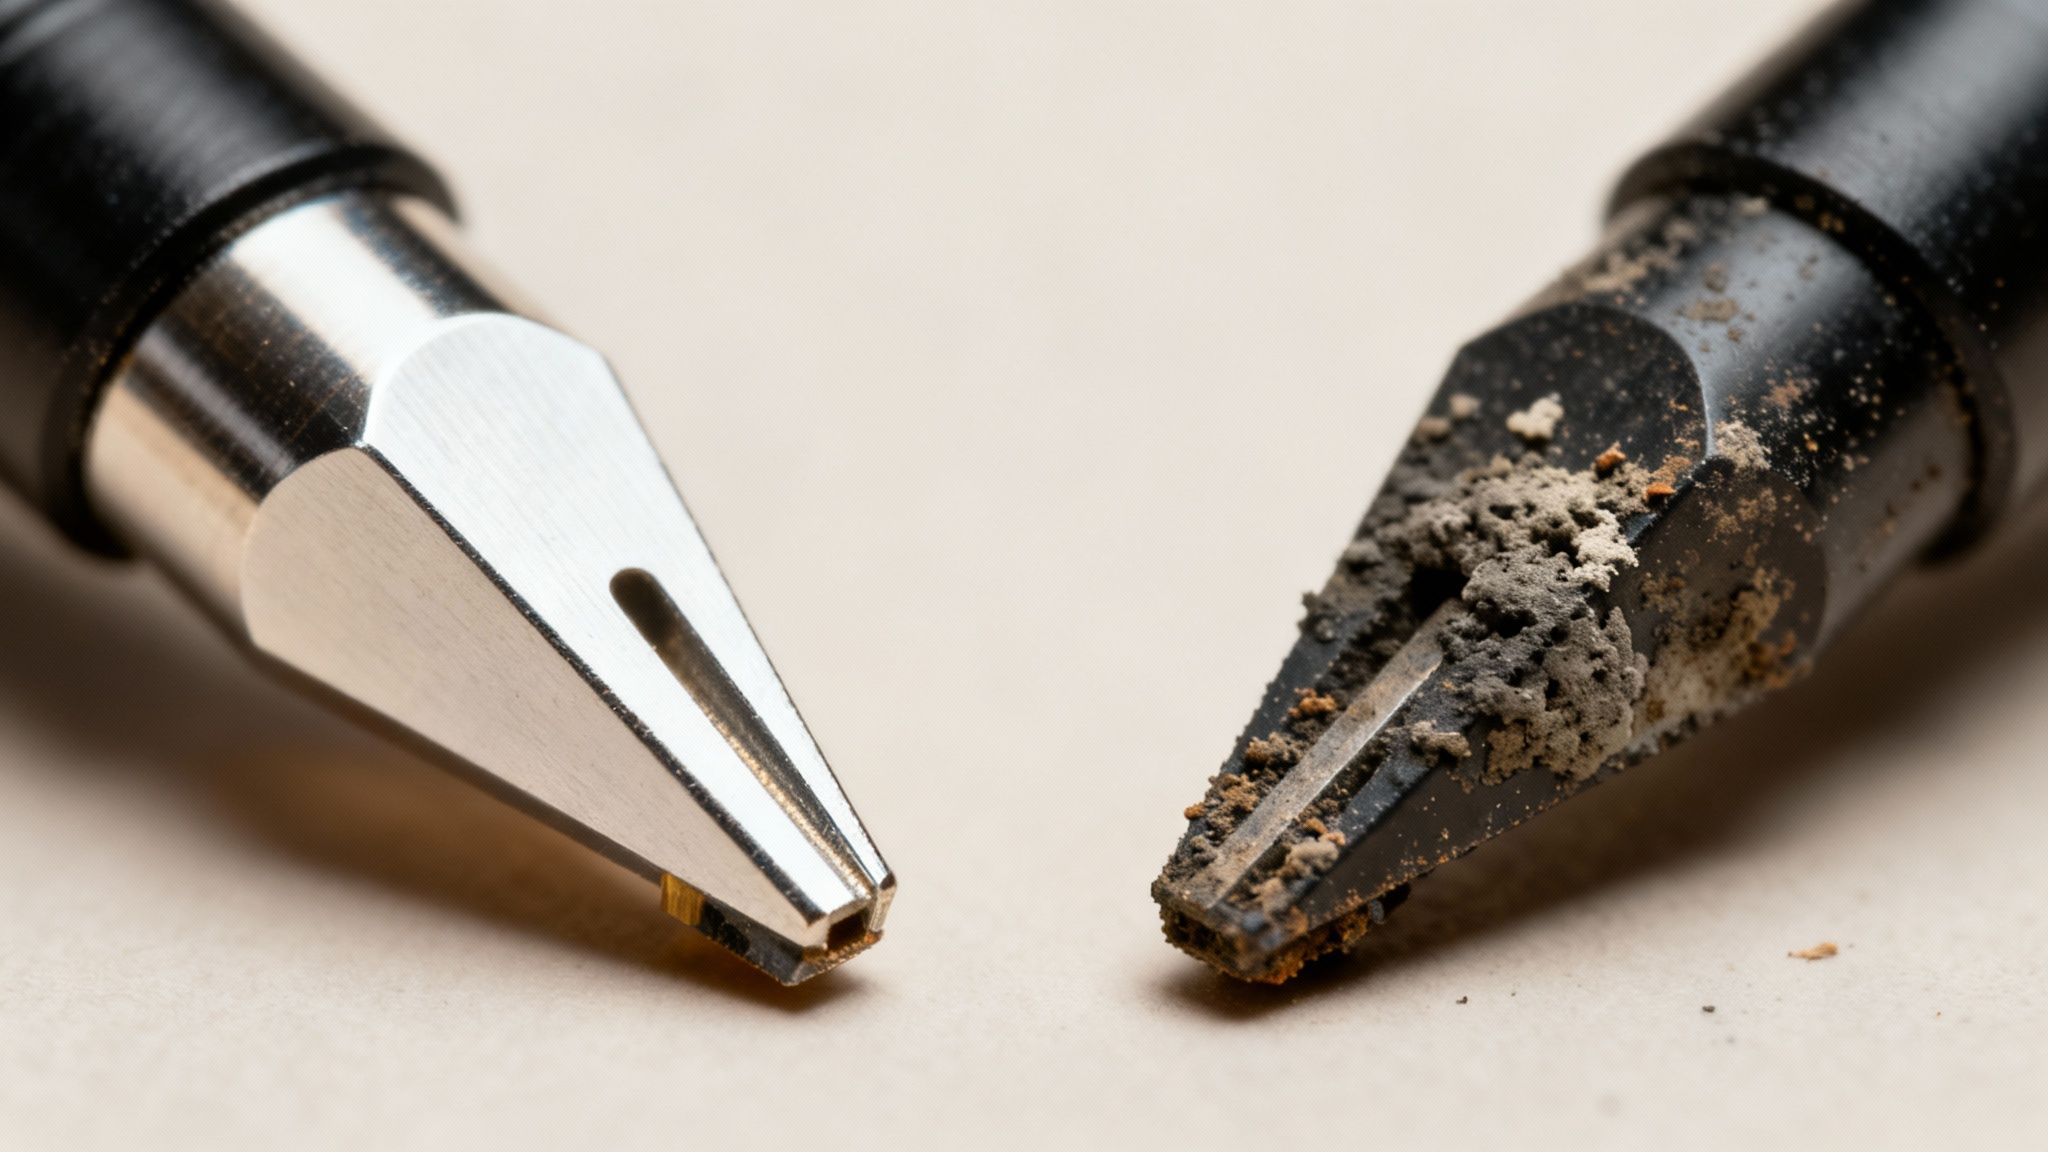
If you look closely, you might even see it. A quick check (a magnifier helps a ton here) will show a tiny grey fuzzball of dust and fibers clinging to the diamond tip. The moment you hear or see any of these signs, it's cleaning time, no matter how recently you did it last.
Diagnosing Common Playback Problems
When your turntable starts sounding a little… off, it's easy to jump to the worst conclusions. Is my cartridge misaligned? Is the tracking force wrong? Before you break out the protractor and start a full-on calibration, take a breath. The culprit is almost always something much simpler: a dirty stylus.
Learning to recognize the tell-tale signs of a gunked-up needle is the first step to becoming a savvy vinyl troubleshooter. A clean stylus glides through the groove with microscopic precision, but a dirty one fumbles the details, creating some seriously frustrating playback issues. Knowing what to listen for will help you fix problems fast and get back to the music.
Hiss, Sibilance, and General Distortion
One of the first giveaways of a dirty stylus is a sudden increase in surface noise, hiss, and particularly sibilance—that nasty, sharp "s" sound on vocals. This happens when dust and grime build up on the diamond tip, preventing it from sitting perfectly in the groove. Instead of a clean read, it bounces and scrapes along, creating a fuzzy, distorted sound that puts a veil over the music.
If your records suddenly sound harsh, grainy, or just plain tired, your first move should always be a good stylus cleaning. A quality phono stylus cleaner and brush can dissolve that buildup and, in most cases, restore that crisp, clear sound you were missing. This is especially true if you’re hearing a hiss that isn’t related to static. If static is a regular problem, you might also want to look into removing static from your vinyl records.
A dirty stylus is like trying to read fine print with smudged glasses. All the detail is still there, but a layer of gunk makes it impossible to perceive clearly. Cleaning your stylus is like wiping those glasses clean, instantly bringing the entire picture back into sharp focus.
Channel Imbalance and Inner Groove Distortion
Ever notice the music sounds like it's leaning to one side, with one speaker louder than the other? This channel imbalance is a classic sign of debris clinging to one side of the stylus. The left and right walls of the record groove correspond to the left and right stereo channels, so a clump of dirt on one side will literally muffle that channel, throwing off the entire stereo image.
Another tell-tale symptom is inner-groove distortion, where the last couple of tracks on a record side sound compressed and fuzzy. While this can be an alignment problem, it's often made much worse by a dirty stylus struggling to navigate the tighter, more condensed grooves near the record label. A deep clean should always be your first step before you even think about adjusting the cartridge.
The Impact on Advanced Stylus Shapes
This need for cleanliness gets even more critical with higher-end stylus profiles. The phonograph cartridge market is growing fast, with a projected CAGR of 4.7% from 2025 to 2031, largely driven by innovations in stylus tech. Advanced shapes like MicroLine or Shibata are designed to make more contact with the groove wall to pull out incredible detail.
The downside? They are far more sensitive to dust. A tiny speck of dirt that an elliptical stylus might just push aside can completely derail a MicroLine tip, causing serious distortion. Keeping that stylus pristine isn't just about maintenance; it's about getting the performance you paid for. You can find more insights on the growing phonograph cartridge market at ResearchAndMarkets.com.
Ultimately, a clean stylus is a small investment of time that preserves the performance of your entire audio system, ensuring you get every last drop of detail from your cherished vinyl collection.
Your Phono Stylus Cleaner Questions Answered
Even with the best advice, you're bound to run into a few head-scratchers along the way. Let's tackle some of the most common questions that pop up in forums, audio shops, and conversations with fellow vinyl lovers.
Think of this as a quick-reference guide to bust some myths and give you clear answers for those tricky situations.
Can I Use Isopropyl Alcohol on My Stylus?
This is easily the most frequent question we hear, and the answer is a hard and fast no. Never.
While isopropyl alcohol seems like a strong cleaner, it’s a powerful solvent that's far too aggressive for the delicate parts of your cartridge. It can easily dissolve the special adhesive bonding the diamond stylus tip to the cantilever.
Even one-time use can weaken that bond. Do it repeatedly, and you’ll almost certainly watch your diamond tip fall right off, completely ruining your cartridge. Beyond that, the alcohol will dry out and harden the sensitive rubber suspension inside the cartridge body—the part that’s crucial for proper tracking. This leads to distorted sound and, eventually, total failure.
Always stick with a fluid specifically formulated for stylus cleaning. These are designed to be tough on grime but gentle on the adhesives and suspension, giving you an effective clean without any collateral damage.
What Is the Difference Between a Stylus Brush and a Record Brush?
They might look a little alike, but these two tools are built for completely different jobs and you should never use them interchangeably.
A dedicated stylus brush is a precision tool. It has short, dense, and relatively stiff bristles (usually carbon fiber) made to dislodge stubborn, caked-on gunk from a microscopic point.
A record brush, on the other hand, has long, incredibly soft bristles designed to gently sweep loose dust from the huge surface of a record’s grooves without scratching them.
- Stylus Brush: Stiff, short bristles for a deep clean on a tiny tip.
- Record Brush: Soft, long bristles for a gentle sweep across a large surface.
Trying to clean your stylus with a record brush will be useless against anything but the lightest fluff. Even worse, using a stiff stylus brush on your vinyl is like dragging a rake through your grooves—it will cause definite and permanent damage.
My Stylus Still Looks Dirty After Cleaning. What Should I Do?
It’s a frustrating moment, but don’t panic. If you’ve already tried both dry and wet cleaning and you can still see gunk—a small magnifying glass is your best friend here—you’re likely dealing with some deeply bonded grime.
First, try another careful wet cleaning. This time, after putting a drop of fluid on your brush, let it soak into the bristles for about 30 seconds before you start cleaning. This gives the fluid a little extra time to work its magic and dissolve that stubborn deposit.
If the gunk still won’t budge, the problem might not be your stylus but your records. Playing just one dirty record will immediately foul up a perfectly clean stylus. Make sure you’re thoroughly cleaning your LPs before they ever touch the platter. If the stylus still looks dirty after cleaning your records and the stylus again, it might be a sign of significant wear. It could be time to start looking for a replacement.
A clean stylus is just one piece of the vinyl care puzzle. For a complete solution that keeps both your stylus and your records in pristine condition, the EVEO 4-in-1 Vinyl Record Cleaning Kit provides all the essential tools you need. Protect your investment and hear your music the way it was meant to be heard. Explore our full range of collection care products at https://eveo.store.
Vinyl Record Cleaning Fluid: Restore Sound Quality in Minutes
Finding the Best Vinyl Record Cleaning Kit for Your Collection