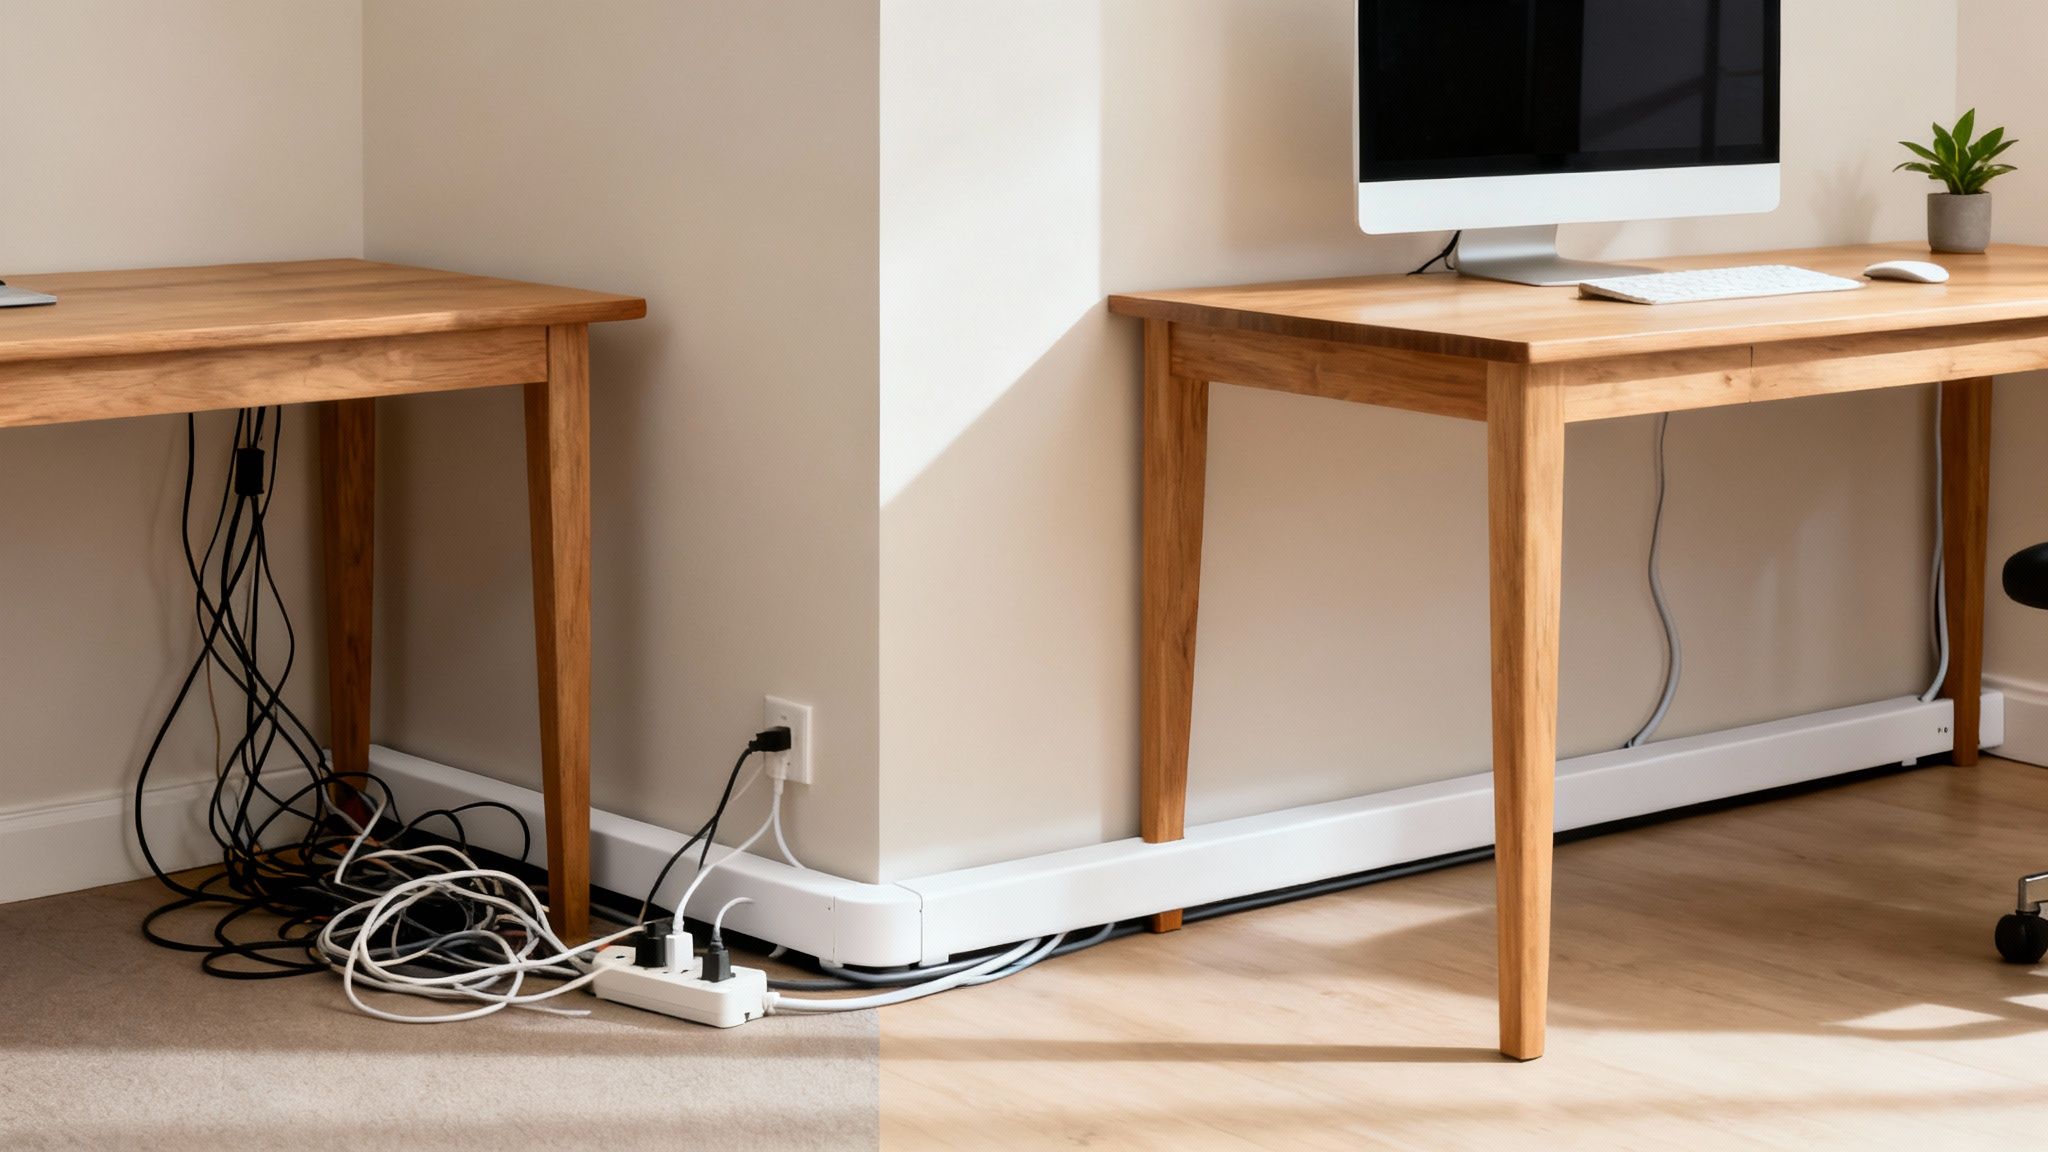
A cable cord hider is the simplest way to finally deal with that tangled mess of wires behind your TV or under your desk. You’ve probably seen them before—they’re simple channels, covers, or sleeves designed to tuck electrical cords away, instantly transforming visual chaos into a clean, professional-looking space.
But it’s about more than just looks. A good cable management solution also gets rid of dangerous trip hazards, making your space safer for everyone.
From Cable Chaos to Calm Focus
That web of wires snaking from your monitor, speakers, and charging station is more than just an eyesore—it’s a source of constant, low-grade distraction. Whether it's in a home office or an entertainment center, this cable clutter quietly chips away at your focus and ruins an otherwise organized room.
This isn’t just about being tidy; it’s about reclaiming your space. A well-managed setup using a simple cable cord hider can have a surprisingly big impact on your mindset and productivity. It creates a streamlined environment that feels intentional, allowing you to work or relax without the background noise of visual disorder.
More Than Just a Pretty Space
The benefits of tackling cable chaos go way beyond aesthetics. A properly installed cord hider system is a practical upgrade that does a few key things:
- Boosts Safety: It neatly contains loose wires, which significantly reduces the risk of trips and falls for family, pets, or coworkers.
- Protects Your Gear: Cords are shielded from damage—no more worrying about pets chewing on them, vacuum cleaners sucking them up, or chair wheels rolling over them.
- Simplifies Cleaning: Dusting and vacuuming around your desk or media console becomes incredibly easy when you aren't navigating a jungle of wires.
By organizing your physical environment, you’re also organizing your mental workspace. A clean desk free of tangled wires helps minimize distractions, leading to better concentration and a more effective workflow.
The growing demand for these solutions shows a clear trend: people want professional-grade organization in their everyday spaces. The dedicated cord cover market alone was valued at USD 1.21 billion and is expected to grow. Meanwhile, the wider cable management industry—which includes things like raceways and under-desk cord hiders—was valued at USD 23.5 billion. You can learn more about the cord cover market's growth on marketintelo.com.
This guide will give you a practical, step-by-step path to achieving that perfectly organized setup.
Choosing the Right Cable Hider for Your Space
Picking the right cable cord hider isn't about what looks good in a product photo—it's about finding a real-world fix for a specific problem. Not every solution is one-size-fits-all. A slim, minimalist raceway designed for a single TV cord is going to be completely overwhelmed by the nest of wires under a serious gamer's desk.
Before you click "buy," just take a minute to size up your own situation. Are you trying to conceal one or two thin speaker wires, or are you wrangling a bunch of thick power cables and a power strip? The answer completely changes the kind of hider you need for a clean, permanent solution.
Match the Hider to the Mess
Most cable messes fall into a few common categories, and thankfully, there’s a perfect hider for each one. Let’s break them down by scenario so you can pinpoint exactly what you need.
-
For Wall-Mounted TVs and Speakers: Your best bet here is a surface-mounted raceway kit. These are simply rigid plastic channels that stick right onto your wall. The best part? They’re usually paintable, so you can make them blend in perfectly with your wall color for a nearly invisible look. For a truly professional finish, look for kits that come with corner connectors.
-
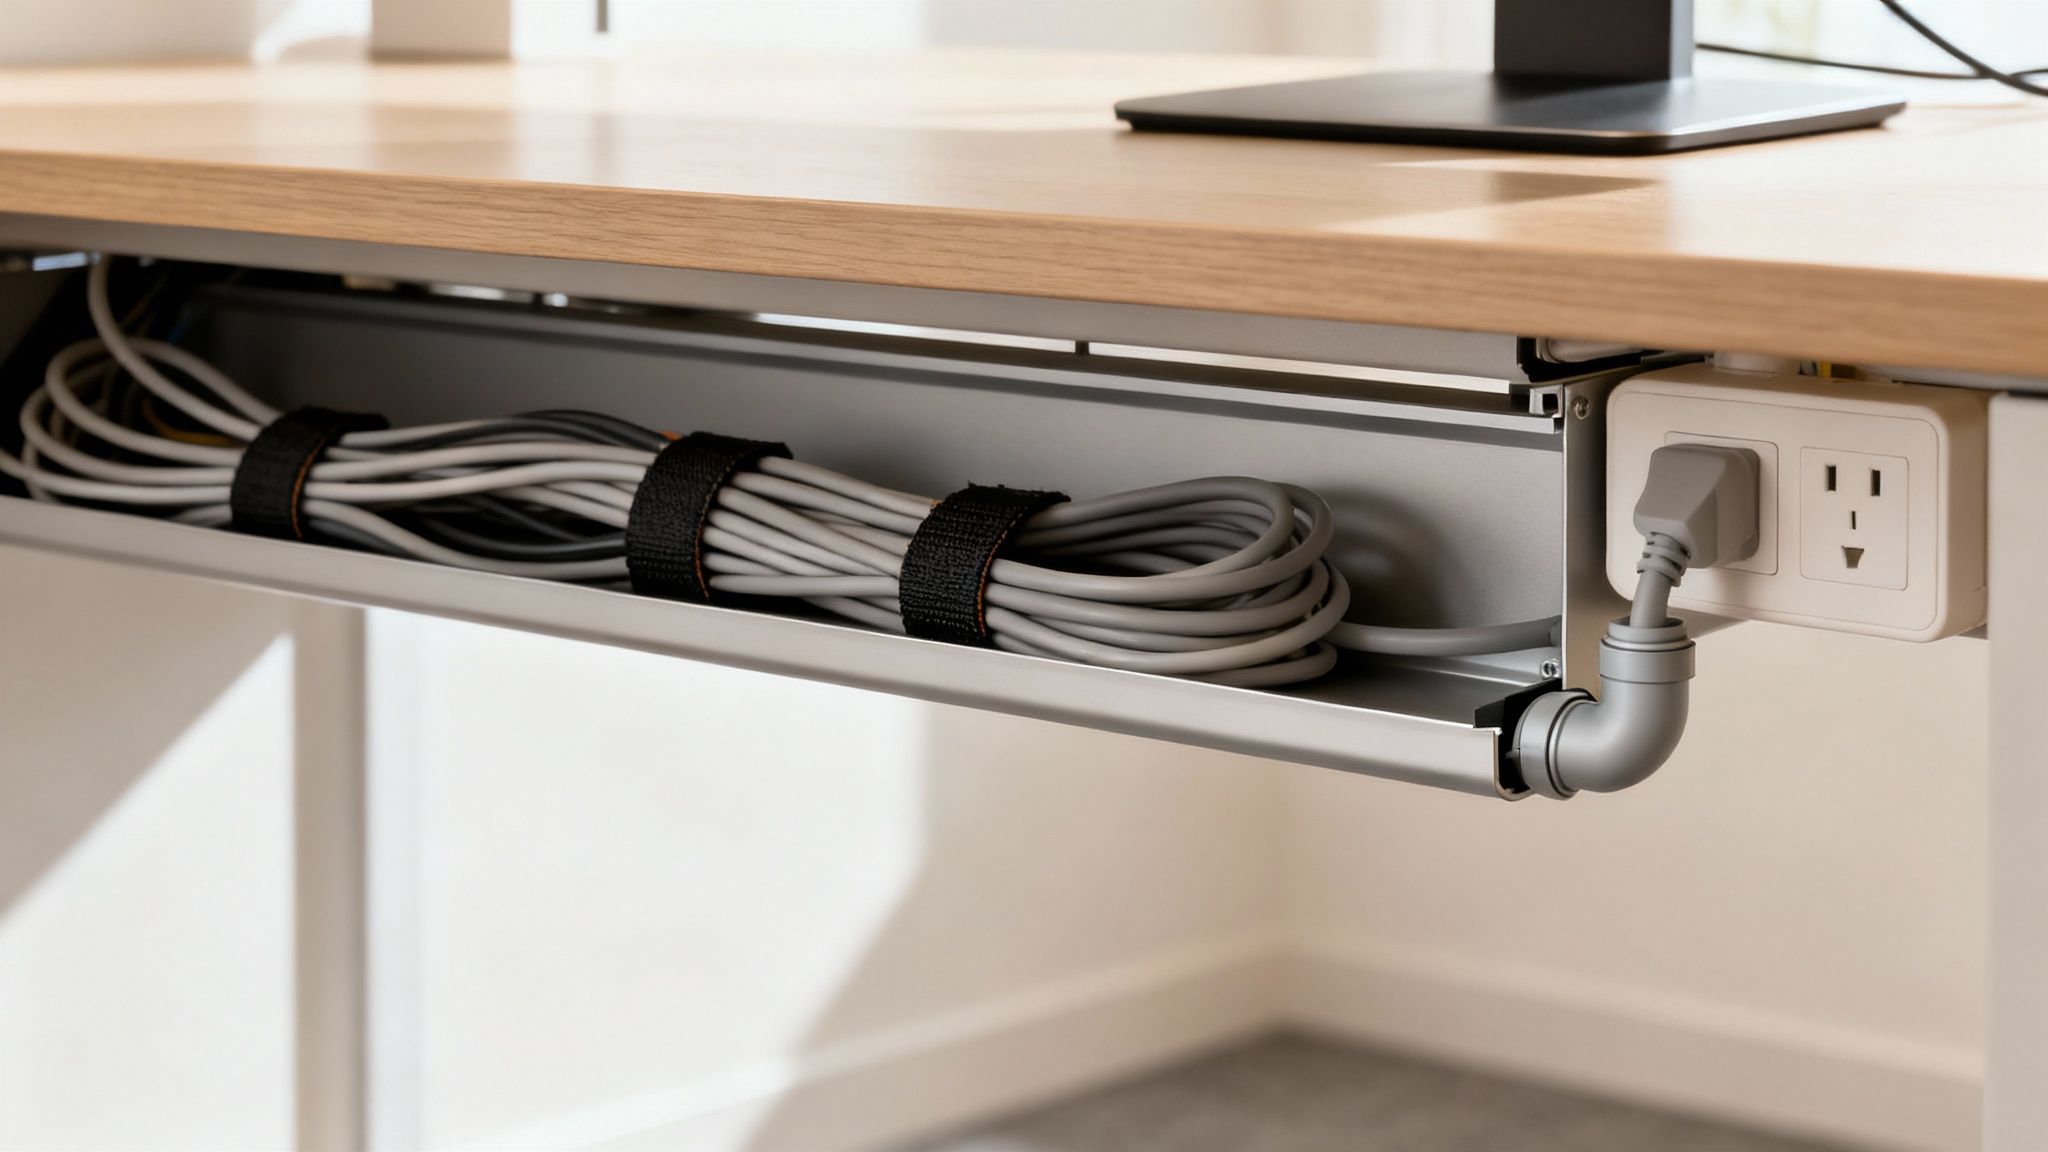
For Under-Desk Chaos: The space under a desk is a high-traffic zone for cables. A J-channel or a bigger under-desk tray is the ideal fix. These mount straight to the underside of your desk, creating a hidden gutter that holds power strips and all that extra cable length, keeping everything up and off the floor.
-
For Bundling Computer Cords: When you’ve got a group of wires all heading in the same direction—like from your monitor and keyboard to your PC tower—a fabric cord sleeve is a fantastic, flexible choice. These sleeves, which usually use a zipper or hook-and-loop, wrap around the entire bundle to create one neat, tidy tube.
For a much deeper look into taming your workspace, our guide on under-desk cable management has tons of specialized tips and product ideas.
Which Cable Cord Hider Fits Your Scenario?
Still not sure which way to go? This table breaks down the most common options to help you find the perfect fit for your cable management project.
| Hider Type | Best For | Installation Method | Capacity |
|---|---|---|---|
| Wall Raceway | Hiding 1-5 cables along walls for TVs, speakers, or lamps. | Adhesive tape or screws. | Low to Medium |
| J-Channel | Mounting under desks to hold power strips and excess cords. | Screws or strong adhesive. | Medium to High |
| Fabric Sleeve | Bundling multiple computer or entertainment center cords together. | Zipper or Velcro wrap-around. | Medium (Flexible) |
| Floor Cord Cover | Protecting cables that run across floors in high-traffic areas. | Lays flat on floor; some have adhesive. | Low to Medium |
Ultimately, the best choice depends on where your cable clutter is and how many wires you need to hide. A wall raceway keeps things looking clean and professional in a living room, while a J-channel is the unsung hero of a productive home office.
Key Factors to Consider
Beyond just the type of hider, a few other details make a huge difference. Capacity is probably the most important one. My advice? Always choose a cable cord hider that’s a little bit bigger than you think you need. That extra space not only makes the installation way easier, but it also gives you room to add another cable down the road without having to tear everything apart.
The installation method is another big one. Most wall raceways come with a strong adhesive backing. It’s convenient, but you absolutely have to prep the surface first by wiping it with isopropyl alcohol to get a solid, lasting bond. For heavier bundles, especially under a desk, look for models that can also be screwed in. That provides much more robust, long-term support you can count on.
Think of your cable hider as a permanent piece of your room's trim. A paintable raceway that matches the wall color elevates the entire space, turning a practical fix into a deliberate design choice.
Finally, don't forget about the material. Rigid PVC raceways are durable and perfect for those clean, straight runs along a wall or baseboard. On the other hand, flexible rubber or fabric hiders are much better for navigating around furniture legs or for situations where you might need to add or remove wires more frequently. Making the right call upfront will save you from the frustration of a fix that just doesn't quite work.
A Practical Guide to Flawless Installation
This is where the magic happens—turning your vision for a clean, organized space into a reality. A flawless installation isn't about having complex tools or technical skills. It's about getting a few key preparation steps right to ensure your cable cord hider looks like it was always meant to be there.
Before you even think about peeling off an adhesive strip, grab a roll of painter's tape. This is your most important tool. Use it to map out the exact path of your raceway on the wall or under the desk. This simple trick lets you visualize the final look, double-check your measurements, and make adjustments without commitment. It’s an extra five minutes that can save you from the massive headache of repositioning a channel that’s already stuck fast.
This visual guide breaks down the selection process, helping you assess your cable chaos, select the right hider, and match it to your environment.
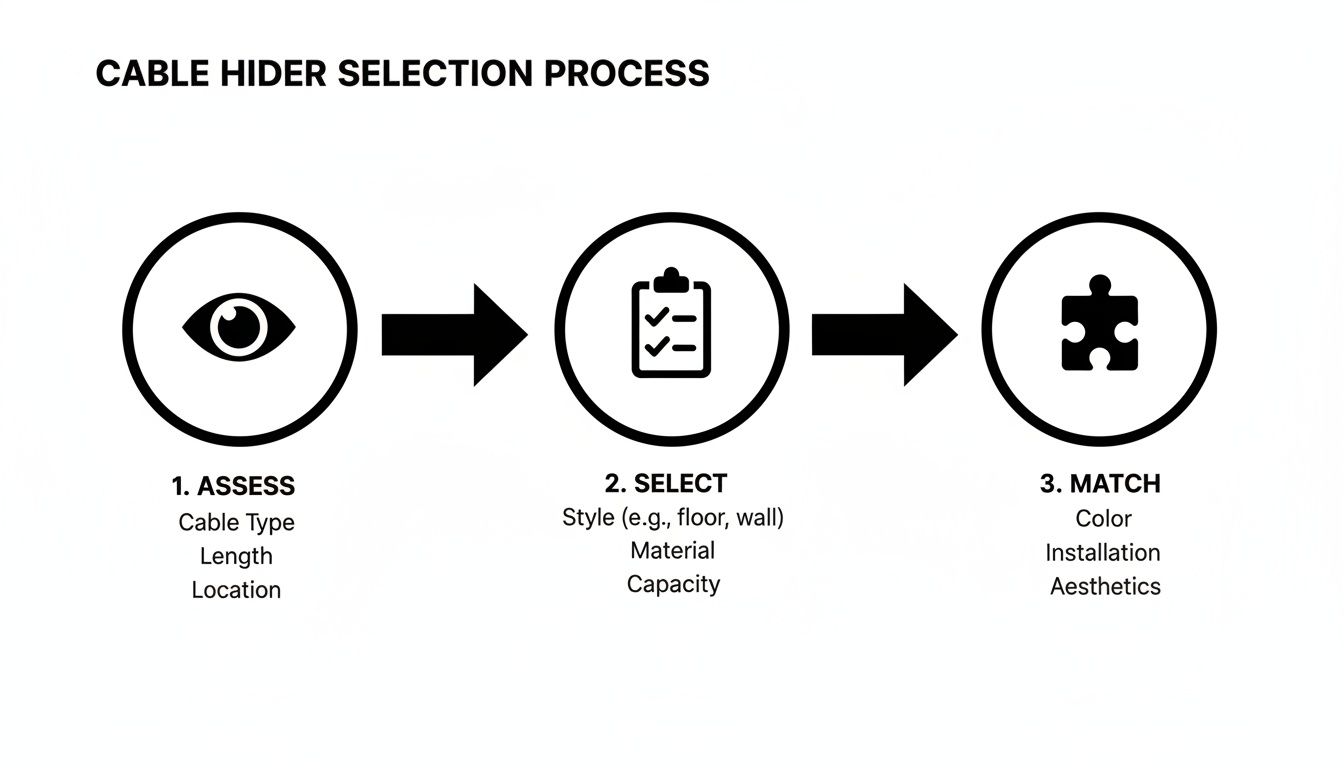
The key takeaway is that a successful outcome starts long before the installation. It begins with correctly identifying the problem and choosing a solution that truly fits the need.
Prepping Your Surface for a Lasting Hold
Once you’ve locked in the path with your painter's tape, the single most critical step for an adhesive-backed hider is surface preparation. Dust, oils, and grime are the ultimate enemies of a strong bond.
Take a clean cloth and a bit of isopropyl (rubbing) alcohol and give the entire path a thorough wipe-down. The alcohol cuts through any residue and evaporates quickly, leaving a perfect, clean foundation for the adhesive to grip. Skipping this can lead to the hider peeling away after just a few weeks, especially in warmer rooms.
Pro Tip: After cleaning with alcohol, let the surface dry completely for a full 5-10 minutes. Trapped moisture can compromise even the strongest adhesive over time. Patience here pays off in durability.
Real-World Installation Scenarios
Every setup has its own quirks. Let's walk through some of the most common projects and the specific techniques that make them a success.
-
The Floating TV: To get that clean, "no-wires" look, a paintable wall raceway is non-negotiable. After mapping your path from the TV down to the outlet, cut the raceway sections to length. Our detailed guide on choosing a TV cable cord cover offers more specialized advice for this exact project. Always remember to install the empty raceway first, pressing firmly along its entire length for 30 seconds before feeding the cables through.
-
The Standing Desk Octopus: The constant up-and-down movement of a standing desk puts extra stress on any cable management system. The winning strategy here is a combination: an under-desk J-channel for the power strip and a flexible fabric sleeve for the cables running to the floor. This creates a flexible "spine" that moves with the desk, preventing snags and protecting your connections.
-
The Baseboard Run: When running cables along a baseboard, precision is everything. Use a level to ensure the raceway is perfectly parallel to the top of the baseboard. This alignment makes it look like an intentional piece of trim rather than a sloppy afterthought. If your kit includes corner pieces, use them—they create a much cleaner turn than trying to miter-cut the plastic yourself.
Beyond just looking good, managing cords effectively is a serious safety measure. Cord hiders are crucial for preventing trip hazards in offices, schools, and public spaces, often forming a key part of formal safety programs. The global market for wire and cable management is projected to grow from USD 30.3 billion in 2025 to USD 72.5 billion by 2035, a clear sign of the growing focus on safety and organization in our spaces.
Mastering Advanced Cable Management Techniques
Getting your main cables tucked into a raceway is a fantastic start, but if you want that truly immaculate, professional look, the magic is in the details. True cable management mastery goes beyond just hiding the main bundle. It’s about creating a seamless system where every single wire is intentionally routed from source to destination. Nothing left to chance.
This next level of organization means pairing your primary cable cord hider with smaller, complementary tools. Think of it as the difference between a tidy desk and a completely curated workspace.
Elevating Your Setup with Smart Accessories
The most polished installations I've seen all rely on accessories that handle the turns, transitions, and final few inches of the cable's journey. You can't just bend a rigid raceway around a sharp corner; you need the right parts to maintain that clean, continuous line.
Here are the essential finishing touches you shouldn't skip:
-
Connector Pieces: Elbows, T-connectors, and couplers are non-negotiable for any run that isn't a single straight line. They allow your raceway to navigate corners and intersections flawlessly, making it look less like an add-on and more like a piece of custom trim.
-
Hook-and-Loop Cable Ties: These are the unsung heroes of internal organization. Before you even think about putting wires into the raceway, use these soft, reusable ties to bundle them into a neat package. This stops individual cables from bulging against the cover and makes it way easier to add or remove one later.
-
Adhesive Cable Clips: For that final stretch—say, from the back of your monitor to the raceway entrance—these small adhesive clips are perfect. They guide the wire along a discreet path, getting rid of that little bit of "dangle" that can spoil the whole effect.
The goal is to create a complete path. The main cable cord hider is the highway, but these smaller accessories are the on-ramps and intersections that make the entire system work together smoothly.
A Real-World Scenario: The Dual-Monitor Desk
Picture a modern home office with a dual-monitor setup, a laptop dock, speakers, and a charging station. You’re easily looking at 8-10 cables creating a web of chaos. Just stuffing them all into a large under-desk tray isn't enough; the wires snaking down from the monitors will still look messy.
This is where a hybrid approach really shines. A main under-desk cable cord hider can house the power strip and all the bulky adapters. From there, a smaller raceway can run up the monitor arm or behind the desk to conceal the display and power cords. Finally, a few well-placed adhesive clips guide the last few inches of wire from the monitor's port right into the raceway opening.
For more ideas on how to organize your desk, you should also check out our guide on raceway cable management for a clean setup.
The rise of complex home workstations has fueled demand for these kinds of professional-grade solutions. In fact, the market for cable cord cover products is projected to hit USD 2.5 billion in 2025 and grow to around USD 4 billion by 2033. This growth reflects a major shift as more of us seek to create efficient and visually calming environments at home. You can learn more about the growth of the cable management market.
By combining different types of organizers, you transform a functional setup into an aesthetically pleasing one. It’s these finishing touches that separate a quick fix from a long-term, satisfying solution.
Maintaining and Adapting Your Organized Setup
Getting your cables perfectly managed feels great, but let's be honest—our tech setups are never truly "finished." A new monitor, a different desk layout, or an extra gadget can instantly threaten that clean, organized look you worked so hard to achieve.
The real secret to long-term cable management isn’t a one-and-done installation. It’s creating a system that can grow and change right along with your tech. The good news is that making adjustments to your cable hiders is surprisingly simple, and you definitely don't have to start over from scratch.
Making Changes Without Making a Mess
One of the most common worries is messing up your walls. Whether you're adding a new cable or removing an entire raceway, the last thing you want is to rip off paint or drywall.
Adding a new wire is the easy part. Just pop the raceway cover off with your fingers, lay the new cable inside with the others (make sure nothing is getting pinched!), and snap the cover back on. It's designed to be that simple.
But what about when you need to remove the whole channel? Don't just pull on it.
- Heat it up: Grab a hairdryer and set it to low or medium heat. Wave it back and forth along the raceway for 30-60 seconds to gently soften the adhesive.
- Pry carefully: Don't use anything that will gouge your wall. A plastic putty knife, an old gift card, or even a credit card works perfectly. Slide it under one end and gently begin to lift.
- Peel slowly: Once you've got a corner up, pull the raceway away from the wall at a sharp angle. Go slow and steady to give the adhesive time to release without taking the paint with it.
Here’s a pro tip from experience: when you first install your cable hiders, always choose a size that gives you about 25% more space than you need right now. This little bit of foresight turns adding a future cable into a two-minute job instead of a major project.
Long-Term Upkeep and Future-Proofing
Over time, your cord hiders might need a little love to stay looking sharp. Dust can settle on the surfaces, but a quick wipe-down with a microfiber cloth is all it takes to make them look new again.
If you find a section of adhesive is losing its grip—this can sometimes happen in warm rooms or on textured walls—you don’t need to replace the entire piece. Just secure it again with a fresh strip of high-quality, double-sided mounting tape.
Ultimately, the best maintenance is planning ahead. Thinking about your future needs is what separates a temporary fix from a sustainable, long-term solution. Your beautifully organized space can stay that way, no matter what new tech comes your way.
Common Questions About Cable Cord Hiders
Even after you've mapped out the perfect route for your cables, a few questions can pop up. It's totally normal. From worrying about peeling paint to picking the right size raceway, let's tackle the common hurdles people run into.
Think of this as your quick-reference guide for those final details that separate a decent job from a professional-looking one. We'll get straight to the point with practical answers so you can finish your project with confidence.
Will Adhesive Cord Hiders Damage My Walls?
This is probably the number one concern, especially if you're renting or just like to rearrange your space often. The good news is that while the adhesive on a quality cable hider is strong, it's not meant to be permanent. The secret to a clean removal is all in the technique, not brute force.
To avoid taking a chunk of paint with it, grab a hairdryer and gently heat the raceway for about 30-60 seconds. This softens the adhesive and makes it much easier to work with. Instead of pulling it straight off the wall, slowly and carefully peel it back at a sharp angle.
For delicate surfaces or freshly painted walls, it's always a smart move to test the adhesive on a small, hidden spot first. A quick check can save you a much bigger headache later.
Can I Paint a Cable Hider to Match My Wall?
Absolutely, and you really should if you want that seamless, "invisible" look. Most modern PVC raceways are designed to be painted. This simple step is what takes your cable management from a functional fix to something that looks like a custom, built-in feature.
For a finish that lasts, just follow these quick steps:
- First, lightly scuff the surface of the raceway with fine-grit sandpaper. This gives the paint something to grab onto.
- Next, apply a thin coat of primer.
- Once the primer is dry, paint it with your exact wall color.
This process helps the paint adhere properly and prevents it from chipping or flaking off down the road.
How Do I Choose the Right Size Cord Hider?
Getting the size right is key to a frustration-free installation. If the channel is too small, you'll never get it closed. If it's too big, it can look clunky and oversized on your wall.
The best way to figure it out is to gather all the cables you plan to hide in one spot. Bundle them together loosely—don't squish them—and measure the diameter of the bundle. When you're shopping, look for a cord hider with internal dimensions that are just a little bit bigger than your measurement.
That extra wiggle room is your best friend. It makes feeding the cables into the channel a breeze and leaves you space to add another wire later if you need to, without having to tear everything out and start over.
Ready to conquer cable clutter for good? Explore the full range of cable management solutions from EVEO and find the perfect fit for your home or office. Visit https://eveo.store to create your clean, organized, and focused space today.
Cable Management for Desk: The Ultimate Guide to a Tidy Workspace
How to clean monitor screen: Remove streaks without damage