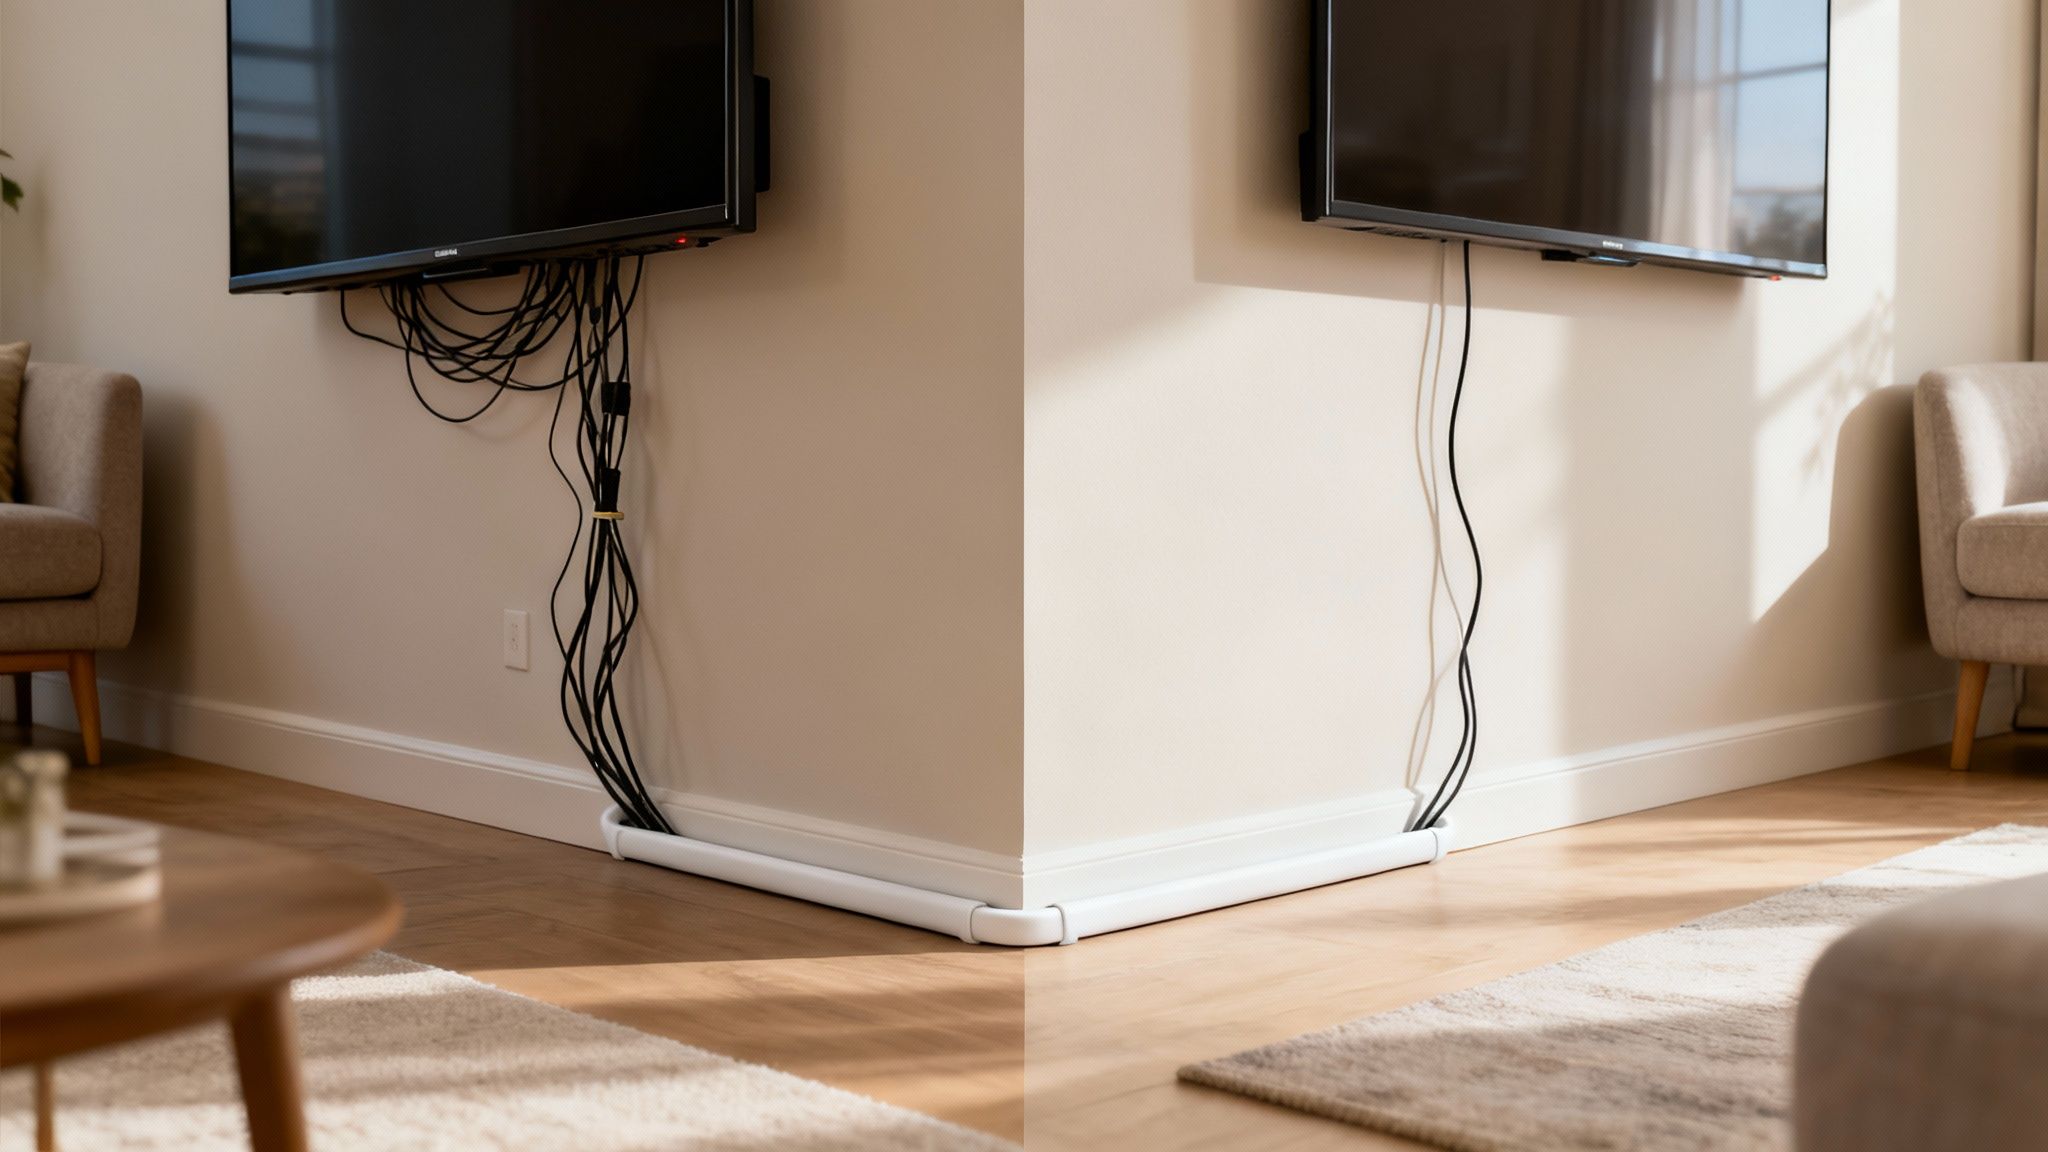
Let's be honest. That tangled web of wires snaking down from your beautiful wall-mounted TV isn't just a minor annoyance—it's a major distraction. It takes away from the clean, modern look you were going for and makes the whole space feel a bit… unfinished.
A TV cable cord cover is the simplest, most effective way to solve this. These handy channels, also called raceways, are designed to hide everything from your power cord to multiple HDMI cables, giving your wall a smooth, professional finish that instantly ties the room together.
From Cable Chaos to a Clean Finish
This guide is your roadmap to finally conquering that cable clutter. We're not talking about complicated electrical work or calling in a pricey professional. This is about using a straightforward tool to get a high-end result that looks like it came straight out of a design magazine.
I'll walk you through the entire process, sharing tips I've picked up from my own home projects. You'll see just how easy it is to transform that wire mess into something you're proud of.
Why This Small Detail Makes a Huge Difference
Great interior design is all about the details, and dangling cords can completely undermine an otherwise beautiful room. Taking care of them is one of the fastest, most satisfying upgrades you can make.
But it’s not just about looks. A clean setup has real, practical benefits:
- A Safer Home: Loose cables are a legitimate trip hazard, especially if you have kids or pets running around. Tucking them away eliminates that risk entirely.
- Effortless Cleaning: Dusting a single, smooth channel is a breeze compared to navigating a spiderweb of wires that just collects dust bunnies.
- Protect Your Gear: Cord covers shield your expensive cables from everyday wear and tear, like getting snagged by the vacuum, kinked behind furniture, or chewed on by a curious pet.
From my own experience, once you hide the cables in one room, you'll immediately want to do it everywhere else. It’s that one finishing touch that makes everything look complete.
Ready to move past the 'why' and get straight to the 'how'? You can explore a variety of cord hiders on eveo.store to find the perfect style for your space and get started on achieving that flawless, organized look.
How to Choose the Right Cord Cover for Your Home
Walking into the cord cover aisle—or browsing online—can feel a little overwhelming at first. But finding the right solution always comes down to three things: your space, how many cables you’re hiding, and the final look you’re aiming for.
Let's cut through the noise and figure out which TV cable cord cover is perfect for you.
The most popular choice, and for good reason, is the surface-mounted cable raceway. Think of it as a simple plastic channel that sticks right onto your wall, giving your wires a clean, straight path. It's a fantastic option for renters or anyone who wants a straightforward install without patching up drywall later.
Matching the Cover to Your Cable Needs
First things first, do a quick cable audit. How many wires are you actually trying to conceal? Hiding a single power cord is a totally different ballgame than wrangling the mess from a home theater with multiple gaming consoles and a soundbar.
- Slimline or Single-Cord Covers: These are your go-to for just one or two thin cables, like a speaker wire or a lamp cord. They have a super low profile and practically disappear on the wall.
- Medium-Capacity Raceways: This is the sweet spot for most wall-mounted TV setups. They’ll comfortably hold a power cord, an HDMI, and maybe an optical audio cable without looking bulky.
- Large-Capacity Trunking: If you're a gamer or tech enthusiast with five or more thick cables, you need a wider, deeper channel. Don't even try to stuff them into something smaller.
I've learned this the hard way: trying to force too many wires into a small channel is a recipe for frustration. The cover will bulge, or worse, pop right off the wall. Always pick a size that gives you a little wiggle room.
My personal pro-tip? Look for kits with a hinged or slide-on design. They make adding or removing a cable later on so much easier, saving you from having to rip the whole thing off the wall.
TV Cable Cord Cover Comparison
Choosing the right cover can feel tricky, but this simple breakdown should help you decide what's best for your setup. Each type has its own strengths depending on your wall, your cables, and your DIY comfort level.
| Cover Type | Best For | Installation Difficulty | Aesthetic |
|---|---|---|---|
| Adhesive Raceway | Renters, smooth drywall, simple vertical drops | Easy | Clean and modern, paintable |
| Quarter-Round | Hiding cables along baseboards or floors | Easy to Moderate | Blends seamlessly with molding |
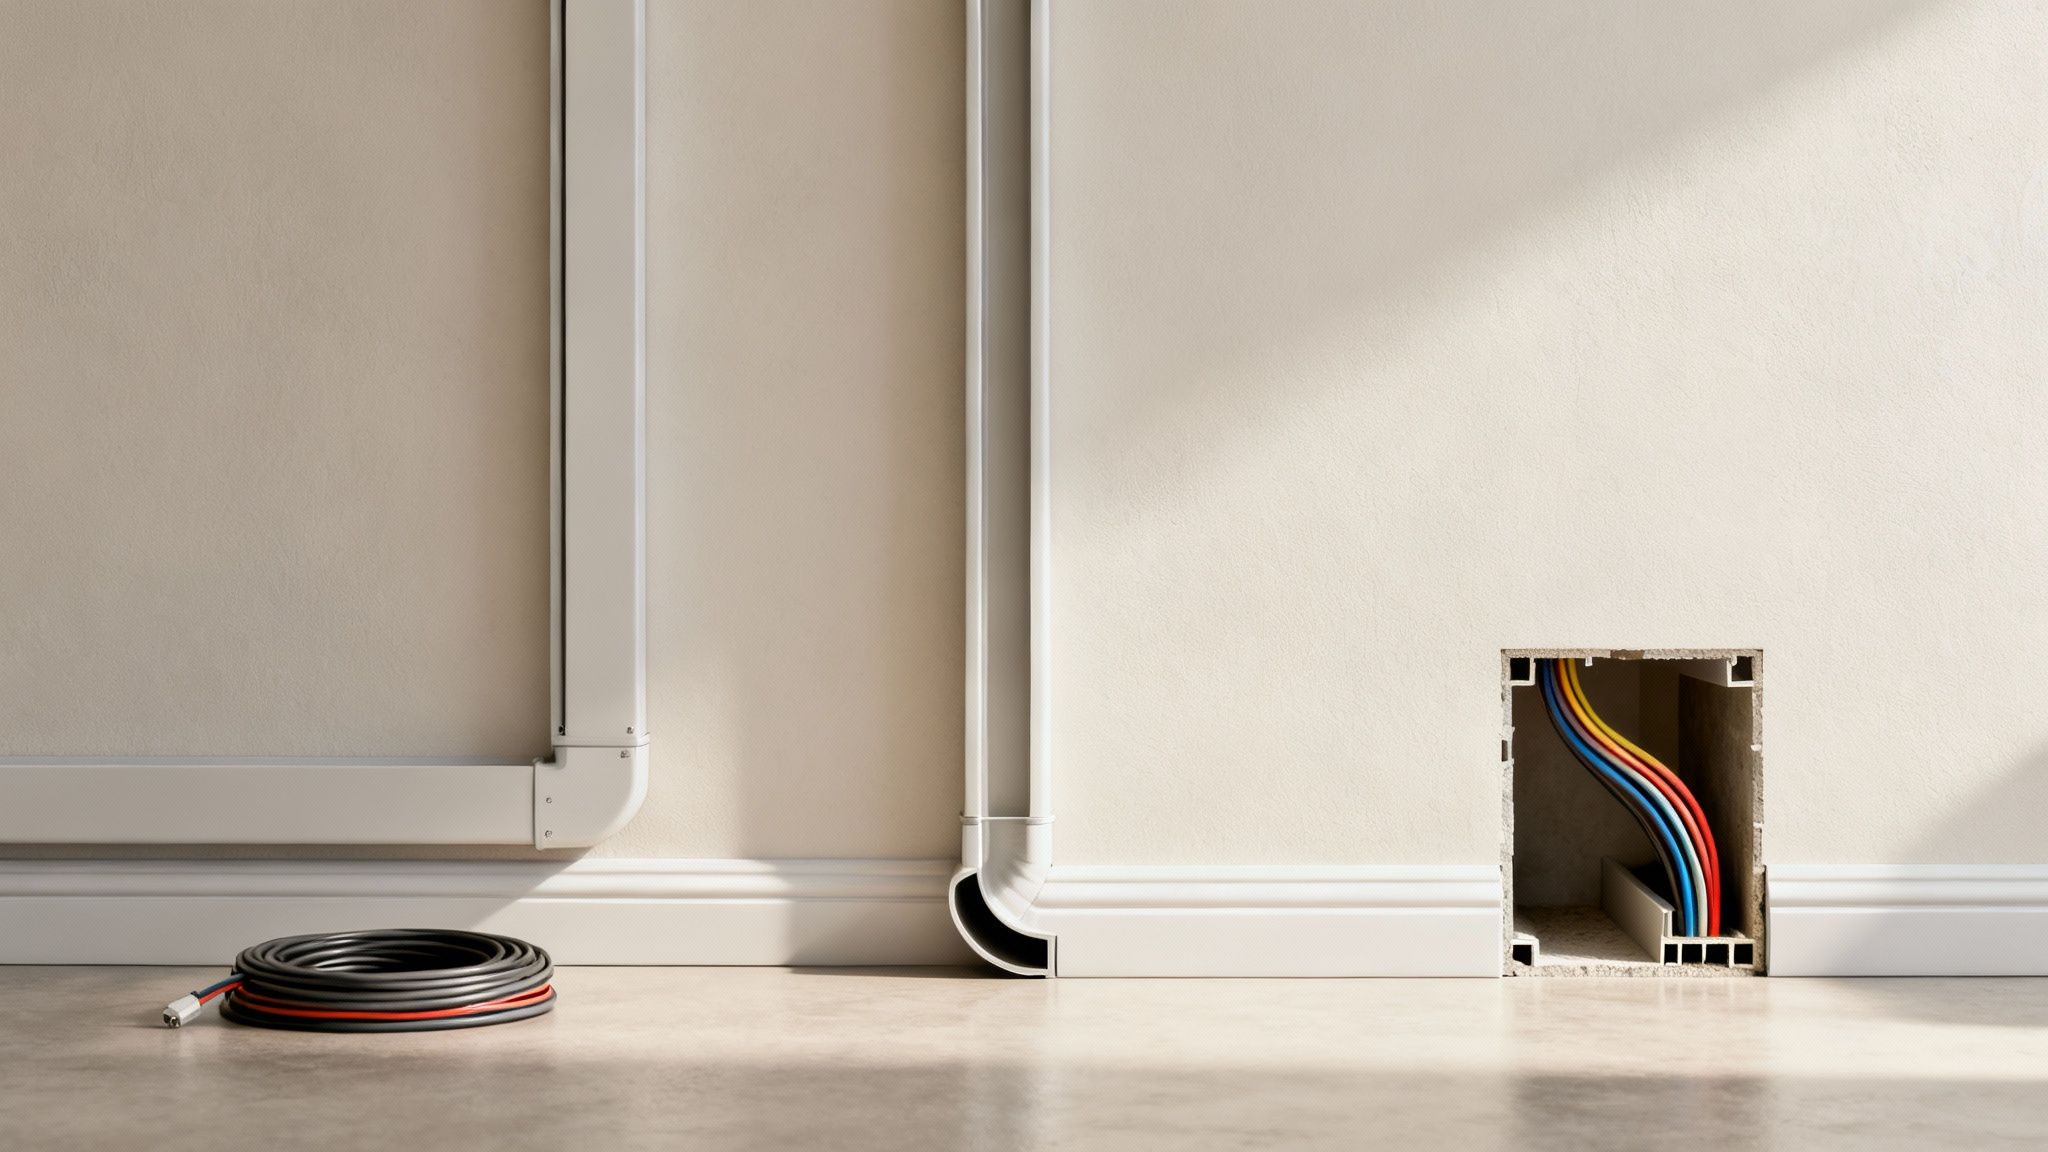
| Screw-In Trunking | Textured walls, brick, concrete, heavy cables | Moderate | Very secure, permanent look |
| In-Wall Kits | The cleanest possible look, hiding all cables | Difficult (requires cutting drywall) | Completely invisible, professional |
Ultimately, the goal is to make the wires disappear without creating a new eyesore. For most people, a good quality adhesive raceway offers the best balance of ease, performance, and looks.
Considering Your Space and Wall Type
Your room's layout is just as important as the cables themselves. Are you just running wires straight down from the TV, or do you need to navigate around a fireplace mantle or along a baseboard?
For a simple vertical drop, a standard rectangular raceway is perfect. But for more complex routes, you’ll absolutely need a kit that includes connectors. Elbows, T-junctions, and couplers are non-negotiable for getting that clean, professional finish around corners or across long walls.
If you’re running cables along the floor, a quarter-round cord cover is a brilliant solution. It's shaped to look exactly like baseboard molding, so it blends right into your room’s architecture for an almost invisible fix.
With smart homes becoming the norm, it's no surprise the demand for these solutions has exploded. The global market for cable cord covers is projected to hit $2 billion in 2025 as more of us try to manage the cable chaos from all our devices.
Finally, take a hard look at your wall's texture. Most self-adhesive raceways are designed for smooth, painted drywall. If you’re dealing with heavily textured plaster, brick, or concrete, you’ll be much better off with a kit that you can secure with screws for a permanent, reliable hold. This is where a comprehensive option like the EVEO Cord Hider Kit really shines, since it comes with all the hardware you need for just about any surface.
Installing Your Cord Cover Like a Pro
Alright, let's get to the satisfying part—taking your plan and turning it into a clean, professional-looking installation. Even if this is your first time tackling a project like this, I promise it's more about patience than any special skills.
The secret to a flawless result isn't a workshop full of power tools; it’s just taking a moment to get the details right. We'll walk through everything from making the perfect cut to mounting it so securely it looks like it was always part of your wall. This is how you get that seamless finish that completely transforms the space.
Planning and Measuring Your Cable Path
Before you cut a single piece or peel any adhesive, mapping out your cable's journey is the most important step. Hold the empty cord cover (the raceway) against the wall and actually visualize the path from your TV down to the outlet or your media console. This is your chance to nail the alignment.
Using a pencil, make a few light guide marks along the path you've chosen. A level is your absolute best friend here. Trust me, even a tiny slant will be surprisingly obvious once everything is installed. If you're dealing with textured walls, a cheap laser level can be a lifesaver for projecting a perfectly straight line to follow.
My number one tip for any home project holds true here: measure twice, cut once. Lay your tape measure along your pencil marks to get the exact length you need for each section. Jot it down. You'll be glad you did.
Once you have your measurements, you're ready to cut. Most plastic TV cord cover kits are designed to be cut without much fuss. You don't need a power saw—a simple, fine-toothed hacksaw will give you a clean, straight edge every time. For the thinner raceways, a sharp utility knife often does the trick; just score it a few times and snap for a clean break.
Mounting Your Cord Cover Securely
With your pieces cut to the right size, it's time to get them on the wall. How you do this really depends on the type of cover you bought and what your walls are like.
For most people using a self-adhesive raceway, the process couldn't be simpler:
- Prep the surface. First, wipe down the wall along your marked path with a clean, dry cloth. This gets rid of any dust or oils and gives the adhesive the best possible grip.
- Peel and stick carefully. Don't pull off the entire backing at once. Peel back just a few inches to start. Line up the top of the raceway with your level line and press that first section firmly against the wall.
- Work in sections. Slowly peel away more of the backing as you press the raceway down along your path. Moving in smaller sections keeps the whole sticky strip from accidentally grabbing the wall before you have it perfectly aligned.
Now, if you've got textured walls or a particularly heavy bundle of cables, screws and wall anchors are the only way to guarantee a rock-solid installation. Just hold the raceway in place, mark the pre-drilled holes with your pencil, drill your pilot holes, pop in the anchors, and then screw the raceway base securely to the wall. It’s a bit more work, but the result is incredibly durable and worth the extra effort. For organizing wires around a workstation, checking out an under desk cord organizer can give you a similar clean and efficient setup.
Bundling Wires and Adding Connectors
Once the base of your raceway is mounted, it’s time to tuck the cables inside. I find it helps to use a small cable tie or a Velcro strap to bundle the wires together first—it makes them much easier to manage and fit neatly into the channel.
Lay the wires as flat as you can inside the raceway. Avoid kinks or letting them pile on top of each other, as this can cause the top cover to bulge or prevent it from snapping on correctly.
Finally, snap the top cover on. You should hear a satisfying click as it locks into place. If your path takes a turn around a corner, now’s the time to pop on any elbow connectors or T-junctions. These little pieces are the secret to a truly pro-looking job; they hide any imperfect cuts and create a single, continuous line that looks seamless.
Achieving a Flawless and Invisible Finish
Getting a cord cover mounted on the wall is half the battle, but the real magic happens in the finishing touches. This is where you elevate the project from a simple, functional fix to something that looks like it was always part of the house. The goal is to make that tv cable cord cover blend in so seamlessly you forget it’s even there.
And the best way to do that? Paint.
Most raceway kits are made from paintable plastic, which is great. But just slapping your wall color directly onto the smooth surface is a recipe for disaster. I've learned from experience that paint will eventually chip and peel right off, making the cover stand out more than the cables did in the first place.
Prepping and Painting for a Perfect Match
For a durable finish that actually lasts, a little bit of prep work is non-negotiable.
Grab a piece of fine-grit sandpaper—something around 220-grit is perfect—and lightly scuff the entire surface of the cord cover. It only takes a minute, but this creates a slightly rough texture for the paint to grab onto, preventing those annoying chips down the road.
Wipe it down to get rid of any dust, then hit it with a thin coat of a quality primer. Once that’s dry, you’re ready for your wall paint. Pro tip: two thin coats will always look better and last longer than one thick, goopy one.
Taking the time to scuff and prime is the difference between a finish that lasts for years and one you’ll have to touch up after the first bump from the vacuum cleaner. It’s a ten-minute step that saves you a major headache later.
This quick visual guide breaks down the core installation before you even get to this finishing stage.
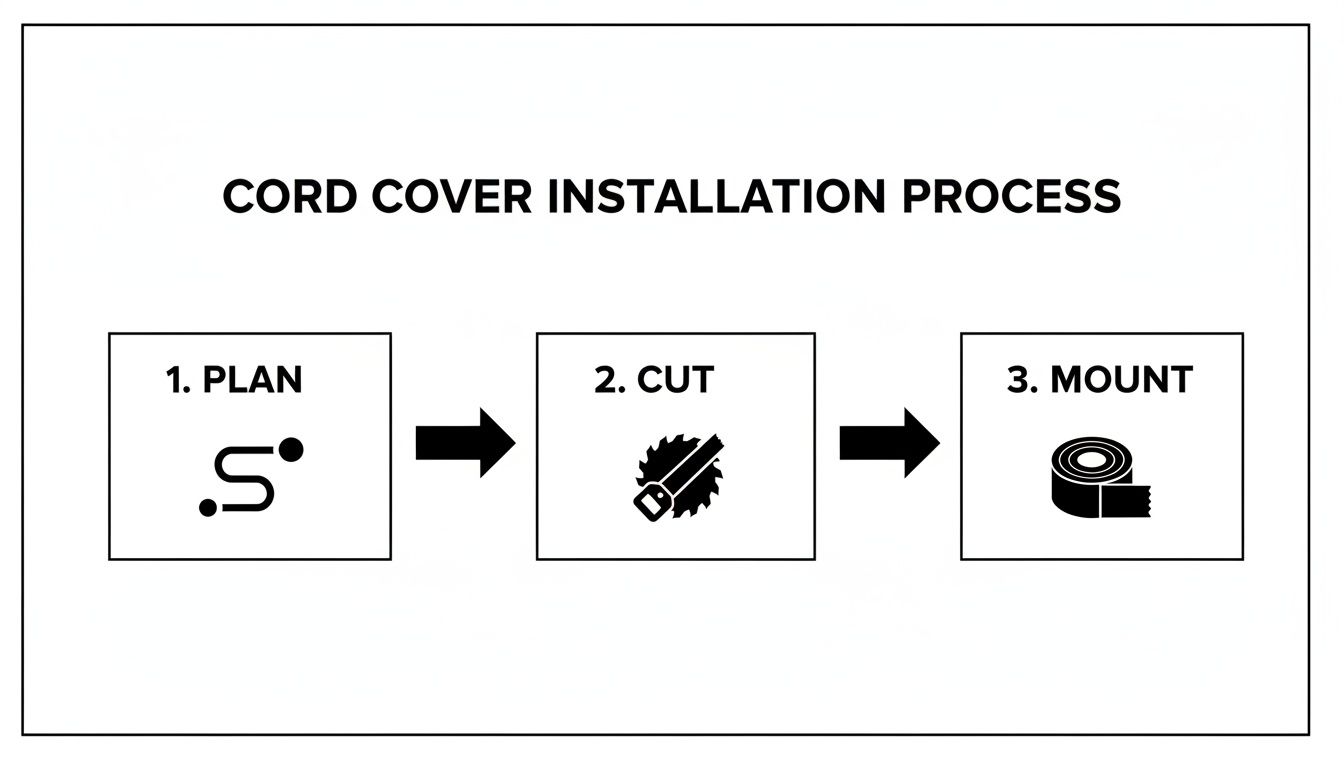
Nailing the planning, cutting, and mounting means you can pour your energy into these final details that create that truly professional look.
Strategic Placement to Trick the Eye
Beyond a perfect paint job, think about how the room’s existing lines can help you out. A cleverly placed cord cover can become almost invisible just by aligning it with other architectural features.
Here are a few placement tricks I’ve used:
- Align with Trim: Run the raceway right alongside a door frame or window casing. Your eye will naturally follow the bigger, more dominant line, making the cord cover fade into the background.
- Follow the Mantel: If your TV is mounted over a fireplace, run the cover down one of the vertical edges of the mantel structure.
- Hide in Corners: This is my favorite for horizontal cable runs. Tucking the raceway into the corner where the wall meets the ceiling or the baseboard is incredibly effective.
When you combine a perfect paint match with smart placement, your cable management stops looking like an add-on and starts feeling like an integrated part of the room. It’s these little details that deliver that clean, uncluttered look you were aiming for all along.
What to Do When Your Installation Hits a Snag
Even the most carefully planned project can hit a bump in the road. You’re in the home stretch, and suddenly the adhesive won’t stick, or a piece goes on crooked. Trust me, I’ve been there. Knowing how to handle these little hiccups is what separates a decent-looking job from a truly professional one.
Let's start with the most common culprit: adhesive failure. You’ve cleaned the wall, lined up your tv cable cord cover, pressed it firmly... and then watched it start to peel away. This is almost always a problem on walls with any texture, from a light "orange peel" finish to something more pronounced. The adhesive just can't get a solid grip on an uneven surface.
When to Ditch the Adhesive and Grab the Screws
If the adhesive gives up, don't try to fight it. It's time to bring in the screws. It might seem like more work upfront, but it’s a permanent fix that guarantees your cord cover will never budge. Thankfully, most quality kits come with all the screws and wall anchors you'll need.
Here’s how to do it without making a mess of your wall:
- Mark your drill spots. Hold the raceway base flat against the wall and use a pencil to mark the screw locations through the pre-drilled holes.
- Drill pilot holes. Grab a drill bit that’s just a bit smaller than your wall anchor and drill a hole at each mark.
- Pop in the anchors. Gently tap the plastic anchors into the holes until they’re sitting perfectly flush with the wall.
- Mount the raceway. Line up the base over the anchors and drive the screws in until they’re snug. Be careful not to overtighten—you don't want to crack the plastic.
This is also the best method if you're dealing with a heavy bundle of cables or installing directly onto tough surfaces like brick or concrete.
Tackling Bulky Cables and Other Quick Fixes
Another classic issue is trying to cram just one more cable into the raceway, only to have the cover bulge or refuse to snap shut. Forcing it is never the answer. The real solution is either to swap it out for a wider channel or, if you can, replace a thick, old cable (like an outdated HDMI cord) with a slimmer, modern one.
And what if you mount a section crookedly? It happens. If you used the adhesive strip, a little gentle heat from a hairdryer will soften the glue. Then you can carefully slide a putty knife behind it to pry it off. If it was screwed in, just unscrew it, fill the old holes with a dab of spackle, and remount it in the right spot.
Quick Safety Tip: Never, ever run a standard power extension cord inside an on-wall TV cable cord cover. These raceways are only designed for low-voltage cables like HDMI, Ethernet, or speaker wire. They aren't rated to handle the heat from a power cord, and doing so creates a serious fire hazard.
It’s this kind of attention to detail that’s becoming so important as our home and office setups get more sophisticated. In fact, North America now accounts for 38% of the global market for cable management products, a boom driven by remote work and the rise of smart home tech. With over 40% of U.S. workers now on hybrid schedules, creating a clean, organized space is more than just a luxury—it's a necessity. You can dive deeper into this trend by checking out the full cable cord cover market research.
Got Questions About Hiding Your TV Cords?
Even with the best-laid plans, a few questions always come up in the middle of a project. It’s totally normal to hit a snag and wonder about tricky surfaces like brick, or how you’ll get the cover off without destroying the wall later.
I’ve pulled together the most common questions I hear to give you clear, straightforward answers. Think of this as your quick-reference guide for those “what if” moments, so you can finish the job with confidence.
Can I Install a TV Cable Cord Cover on Brick or Concrete?
You absolutely can, but you’ll need to switch up your installation method. That peel-and-stick adhesive on the back of most kits is fantastic for smooth, painted drywall, but it just won't hold on to rough, porous surfaces like brick, concrete, or even heavily textured plaster.
For walls like these, you have to use the screw-mount method. It’s a far more permanent and reliable approach that ensures your tv cable cord cover is there to stay. You'll need a drill with a masonry bit to create the pilot holes for your screws. I also strongly recommend popping wall anchors into those holes to get a rock-solid fit. The best cord cover kits will include all the hardware you need for this.
How Do I Remove an Adhesive Cord Cover Without Wrecking My Wall?
This is a big one, especially for renters. The last thing you want is to peel off a huge strip of paint or, even worse, the paper layer of your drywall. The secret to a clean removal is heat. You just need to soften the adhesive before you start pulling.
Grab a hairdryer on a low or medium setting and wave it back and forth along the raceway for a minute or two. This gently loosens the glue's grip on the wall. Once the plastic feels warm, you can slide a putty knife, a thin plastic scraper, or even some dental floss behind an edge and slowly work it away from the surface.
The key here is patience. If you go too fast, you’ll take the paint with it. If there’s any sticky gunk left over, a citrus-based adhesive remover usually cleans it right up—just be sure to test it on a hidden spot first!
Are These Cord Covers Considered a Fire Hazard?
When they’re installed and used as intended, high-quality cord covers are perfectly safe. Reputable brands make their products from flame-retardant materials designed specifically for low-voltage cables. That includes all the usual suspects: HDMI, Ethernet, speaker wires, and coaxial cables.
The risk only enters the picture when people misuse them. You should never run high-voltage power extension cords through a standard on-wall raceway. They simply aren’t built to handle the heat those cords can generate. Likewise, cramming too many wires into a small channel can also trap heat. Stick to the intended use, and your setup will be both clean and completely safe.
Ready to get that polished, professional look in your own home? EVEO offers a range of durable, easy-to-install cord management solutions perfect for any project. Explore the full collection and conquer cable chaos for good at https://eveo.store.
How to Clean Computer Screen: how to clean computer screen without streaks
A Practical Guide to Raceway Cable Management for a Clean Setup