Safely cleaning your computer screen really just comes down to a few simple steps: power down your device, give it a quick pass with a dry microfiber cloth to get rid of loose dust, and then use a separate, lightly dampened cloth for any stubborn smudges. That’s it. This approach protects your display from scratches and chemical damage, leaving you with a perfectly clear, streak-free finish every time.
Why Cleaning Your Screen The Right Way Matters
A smudged, dusty display is more than just an eyesore—it’s a genuine barrier to getting your work done comfortably and effectively. All those fingerprints, dust particles, and mystery spots create a visual mess that forces your eyes to work harder just to see what's on the screen.
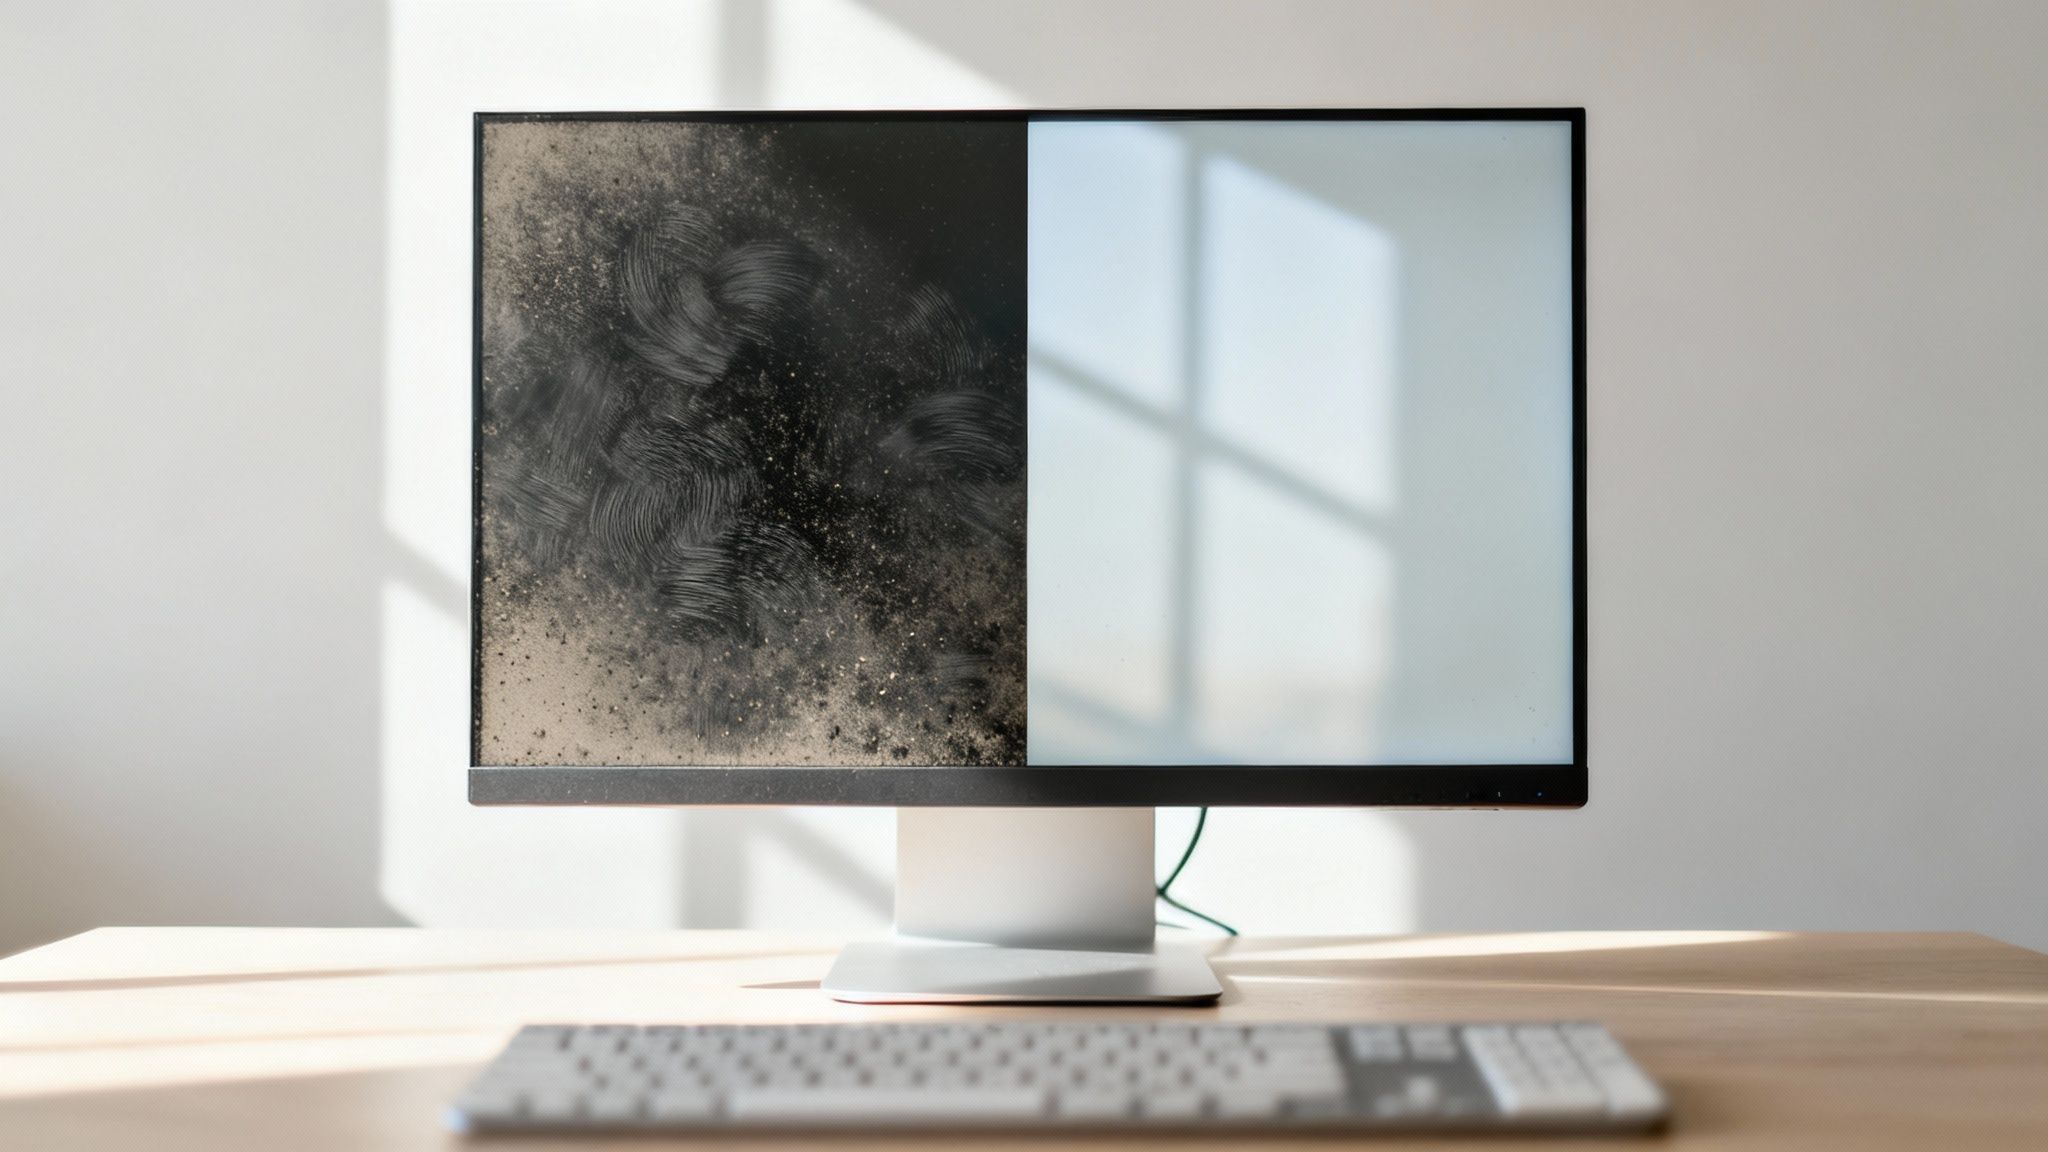
This constant refocusing can easily lead to eye strain and headaches, especially after a long day. For creative professionals like graphic designers or video editors who depend on perfect color accuracy, a dirty screen can subtly throw off their perception and compromise the quality of their work.
The Dangers of Improper Screen Cleaning
It’s tempting to just grab whatever is handy—a paper towel, some Windex—and give your screen a quick wipe. But this is where most people go wrong, and it can be a costly mistake.
| Mistake | Common Household Product Used | Potential Damage |
|---|---|---|
| Using Harsh Chemicals | Window cleaner, all-purpose sprays, bleach | Strips anti-glare/anti-reflective coatings, causes cloudiness or haze, can yellow plastics. |
| Using Abrasive Materials | Paper towels, tissues, old T-shirts | Creates micro-scratches on the screen surface, leaves behind lint and residue. |
| Applying Too Much Pressure | Pressing hard to remove a tough spot | Can permanently damage individual pixels, creating "dead spots" on an LCD or OLED screen. |
| Spraying Directly on the Screen | Any liquid sprayed directly | Liquid can seep into the bezel and damage internal components, causing shorts or corrosion. |
Modern computer screens, especially those with specialized anti-glare coatings, are surprisingly delicate. A gentle, methodical approach is the only way to restore clarity without accidentally shortening your monitor's lifespan.
The Hidden Hygiene Factor
Our workstations have become central to our lives, and with over 25% of the global workforce now settled into remote or hybrid roles, our desks are high-touch zones. Keyboards, mice, and yes, our screens, can become breeding grounds for germs.
In fact, studies have shown that a typical screen can harbor thousands of bacteria. That's a serious concern, especially in shared office spaces or even at home where family members might use the same computer. The screen cleaner market has grown for a reason; learning how to clean a computer screen safely isn't just about tech maintenance, it's about keeping your personal workspace healthier.
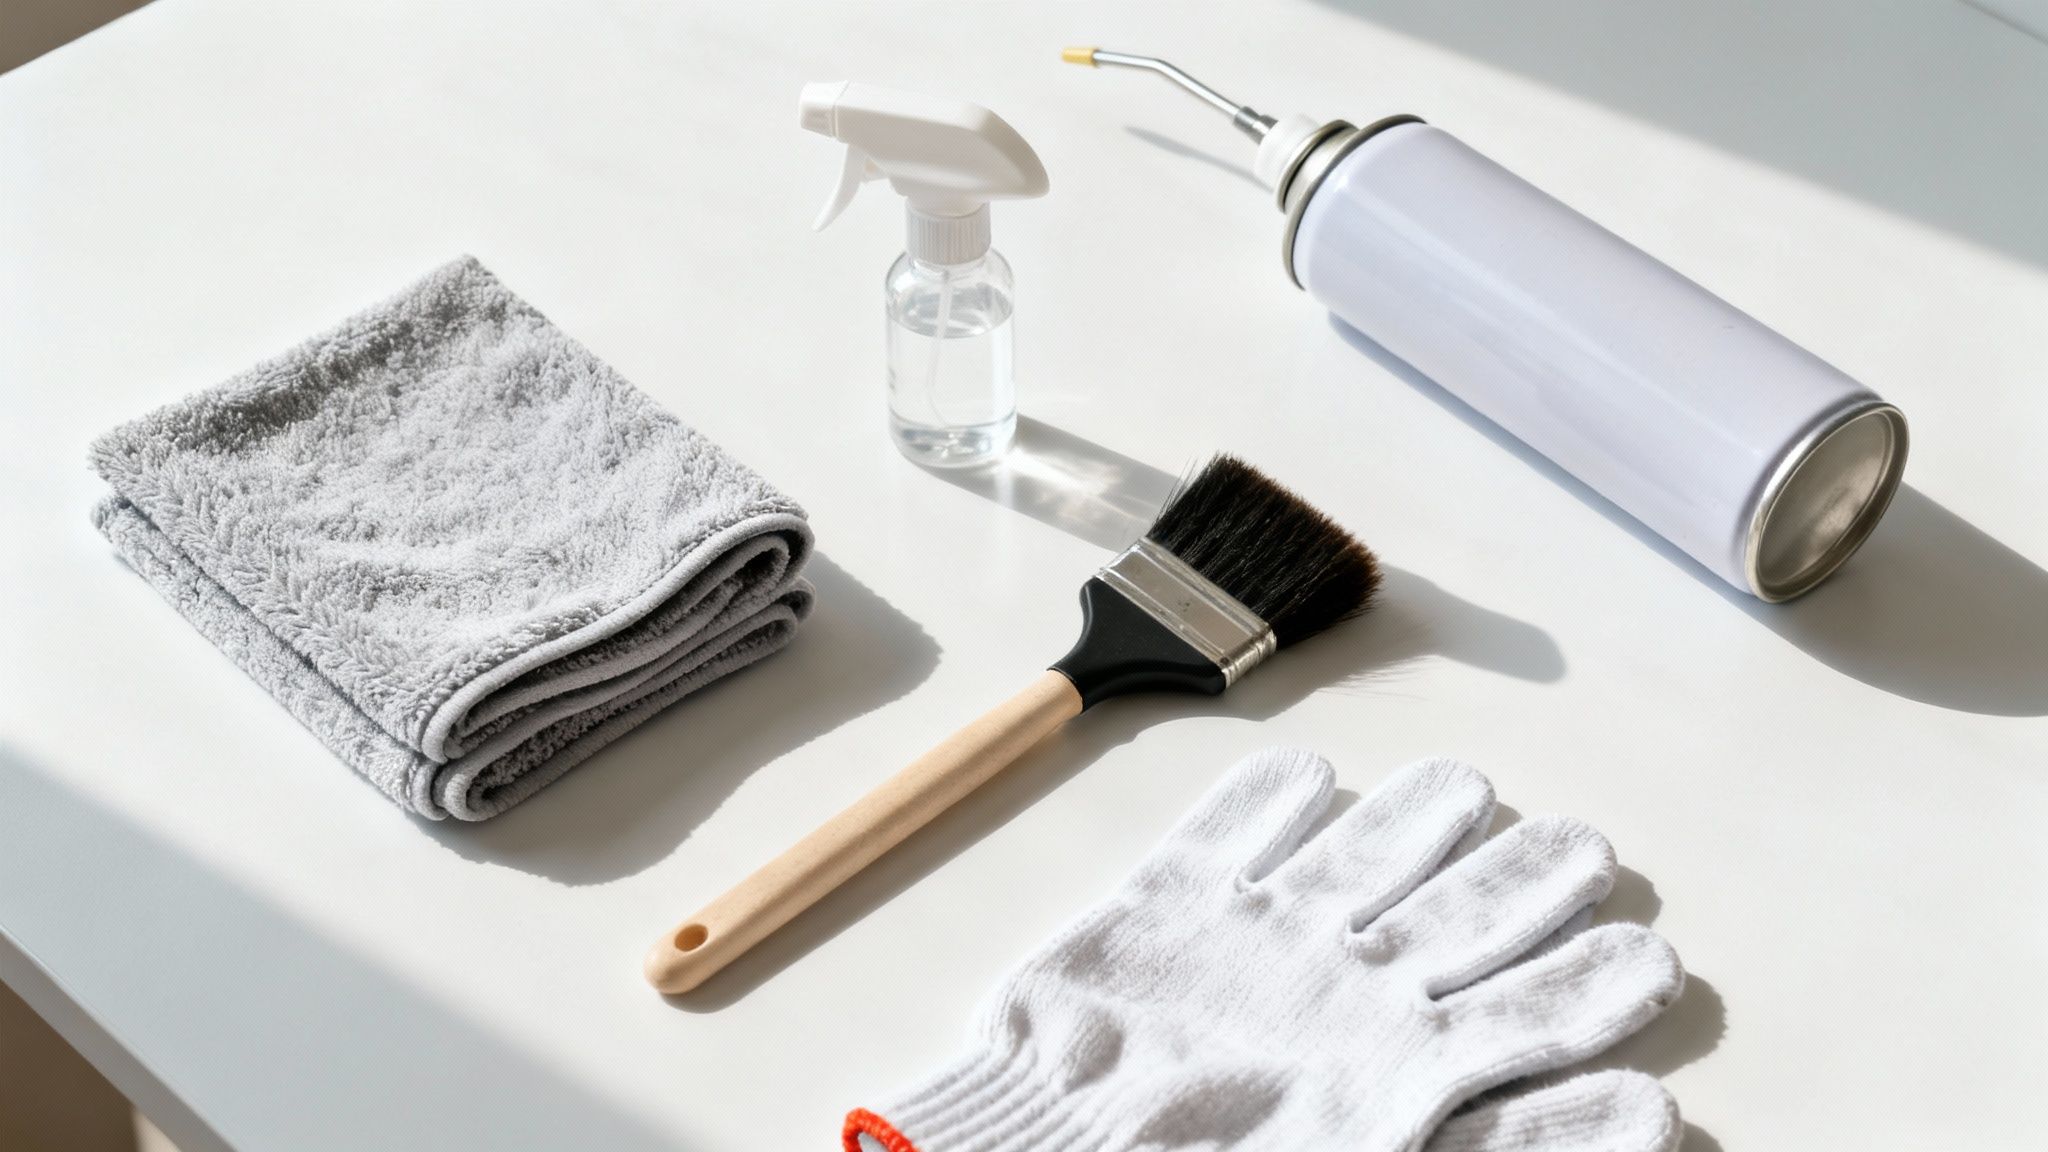
Gathering the Right Tools for a Flawless Finish
Before you even think about touching your screen, getting the right supplies ready is the secret to a perfect, streak-free result. The most critical item in your toolkit isn't some fancy chemical—it's a high-quality microfiber cloth. Honestly, this is the foundation of any safe screen cleaning routine.
Unlike paper towels or that old t-shirt you were about to grab, microfiber cloths are made of thousands of tiny, soft fibers. Paper towels are surprisingly abrasive, and cotton fabrics just push dirt around and leave lint behind. Microfiber, on the other hand, is specifically designed to trap and lift dust, oil, and grime without scratching the delicate surface of your display.
Using the wrong material is one of the fastest ways to cause permanent, tiny scratches. It’s just not worth the risk.
Choosing Your Cleaning Solution
Once you've got the right cloth, the next step is picking a safe cleaning liquid. Not all solutions are created equal, and grabbing a household cleaner off the shelf can be a disaster for modern screens, especially those with sensitive anti-glare coatings.
Here’s a quick rundown of your safest options:
- Distilled Water: For light smudges and dust, a few drops of distilled water on your cloth are often all you need. It has to be distilled, not tap water, because tap water contains minerals that will leave a streaky film behind.
- DIY Solution: For tougher spots, a 50/50 mix of distilled water and white vinegar can work in a pinch. The vinegar is great at cutting through oils, but use it sparingly and I'd only recommend it for glossy, glass-coated screens. It can be too acidic for some modern anti-reflective coatings.
- Professional Screen Cleaner: For the best and safest results, a professionally formulated cleaner is the way to go. These are specifically made to be ammonia-free and alcohol-free, so you know they won’t strip away protective layers or cause discoloration. For a deeper dive, check out our ultimate screen cleaner buying guide to find the perfect match for your gear.
A key takeaway: Never, ever use window cleaners like Windex, all-purpose sprays, or anything with ammonia or isopropyl alcohol. These harsh chemicals are notorious for causing a cloudy, hazy effect that can permanently damage your display.
Essential Extras for a Deeper Clean
To round out your cleaning kit and handle the whole job, a couple of extra tools make a world of difference. They help you tackle the gunk that builds up around the screen, not just on it.
A can of compressed air is perfect for blasting dust out of your monitor's bezels, vents, and ports before you even start wiping.
Also, a soft-bristled brush—like a clean makeup brush or one designed for camera lenses—is fantastic for gently sweeping stubborn particles out of crevices without scratching the plastic frame.
The Step-by-Step Method for a Streak-Free Screen
Alright, you’ve got your supplies. Now it's time to actually get that screen looking factory-fresh. This isn't about brute force or scrubbing; it’s a gentle, methodical process that lifts away grime without hurting your display.
First things first, and this is non-negotiable: safety. Before a cloth even touches the screen, completely shut down your computer. Then, go ahead and unplug the monitor from the wall.
This is critical for a couple of reasons. Working on a dark, powered-off screen makes it a hundred times easier to spot every last speck of dust and fingerprint. More importantly, it completely removes the risk of an electrical short if a rogue drop of moisture sneaks into the monitor’s frame. Give the screen a few minutes to cool down, too—a warm surface makes cleaning solutions evaporate too fast, which is a one-way ticket to a streaky mess.
The Initial Dry Pass
Your first move is always a dry one. The golden rule for cleaning screens safely is 'dry first, damp second.'
Grab a clean, dry microfiber cloth and gently wipe down the screen to get rid of all the loose dust. You'd be surprised, but this often takes care of 60% of the screen haze right off the bat. If you have some canned air, you can give a quick, upright blast to the crevices around the bezel, but for those stubborn fingerprints—which are an issue for 90% of us daily users—you'll need to move on to the next step.
Technique really matters here. Use light, sweeping motions, either going from top to bottom or from one side to the other. Whatever you do, avoid scrubbing in aggressive little circles. That’s how you grind unseen abrasive dust into the panel and create micro-scratches. Think of it more like dusting a priceless antique, not washing your car window.
Tackling Smudges with a Damp Cloth
With the loose debris gone, it's time to deal with the stickier stuff like fingerprints and smudges. This is where your cleaning solution enters the picture, but there's one massive rule you have to follow: never spray liquid directly onto the screen.
Always apply the cleaning solution to your microfiber cloth, not the monitor itself. Spraying the screen lets liquid drip down into the frame, where it can cause irreversible damage to the internal electronics.
Lightly mist a separate, clean section of your microfiber cloth (or a new cloth entirely) with your screen-safe solution. You're aiming for slightly damp, not wet. If the cloth is dripping, you've used way too much. If you're using a dedicated kit like the EVEO Screen Cleaner, just a couple of spritzes onto its cloth are more than enough.
Now, gently wipe the screen with the dampened cloth using those same consistent, linear motions. Start at the top and work your way down in slightly overlapping passes. You only need light, even pressure to lift oils and smudges. If you hit a really stubborn spot, you can make a second pass, but fight the urge to press harder. Let the solution do the work.
Perfecting the Final Finish
After the damp wipe, the last step is all about buffing the screen dry for that perfect, streak-free finish. Grab a third, completely dry part of your microfiber cloth (or a fresh, dry cloth) and go over the entire screen one last time.
This final pass picks up any faint moisture residue before it has a chance to evaporate and leave streaks behind.
- Check Your Work: Step back and look at the screen from a few different angles with a light source nearby. This is the best way to spot any faint streaks you might have missed.
- Final Buff: See a streak? No problem. A few more gentle passes with the dry cloth should make it disappear.
- Bezel and Stand: Don't forget to give the monitor's frame and stand a quick wipe-down. A sparkling screen on a dusty frame just looks unfinished.
By sticking to this dry-then-damp method, you're not just cleaning your screen—you're protecting your investment and bringing back that crisp, clear picture. It's a simple routine that delivers professional results every single time.
Cleaning Different Screen Types and Setups
You wouldn't use the same cleaner on a glass window as you would on a pair of prescription glasses, right? The same logic applies to computer screens. Not all displays are made the same, and what works for an old glossy monitor could be a disaster for a brand-new matte or anti-reflective screen. Knowing what you're working with is the first step to a safe, streak-free clean.
Glossy screens, like the ones on iMacs or many gaming monitors, are essentially fronted with glass. They're tougher and can handle a bit more, but they attract fingerprints and glare like magnets. Matte screens are the opposite. They have a special anti-reflective coating that diffuses light beautifully, but this layer is incredibly delicate.
Spray the wrong chemical on a matte screen—anything with ammonia or harsh solvents—and you can permanently etch or strip that coating. You'll be left with a cloudy, damaged patch that’s impossible to fix. For these sensitive displays, a simple spritz of distilled water on your cloth is always the safest route.
Handling Modern Displays and Coatings
Today's high-end displays, especially OLED and premium LED panels, need a little extra TLC. They often feature sophisticated coatings to boost color and cut down on reflections, but these layers are easily damaged.
- OLED Screens: Known for those deep, inky blacks and vibrant colors, OLED panels are often more sensitive to physical pressure. Use an extremely light touch to avoid damaging the organic compounds that light up to create the image.
- LCD and LED Screens: Generally quite durable, the main thing to watch out for is the outer layer. If it has a matte finish, treat it gently to protect those all-important anti-glare properties.
- Anti-Reflective Coatings: The golden rule here is simple: less is more. Steer clear of any cleaner containing alcohol, ammonia, or other aggressive chemicals. A microfiber cloth lightly dampened with pure, distilled water is the industry standard for keeping these surfaces pristine.
This handy decision tree shows the basic thought process: start with a dry wipe for dust, and only move to a damp wipe for more stubborn smudges.
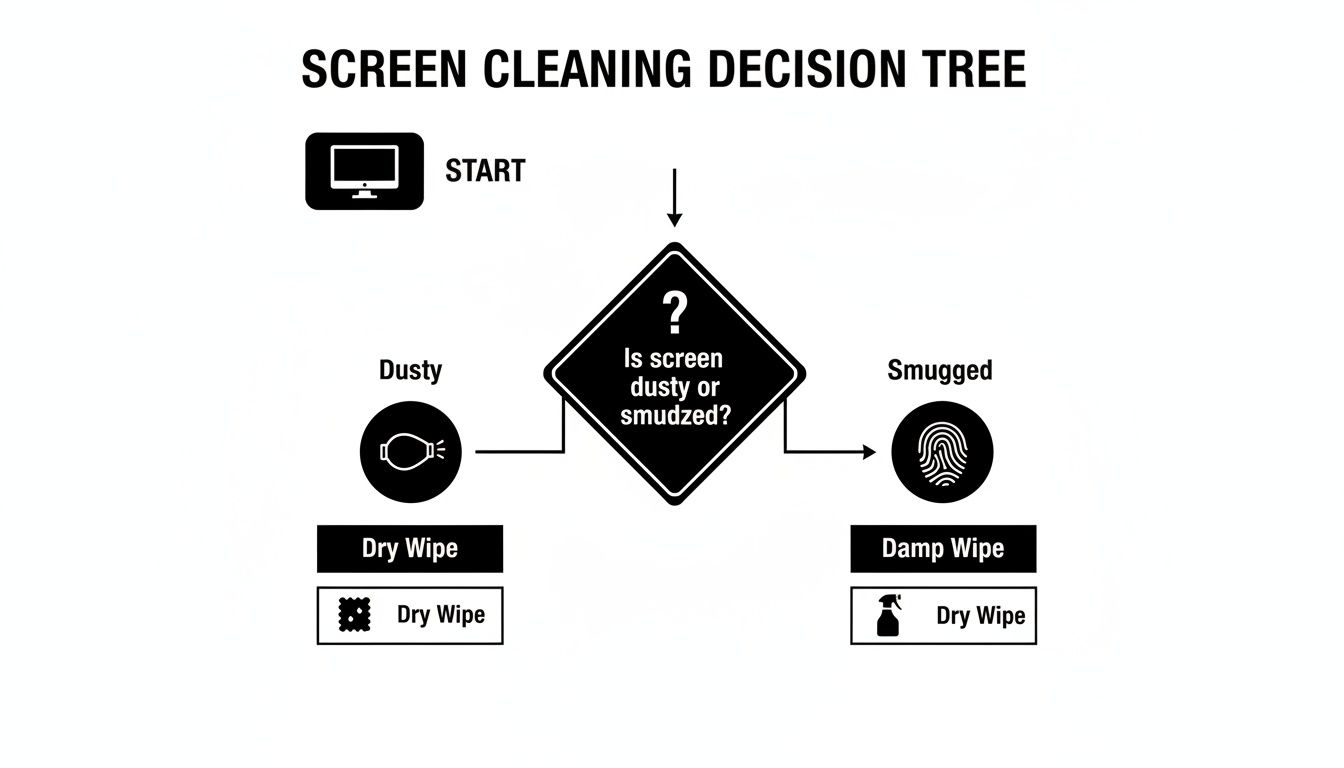
The key takeaway? Always start with the gentlest method possible before you bring any moisture into the equation.
Strategies for Complex Desk Setups
Cleaning a single monitor is straightforward enough. But what about those sprawling multi-monitor battle stations or massive ultrawide displays? The sheer surface area can be a challenge, not to mention curved or mounted screens that are awkward to reach. If your setup is more mobile, our guide on how to clean your laptop screen has you covered.
With the boom in remote work, ultrawide monitor sales have jumped by 50%. Keeping a 34-inch (or larger!) display perfectly clean requires a bit of strategy. Don't try to wipe the whole thing down in one go—you’re just asking for streaks. Instead, work in smaller, manageable sections. Clean the left side, then the middle, then the right, using a fresh part of your cloth for each zone to avoid dragging grime around.
Interestingly, 65% of users now prefer eco-friendly cleaning formulas, which lines up perfectly with the "less is more" approach of using simple, non-toxic solutions.
For mounted or curved monitors, your best tool is patience. Grab a step stool if you can't comfortably reach the top. Follow the natural curve of the screen with your cloth to maintain even, light pressure across the entire surface. Don't stretch or apply pressure at an awkward angle.
Essential Do's and Don'ts of Screen Maintenance
Knowing how to clean a computer screen is only half the battle. The other half is remembering what not to do. It’s easy to grab the wrong cloth or cleaner in a hurry and accidentally cause permanent damage.
To make it simple, we've broken down the most critical rules to follow. Think of this as your final checklist before you start wiping—a quick reminder that will protect your investment and ensure you get that perfect, streak-free shine every time.
Screen Cleaning Quick Reference Guide
To make things even clearer, here's a quick side-by-side look at the right way versus the common mistakes that can ruin your display.
| Do ✅ | Don't ❌ |
|---|---|
| Power down and unplug your monitor first. This is safer for the electronics and makes it easier to spot dust on a dark screen. | Never spray a screen that's powered on. You risk electrical shorts and can miss smudges that are invisible on a lit display. |
| Use a high-quality microfiber cloth. The fine fibers are designed to lift grease and trap dust without scratching the delicate surface. | Avoid paper towels, tissues, or old rags. They're abrasive and can leave behind lint and permanent micro-scratches. |
| Start with a dry wipe. Gently brush away loose dust first so you aren't grinding it into the screen when you add moisture. | Don't skip the dry wipe. Pushing around dust with a damp cloth is like cleaning with fine-grit sandpaper. |
| Spray the solution onto the cloth, not the screen. This gives you complete control over the amount of liquid and prevents it from dripping into the monitor's internal parts. | Never spray liquid directly onto the screen. It can easily seep behind the bezel and cause irreversible damage to the electronics. |
| Use distilled water or a dedicated screen cleaner. These are free of minerals and harsh chemicals that can damage coatings and leave residue. A 50/50 mix of distilled water and 70% isopropyl alcohol is also a safe DIY option. | Never use household cleaners like Windex, bleach, or anything with ammonia. These chemicals will strip away anti-glare coatings and leave your screen permanently hazy or cloudy. |
| Wipe gently in smooth, even motions. Let the cloth and the cleaning solution do the heavy lifting for you. | Don't apply heavy pressure to scrub off stubborn spots. You can permanently damage the pixels underneath, creating dead spots on your display. |
Following these simple rules is the key to keeping your monitor looking brand new for years. It's all about using the right tools and the right techniques.
The Non-Negotiables: Your Checklist for Success
These are the core practices you should always follow. Sticking to them will keep your monitor in pristine condition.
- Power Down Completely: Always turn off and unplug your monitor. A dark screen makes it way easier to see every last speck of dust and grime. Plus, it’s just safer.
- Trust in Microfiber: A clean, high-quality microfiber cloth is your best friend here. Its tiny fibers are specifically designed to trap dust and lift oils without a hint of scratching.
- Start Dry, Always: Your first pass should always be with a dry cloth to gently lift any loose dust. This prevents you from grinding abrasive particles into the screen when you follow up with a damp cloth.
- Cloth First, Not the Screen: Lightly mist your cleaning solution onto the cloth—never directly onto the monitor. This gives you total control and stops liquid from finding its way into the bezel and damaging the electronics inside.
Here's a pro-tip from my own routine: Designate a few specific cloths for cleaning. I use one for the initial dry wipe, a second for the damp cleaning, and a fresh one for the final buff. It’s a simple system that prevents cross-contamination and guarantees a flawless finish.
The Danger Zone: Common Mistakes to Avoid
Avoiding these destructive habits is just as critical as knowing what to do. A single mistake with the wrong chemical or material can cause damage that you can't undo.
- No Household Cleaners: Step away from the Windex. Never, ever use ammonia-based sprays, bleach, or all-purpose cleaners. Their harsh chemicals will strip away the anti-glare coatings on modern screens, leaving a permanent hazy or cloudy mess.
- Put Down the Paper Towels: Paper towels and tissues might feel soft, but they're made from wood pulp and are surprisingly abrasive. They will create a web of micro-scratches on your screen and leave a trail of lint behind.
- Don't Press So Hard: Let the cleaning solution and microfiber do the work for you. Pushing down hard to remove a stubborn smudge can damage the delicate pixels underneath, leading to those dreaded dead spots on your screen.
- Avoid Tap Water: It might seem harmless, but the minerals in your tap water will leave behind a streaky, white residue once the water evaporates. Always use distilled water to get a truly clean and clear result.
Answering Your Top Screen Cleaning Questions
Even with the right tools, you might still have a few questions. That's perfectly normal. Getting straight answers to these common concerns is the final step to cleaning your screens with total confidence, knowing you're protecting your gear for the long haul.
Let's clear up some of the most frequent questions I hear.
How Often Should I Clean My Computer Screen?
Honestly, there's no single magic number. It really comes down to your environment and how much you use your computer.
Think of it this way:
- For light dust: A quick, dry wipe with a microfiber cloth every 2-3 days is perfect. This is just basic maintenance to keep dust from settling in.
- For smudges and fingerprints: You'll want to do a more thorough damp cleaning about once a week. This tackles the grime and oils that a dry cloth just pushes around.
- For creative pros: If you're a photographer, designer, or video editor who depends on perfect color, you'll probably want to give your screen a quick wipe-down daily. You can't afford to have a smudge throwing off your work.
My personal rule is pretty simple: if a fingerprint or smudge is distracting me while I'm trying to work, it's time for a 30-second clean. Don't let it build up.
Is It Okay to Use Regular Tap Water?
It’s tempting, I know. But you should avoid tap water entirely.
The problem is that tap water is full of minerals like calcium and magnesium. While they're fine to drink, they leave behind a streaky, chalky white residue once the water evaporates on your screen. You'll end up with a bigger mess than you started with.
Always reach for distilled water. It has all those minerals removed, meaning it will evaporate cleanly and leave nothing behind. It guarantees a truly streak-free finish, making it the only water you should use on any electronic display.
What Should I Do If I Spill Something on My Monitor?
First, don't panic. Accidents happen. The most important thing is to act fast.
- Kill the Power Immediately. This is non-negotiable. Unplug the monitor from the wall outlet right away to prevent any electrical shorts.
- Blot, Don't Wipe. Grab a dry, absorbent microfiber cloth and gently blot the liquid. Wiping can push the liquid further into the seams. Pay close attention to the bottom bezel and base, where liquid loves to pool and seep inside.
- Give It Time to Air Dry. This requires patience. Do not plug it back in or turn it on. Place the monitor in a dry, well-ventilated spot for at least 48 hours to give any internal moisture a chance to evaporate completely.
Are Alcohol Wipes Safe for My Screen?
For almost every modern screen, the answer is a hard no. Those standard disinfectant or alcohol wipes you have around the house are way too harsh.
The chemicals in them can strip away the delicate anti-glare and anti-reflective coatings on your screen. This causes permanent damage that looks like a cloudy, hazy mess. It's a surefire way to ruin an expensive monitor. Always stick to cleaners made specifically for electronics.
For a clean you can trust every single time, the EVEO Screen Cleaner is the answer. Our formula is engineered to be completely streak-free and safe for all your screens, while our premium microfiber cloth delivers that flawless, like-new finish. Keep your workspace pristine and your view crystal clear. Visit https://eveo.store to get your kit today.
How to clean monitor screen: Remove streaks without damage
How to Clean a Monitor Screen Safely and Avoid Damage