
If you're still using the clunky stands that came with your monitors, you're missing out. A dual monitor arm is one of the most transformative upgrades you can make to your workspace, letting you position two screens at the perfect height and angle for all-day comfort and peak efficiency. They don't just replace the stock stands—they free up a massive amount of desk space and give your setup a clean, professional look.
Why Dual Monitor Arms Are a Workspace Game Changer
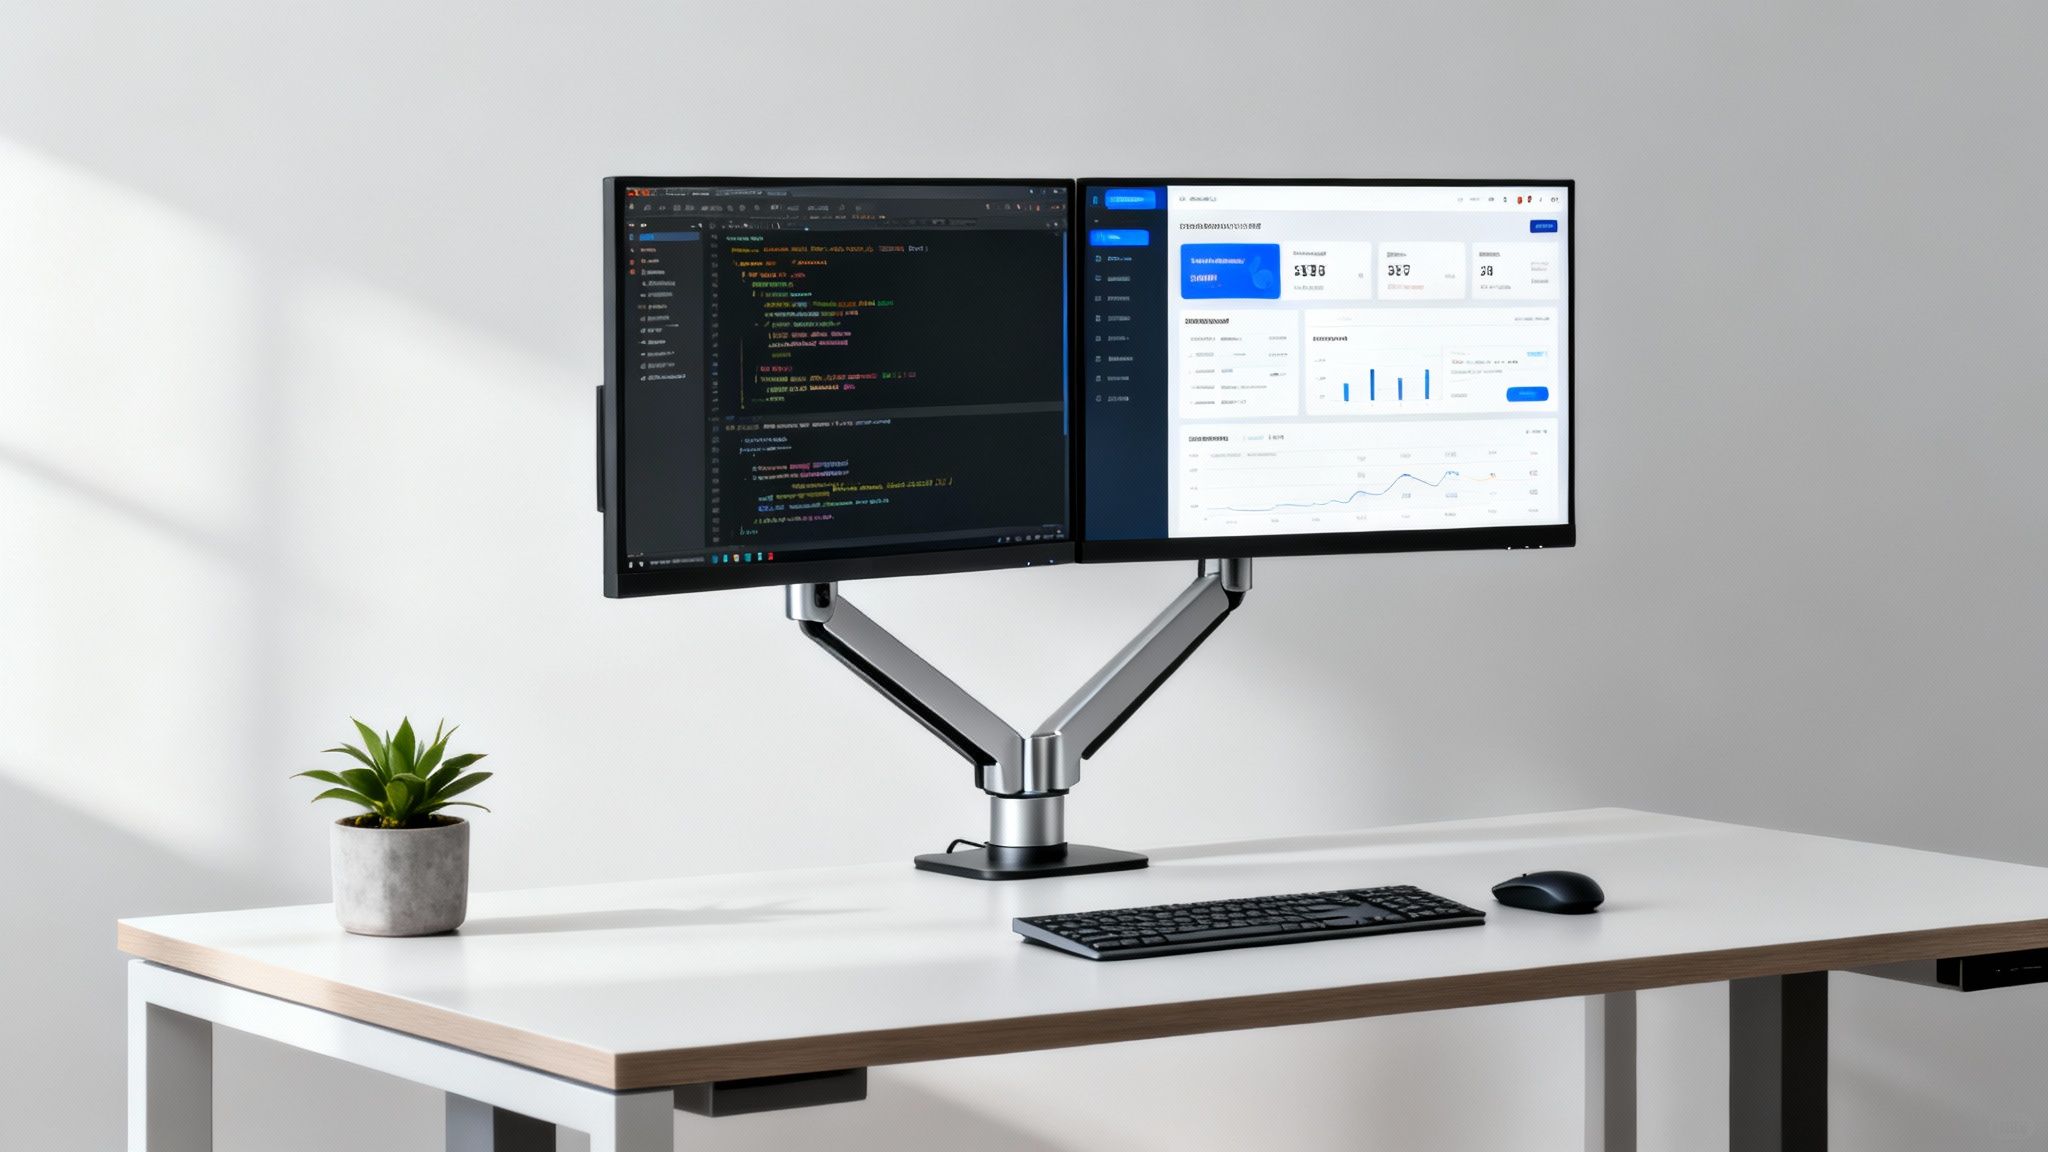
Let’s be real: a desk cluttered with two monitors on their original, mismatched stands is a productivity nightmare. Those stands are bulky, rarely adjustable, and eat up way more surface area than you’d think. This forces you into awkward postures, craning your neck or constantly shifting just to get a clear view of both screens.
Dual monitor arms solve all of this in one fell swoop.
By lifting your monitors completely off the desk, you instantly get that prime real estate back. Suddenly, you have a clear, open space for your keyboard, notebooks, and other essentials without feeling boxed in. This creates a cleaner, more focused environment that helps cut down on mental clutter.
Unlocking Ergonomic Freedom
The biggest win here is the ergonomic freedom you gain. A quality dual monitor arm gives you precise, independent control over the height, depth, and angle of each screen. This isn’t just a minor perk; it's a critical adjustment for your long-term health and comfort.
You can finally align the tops of your screens with your eye level—the gold standard for reducing neck and shoulder strain. No more slouching or propping monitors up with a stack of books. You can position them side-by-side for a seamless, panoramic view that minimizes eye fatigue. For anyone with a standing desk, this level of dynamic adjustability is an absolute must-have.
A well-adjusted ergonomic setup isn't a luxury—it's a necessity for preventing chronic pain. Correctly positioning your monitors reduces the physical stress that builds up over an eight-hour workday, leading to fewer headaches and less muscle soreness.
Boosting Your Daily Productivity
The efficiency boost from using dual monitor arms is something you'll feel right away. Think about a developer keeping code on one screen while watching the live output on the other, cutting out the constant alt-tabbing that kills concentration. Or a marketer analyzing campaign data on one monitor while building a presentation on the second, making their entire workflow smoother.
This isn't just a feeling; the numbers back it up.
- Research shows that users with two monitors can see a 42% increase in productivity compared to their single-screen colleagues.
- In demanding fields like IT and design, a dual setup has been found to cut cognitive load by 20%, paving the way for deeper focus.
- It's no surprise that since 2020, an estimated 70% of knowledge workers have switched to a multi-screen configuration.
You can dive deeper into these trends and their market impact in this detailed report on monitor arms.
A dual monitor arm setup turns your desk from a rigid surface into a fluid, adaptable environment. It’s a simple tool that reframes how you work, making your day more comfortable, efficient, and professional.
How to Choose the Right Dual Monitor Arm
Picking out the perfect dual monitor arm is hands-down the most important step in upgrading your workspace. It's easy to get bogged down in the specs, but if you lock in on three key things—weight capacity, VESA compatibility, and mounting style—you’ll nail the choice. Getting this right from the start saves you a world of frustration from sagging screens or a wobbly setup.
This isn’t just about making your desk look cool; it’s about building a rock-solid, ergonomic foundation for your daily grind. The health benefits are huge. In fact, OSHA data shows that putting your monitors in the right spot can slash neck strain by a whopping 50% and cut down on eye fatigue by 30%. With more professionals than ever using two screens, those are improvements you can't ignore. You can even see this trend reflected in the latest computer monitor arm market report.
Verify Your Monitor Weight and VESA Pattern
Before you even start looking at arms, you need two pieces of info from your monitors: their weight (without the stand attached) and their VESA pattern. Most arm manufacturers list a weight capacity per arm, and you absolutely cannot exceed this. An overweight monitor will make the arm droop, sag, or just give up entirely.
Next up is the VESA pattern. This is just the standard four-hole mounting setup you'll find on the back of most modern monitors. To find yours, just turn your screen around. You should see four screw holes arranged in a square.
- 75x75mm Pattern: The screw holes are 75 millimeters apart from each other.
- 100x100mm Pattern: The holes are 100 millimeters apart.
These two are by far the most common sizes for desktop monitors. If you don't see any holes, don't sweat it. Your monitor isn't directly compatible, but you can usually find a third-party VESA adapter made just for your model.
Choose Your Mounting Style Desk Clamp vs Grommet
How the arm connects to your desk is just as important as how it holds your screens. The two main ways are a desk clamp and a grommet mount. Your decision here really comes down to your desk’s design and whether you prefer a super clean look.
A desk clamp is a simple C-shaped bracket that you tighten onto the edge of your desk. It’s incredibly flexible, a breeze to install, and doesn't require drilling any holes in your furniture. This makes it the go-to for renters or anyone who likes to change up their setup now and then. The only catch is that you need a flat, clear edge for it to grip onto—desks with beveled edges or thick support lips underneath can be a problem.
On the other hand, a grommet mount gives you a much sleeker, more "built-in" look. It works by passing a bolt through a hole in your desk and securing it from below. A lot of office desks already have pre-drilled holes for cable management that are perfect for this. If yours doesn't, you'll have to drill one yourself, which obviously makes it a more permanent choice.
Deciding between the two can be tricky, so here’s a quick breakdown to help you choose.
Clamp Mount vs Grommet Mount Which Is Right for You?
| Feature | Desk Clamp Mount | Grommet Mount |
|---|---|---|
| Installation | Quick and easy; no tools needed | Requires a hole in the desk (or drilling one) |
| Desk Damage | None; completely reversible | Permanent (if you drill a new hole) |
| Aesthetics | Visible clamp on the desk edge | Minimalist and clean; almost invisible |
| Best For | Renters, glass tops, frequent movers | Desks with pre-drilled holes, permanent setups |
| Positioning | Limited to the desk edge | More flexible placement on the desk surface |
Ultimately, for solid wood or thick particleboard desks without any weird lips or obstructions, a clamp is a secure and simple choice. If your desk already has a cable hole and you want that super clean, minimalist vibe, the grommet mount is the way to go.
Consider Articulation and Adjustability
Not all monitor arms move the same way. The type of "articulation" they have dictates how easily you can shift your screens around.
-
Gas-Spring Arms: These are the gold standard for smooth, fluid motion. They use a pressurized cylinder that perfectly counterbalances your monitor's weight, letting you adjust the height and depth with a featherlight touch. They're an absolute must-have for sit-stand desks where you're constantly changing positions.
-
Mechanical Spring Arms: These are very similar to gas springs and offer easy adjustment, but they use a traditional coiled spring instead. They're incredibly durable and reliable, striking a great balance between top-tier performance and price.
-
Manual Adjustment Arms: These are a more basic style, where you typically have to loosen a collar or a screw on a central pole to change the height. While they're not great for frequent adjustments, they are extremely stable and very friendly on the wallet.
Let your workflow be your guide here. If you collaborate a lot and find yourself swinging a screen around to show a colleague, a gas-spring arm is worth every penny. But if you're more of a "set it and forget it" person, a manual arm will give you all the stability you need without the extra cost. To see how these different features come together in some of the top products out there, check out our guide on the best monitor arms for dual monitors.
A Frustration-Free Installation Guide
Getting your new dual monitor arms out of the box should be exciting, not intimidating. But let's be honest, those instruction manuals with their tiny diagrams and vague steps don't always inspire confidence. We're going to walk through this the practical way—with real-world advice that gets you set up without the usual headaches.
The goal isn't just to bolt some parts together. It's about doing it smartly and safely. By breaking it down into logical phases, from prepping your space to mounting the screens, we’ll cover the tips that official guides often miss. A little prep work makes all the difference.
This visual guide neatly summarizes the key decisions we talked about earlier. It shows how VESA patterns, weight limits, and your choice of mount all lead to the perfect arm for your setup.
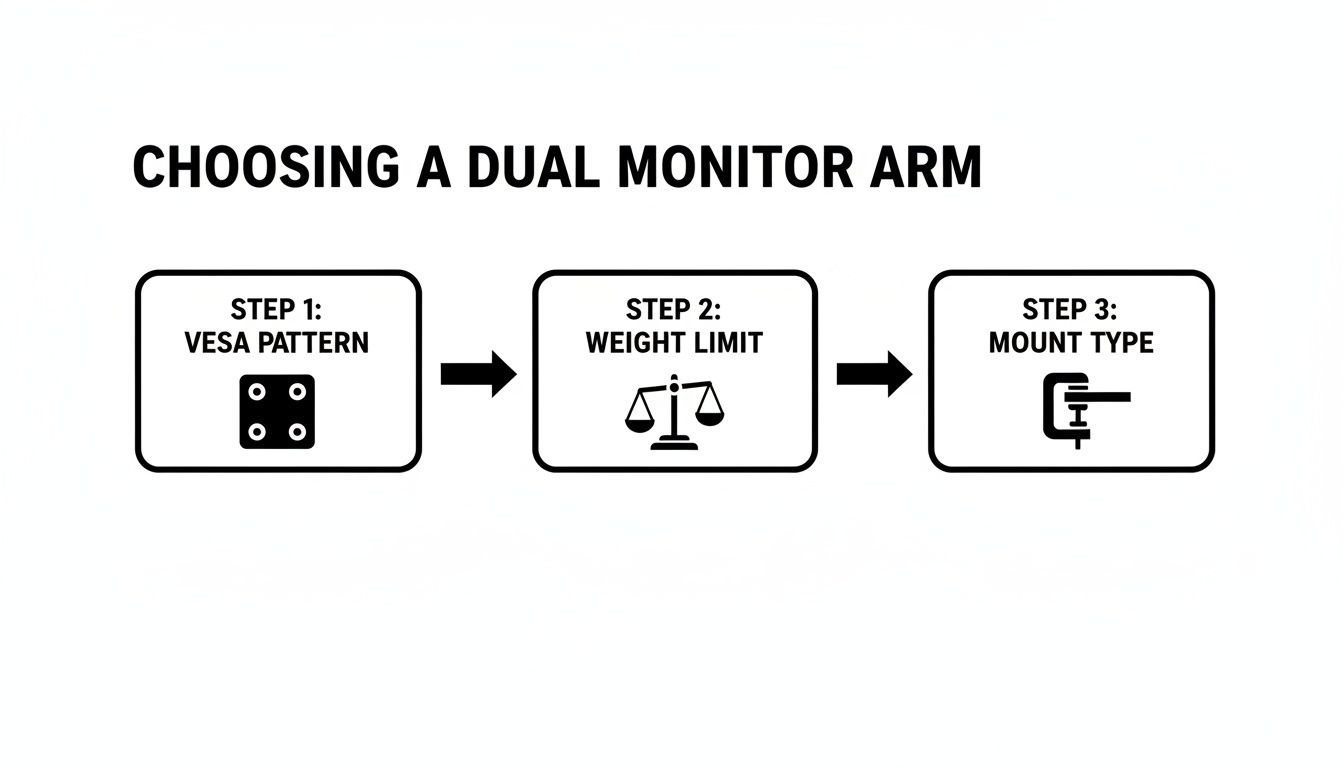
Seeing it laid out like this reinforces one simple truth: a successful installation starts way before you open the box. It begins with choosing an arm that’s a perfect match for your monitors and desk.
Preparing Your Workspace and Tools
First things first: clear your desk completely. You need room to maneuver without worrying about knocking over a coffee mug or scratching a screen. I always recommend laying down a soft towel or the foam packaging from the box; it creates a safe, scratch-free zone for your monitors when you lay them face-down.
Next, get your tools in order. Most kits include the basic Allen keys and a small wrench, but having a couple of your own tools on hand can be a real lifesaver.
- A Phillips head screwdriver: You'll almost certainly need this for attaching the VESA plates to your monitors.
- A tape measure: Perfect for finding the dead center of your desk and making sure everything looks symmetrical.
- A level (optional but handy): A small bubble level or even a level app on your phone helps get the arms perfectly horizontal.
Before you attach a single screw, do a quick "dry fit." Hold the clamp or grommet base right where you plan to install it. Is it going to block a drawer? Is there a hidden support beam underneath that’ll get in the way? Figuring this out now saves you from having to take everything apart later.
Pro Tip: Don't toss your original monitor stands in the trash. Bag them up and store them somewhere safe. If you ever change your setup or decide to sell the monitors, you’ll be glad you kept them.
Mounting the Base Securely
Whether you're using a clamp or a grommet, this base is the foundation for your entire setup—it needs to be rock-solid. If your desk is made of a softer wood like pine or particleboard, the clamp’s pressure can leave dents over time. An easy fix is to slip a thin piece of metal or a small wood block between the clamp and the desk to distribute the force.
For a desk clamp, tighten it until it feels firm, but resist the urge to overtighten. You want it snug enough that it doesn’t wobble at all, not so tight that you risk cracking your desk. Give the pole a good shake to test its stability before moving on.
If you opted for a grommet mount, this is your ticket to an ultra-clean look. Once the bolt is through the desk hole and the arm base is in position, tighten the nut from underneath until it's secure. The goal is to have the arm base sit perfectly flush against your desktop with zero gaps.
The Smart Way to Attach Your Monitors
This is the step where most people run into trouble—trying to awkwardly lift a heavy monitor while lining up tiny screws with the arm. There’s a much easier, back-saving method.
Attach the VESA plates to your monitors first.
Lay each monitor face-down on the soft surface you prepared earlier. Remove the old stand (usually just a few screws), and you'll see the four VESA screw holes. Now, just screw the VESA mounting plates from your kit securely onto the back of each monitor. If you want to get into the nitty-gritty, you can learn more about the desk mount VESA standard and why it’s so critical for a secure fit.
With the plates attached, the final part is a breeze. Most modern arms use a quick-release or slide-and-lock system. All you have to do is lift the monitor, hook the plate onto the end of the arm, and secure it with a locking screw or lever. It turns what could be a clumsy, two-person job into a simple, one-person task. It's safer for you, safer for your gear, and the final step in a truly frustration-free installation.
Achieving Perfect Ergonomic Screen Placement
Getting your dual monitor arms installed is a big win, but the real magic starts now. This is where we dial in the placement and turn your desk from just functional to genuinely comfortable. The goal is to eliminate that dreaded "tech neck" and eye strain that can completely derail a productive day.
Proper ergonomics isn't just a buzzword; it's the key to a healthy and efficient workspace. The core idea is simple: your body shouldn't have to adapt to your technology—your tech should adapt to you. That’s the freedom a good monitor arm gives you. No more hunching over, craning your neck, or squinting. With a few quick tweaks, you can create a setup that feels supportive for hours on end.
The Foundation of Good Posture
Let's start with the most critical adjustment: screen height. Your goal is to position the monitors so your relaxed, natural gaze falls on the top third of the screen. The easiest way to nail this is the eye-level rule.
Sit comfortably in your chair, back straight, and look forward. The top edge of your monitors should be right at or just below your eye level. This simple alignment keeps your neck in a neutral position, which dramatically cuts down on the strain that leads to soreness and headaches. If you catch yourself tilting your head up or down, it's a sign your screens are off.
Next up is viewing distance. For this, we use the arm's length test. While sitting in your normal working position, reach your arm straight out. Your fingertips should just about touch your main monitor. This distance, usually between 20 and 40 inches, is the sweet spot for minimizing eye fatigue without making you lean in to read text.
Creating a Seamless Viewing Arc
With height and distance set, it's time to angle your monitors inward to create a gentle, immersive curve. This isn't just for looks; it keeps the viewing distance consistent as your eyes move from one screen to the other.
A great starting point is a 15-degree angle for each monitor, but feel free to adjust it to what feels right for you. The bezels of the two monitors should almost touch, creating a nearly seamless panoramic view. This "cockpit" setup reduces how much you have to twist your neck and helps your brain process everything more naturally. You should be able to see both screens with just a slight turn of your head, not your entire body.
Your setup should feel like an extension of your natural field of view. By angling the monitors, you create a viewing arc that matches how your eyes naturally scan, which reduces both physical and cognitive load throughout the day.
The recent explosion in remote work has really put a spotlight on these ergonomic principles. As home office desks get smaller, dual monitor arms have become essential for saving space and improving well-being. According to the Bureau of Labor Statistics, ergonomic setups can lead to a 20-40% drop in workplace injuries—a pretty clear sign that these adjustments pay off. You can dive deeper into this trend by exploring the latest research on the monitor arms market.
Fine-Tuning the Arm Tension
Now for the most overlooked step: adjusting the tension. This is what gives your setup that "weightless" feel, allowing you to move your screens around with just a light touch.
If your monitors are sagging or won't stay put, the tension is too loose. If they’re a pain to push down, it’s too tight. Most gas-spring arms have an adjustment screw, often marked with "+" and "-" symbols. Use the included Allen key and make small, incremental turns until each monitor holds its position perfectly.
Properly tensioned arms make switching from sitting to standing effortless, as your monitors just float right along with you. This is the dynamic adjustability that really sets a premium setup apart, turning your arms from simple holders into active tools for your health.
Mastering Cable Management for a Clean Desk
You can have the most ergonomic, perfectly positioned dual monitor setup, but a nest of chaotic wires will ruin the entire effect. A visible tangle of power cords, display cables, and peripheral wires creates instant visual noise, undermining the clean, spacious desk you were aiming for.
Getting this right is the final, crucial step that elevates a good setup into a great one. The goal isn't just to hide wires, but to create a system that looks professional and works for you—letting you unplug a laptop or swap a device without starting a cable avalanche.
Start with the Built-In Channels
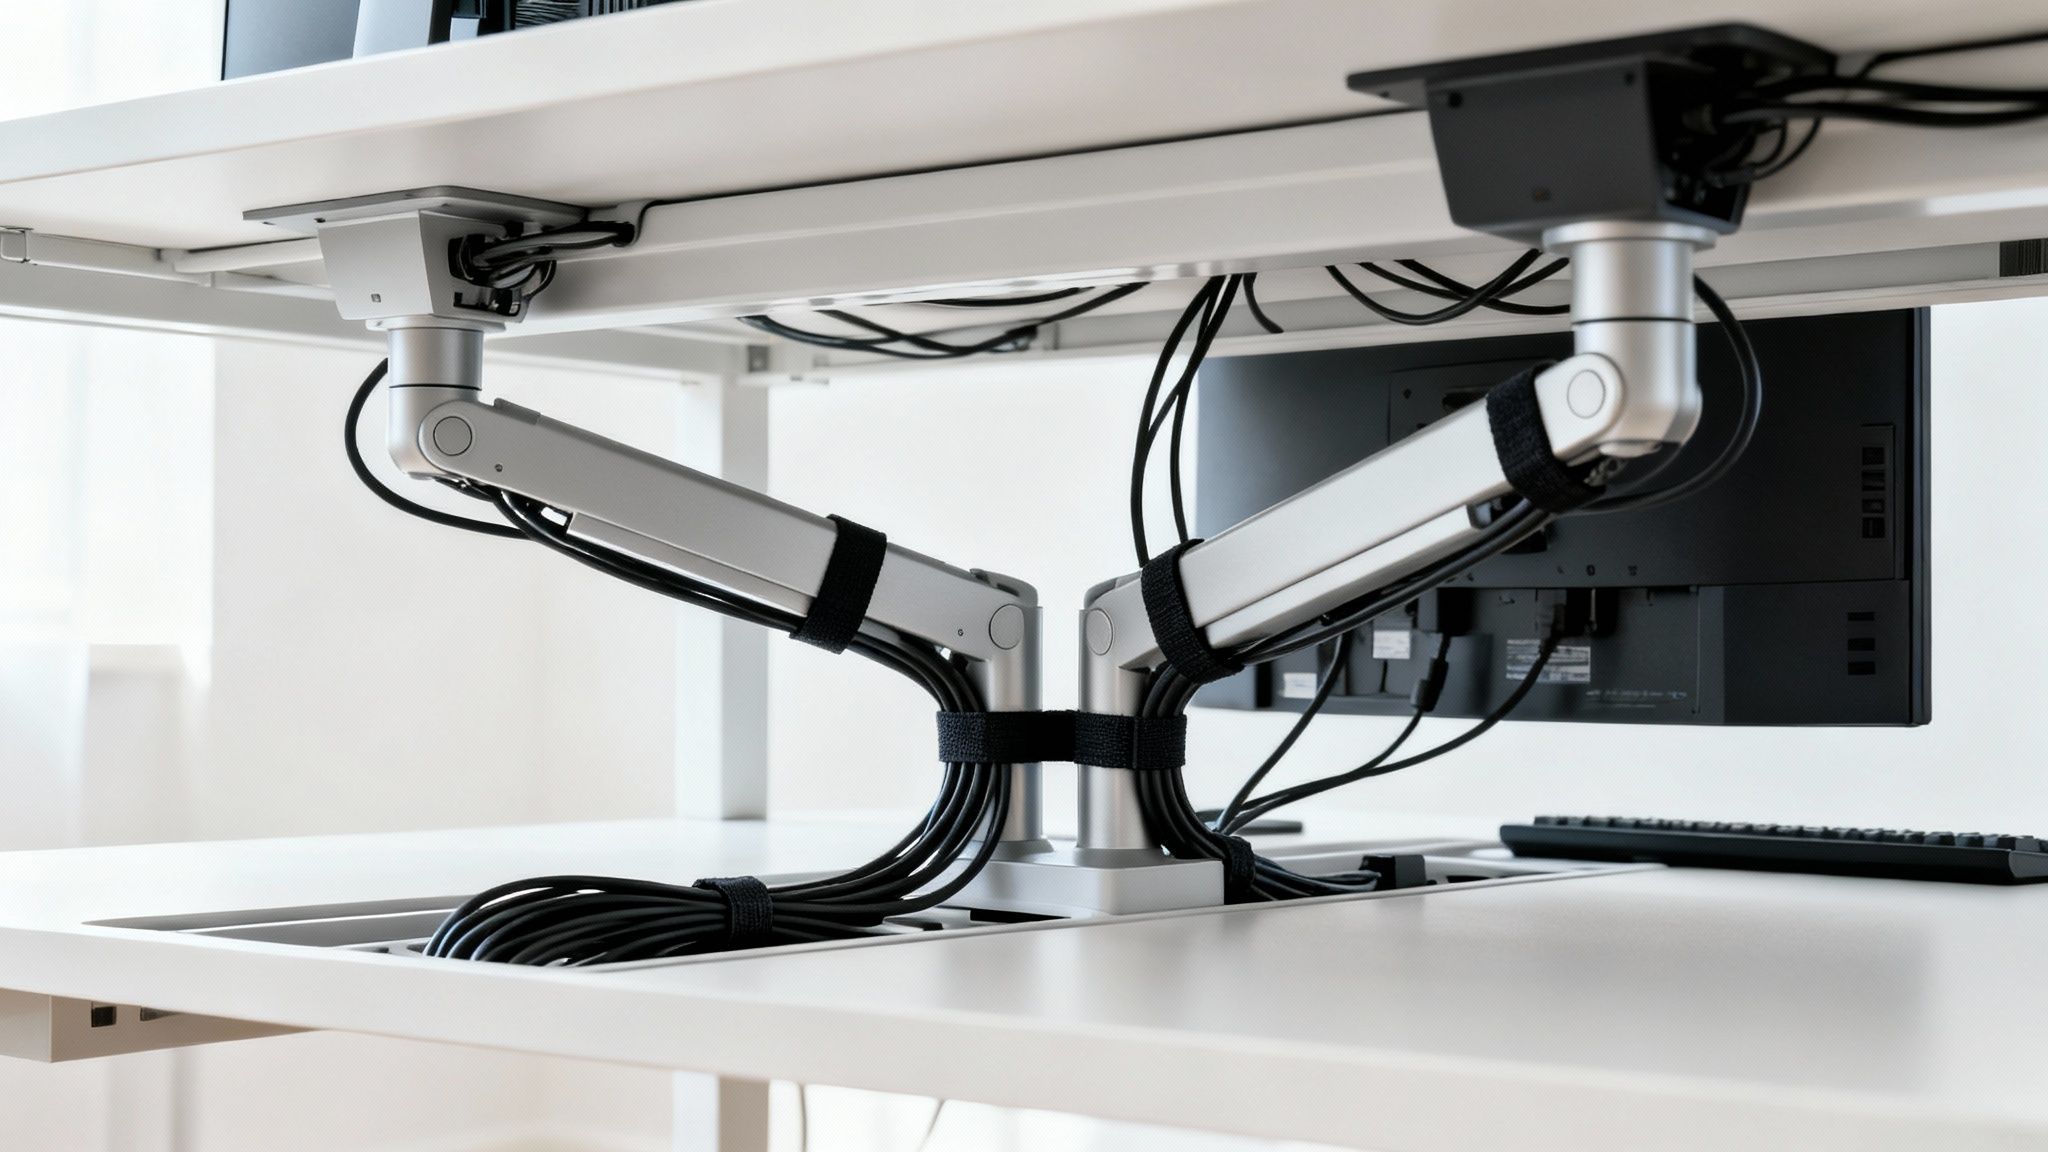
Almost every modern dual monitor arm comes with some form of built-in cable management. These are usually simple plastic covers that snap onto the arms, creating a hidden channel to run your monitor's power and display cables. Don't skip this step. It's your first and best line of defense against desk clutter.
A quick pro tip: as you route your cables, be sure to leave a little extra slack near the joints and pivot points of each arm. This prevents the cables from pulling tight or getting unplugged when you move your screens. A cable that's too tight can restrict movement and even damage the ports on your monitor over time.
Elevate Your Setup with Smart Accessories
While the arm's channels hide cables on the way up, they don't solve the problem of getting those cables down to your PC or power strip. To achieve that truly seamless look, you just need a few simple accessories.
- Velcro Cable Ties: Forget about annoying plastic zip ties that you have to cut off. Reusable velcro ties are a game-changer for bundling cables together cleanly. Use them to group the cables from each monitor as they exit the arm.
- Adhesive Cable Clips: These little clips stick to the back of your desk or monitor and are perfect for guiding individual wires, like for your mouse and keyboard, along a specific path so they stay out of sight but within reach.
- Cable Sleeves: For the main bundle of wires running down to the floor, a braided cable sleeve is the perfect solution. It zips around the cables, turning an octopus of wires into a single, tidy tube that blends right in.
Hiding Everything with Cable Raceways
For the true clean-desk fanatic, the cable raceway is the final piece of the puzzle. These are adhesive plastic channels that you mount to the underside or back of your desk, letting you tuck your power strip, charging bricks, and all excess cable length completely out of view.
This approach gives your desk a "floating" look where almost no wires are visible from a normal sitting or standing position. It takes a bit more planning, but the payoff is a workspace that feels incredibly professional and organized. If you want a full walkthrough, our guide to raceway cable management breaks it down step-by-step.
A clutter-free space directly contributes to a clutter-free mind. Organizing your cables is a small investment of time that pays significant dividends in focus and reduced stress every single day you sit down to work.
The real beauty of a well-managed system is how practical it is. When you need to unplug your laptop, you're not wrestling with a tangled mess. Everything has its place, making your workspace more efficient and genuinely enjoyable to use.
Answering Your Top Questions About Dual Monitor Arms
Even after you've picked out the perfect arm, a few questions can pop up. Getting these final details right is what turns a good setup into a great one. Let's walk through some of the most common concerns we hear, so you can feel completely confident in your new workspace.
Will a Monitor Arm Damage My Desk?
This is probably the number one question we get, and for good reason. The short answer is no—a quality monitor arm, installed correctly, will not damage your desk. Both clamp and grommet mounts are engineered to spread the weight and pressure across a wide surface area, preventing any single point from taking too much stress.
Good monitor arms also come with built-in protective padding where they meet your desk, stopping scuffs and scratches before they start. The two things that really matter are your desk's material and how you install the mount.
- Your Desk Material: Make sure your desk is made of a solid material. Think solid wood, MDF, or a nice, thick particleboard. Hollow-core desks, which are common in budget flat-pack furniture, just don't have the internal support to handle the focused pressure of a clamp.
- Proper Installation: Resist the urge to overtighten the clamp. It just needs to be snug and firm, enough to keep the monitors from wobbling. Cranking it down as hard as you can is a surefire way to leave an indentation, especially on softer wood.
If you're still a bit worried or have a particularly heavy setup, you can slide a small steel reinforcement plate under the clamp. This distributes the load even more, making it safe for just about any solid desk.
Can I Use Two Different-Sized Monitors?
Absolutely! This is one of the best parts of using a dual arm system. Most modern arms are fully independent, meaning each one moves on its own. This gives you incredible freedom to mix and match screens to fit exactly how you work.
One of the most popular and productive setups is pairing a standard landscape monitor with a second one rotated vertically into portrait mode. This is a total game-changer for coders who need to see long scripts, writers editing documents, or anyone who spends their day scrolling through feeds or articles.
Just remember the two golden rules we covered earlier:
- Make sure each individual monitor is under the weight limit for a single arm.
- Check that both screens have a compatible VESA mounting pattern, usually 75x75mm or 100x100mm.
As long as you’ve got those two things covered, feel free to combine different sizes, brands, and orientations to build the setup that works for you.
How Do I Stop My Monitor From Sagging or Drooping?
A drooping monitor is the most common hiccup people run into, but it’s almost always an easy fix. It doesn't mean your arm is faulty; it just means the tension inside hasn't been adjusted for the exact weight of your screen yet.
Every gas-spring or mechanical arm has a tension adjustment screw somewhere on the arm’s body, usually marked with "+" and "-" symbols.
Think of it like tuning an instrument. You're not just making it "tight"—you're finding the perfect balance so the monitor feels weightless. It should stay exactly where you put it, moving only with a light touch.
If your monitor slowly sinks down, the tension is too loose. Grab an Allen key and turn the screw toward the "+" sign. If it’s hard to push down or springs back up on its own, the tension is too tight—turn it toward the "-" sign. Just make small, quarter-turn adjustments and test it until it feels just right.
How Can I Tell if My Monitors Are VESA Compatible?
VESA is the universal standard that lets mounts and monitors from different brands work together perfectly. Checking for it is super simple.
Just turn your monitor around and look at the back. If you see a square pattern of four screw holes, your monitor is VESA compatible. The most common sizes for desktop monitors are 75x75mm and 100x100mm, which is the distance between the holes.
What if there are no holes? It means your monitor isn't directly compatible, but you're not out of luck. Plenty of companies sell VESA mount adapter kits designed for specific non-VESA models. These brackets attach to your monitor and give you the standard mounting holes you need.
Ready to build a cleaner, more ergonomic workspace? Explore the full range of premium monitor arms and organizational accessories from EVEO and find the perfect solution for your desk today.
How to Clean a Vinyl Record and Restore Perfect Sound
How to Handle Vinyl Records Without Damaging Them