To really get the most out of your vinyl, you need more than just a quick wipe-down. The process is a two-part ritual: a quick sweep with a carbon fiber brush before each spin to handle daily dust, and a deeper clean with a dedicated solution and velvet brush when the grime really starts to build up. This approach tackles everything from surface-level dust to the stubborn gunk that gets wedged in the grooves.
Why Cleaning Your Vinyl Is a Non-Negotiable Ritual
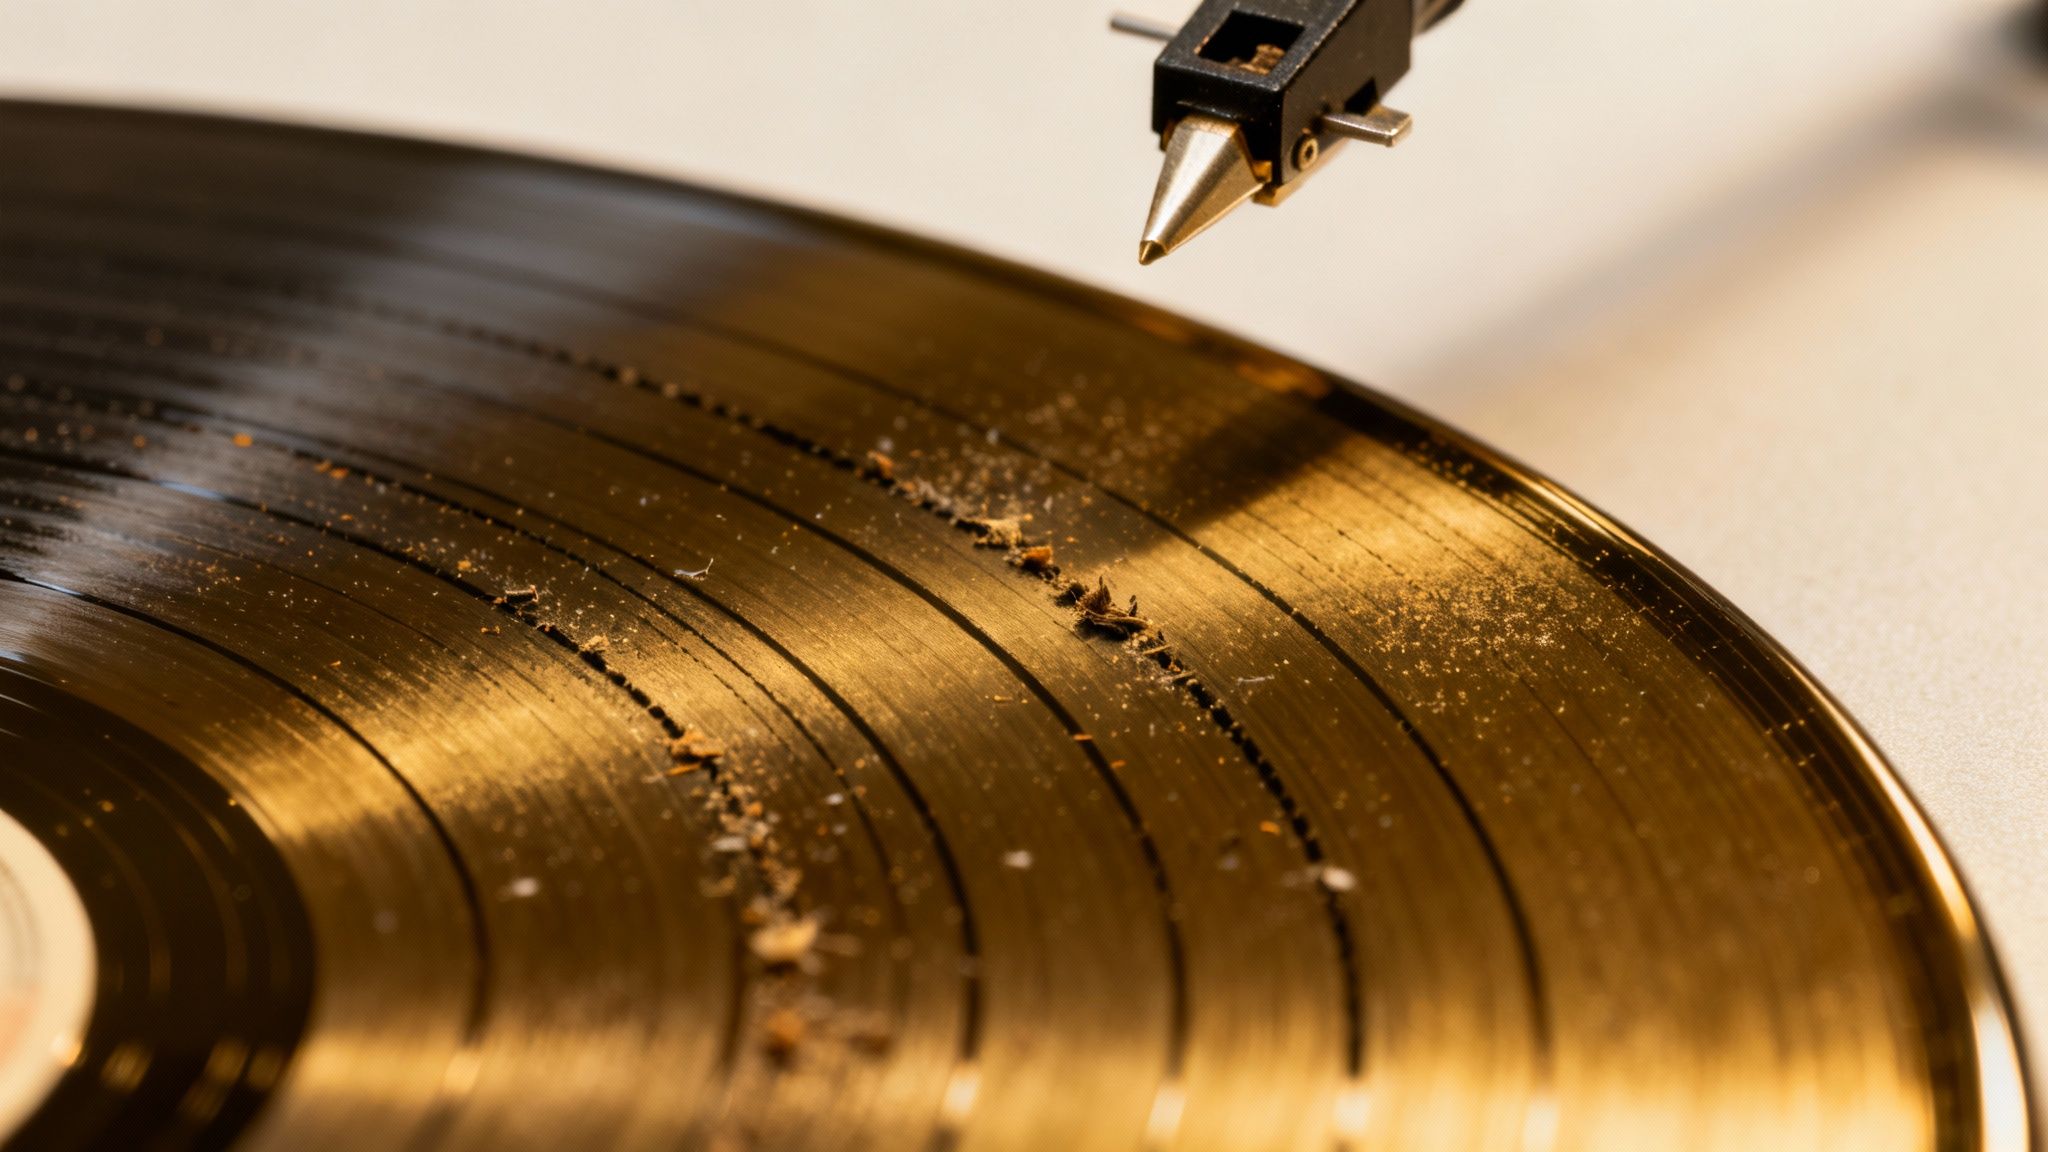
That faint crackle and pop might sound charming at first, but it's often the first sign that your records are crying out for a clean. Ignoring the dust, fingerprints, and invisible grime that settles into a record's grooves is a bit like driving a car without ever changing the oil—eventually, something is going to break. This isn't just about how it looks; it's about preserving the sound and the physical integrity of your collection.
The Unseen Damage of a Dirty Record
Every single time your stylus glides through a dirty groove, it's doing more than just creating a distorted sound. It's actively grinding tiny particles of dust, skin cells, and airborne pollutants against the delicate vinyl walls. This causes a double-whammy of damage:
- It tanks the sound quality. When there's a layer of filth in the way, the stylus can't properly read the musical information pressed into the groove walls. The result? Muffled audio, a loss of crisp high-frequency detail, and a whole lot more surface noise.
- It accelerates wear and tear. All that debris acts like fine-grit sandpaper, slowly but surely wearing down both the record and your expensive stylus. A dirty record can drastically shorten your turntable needle's lifespan, forcing you into a costly replacement sooner than you'd like.
The damage isn't just theoretical. Dust and grime can degrade a record's sound quality by up to 30% over time. Even a single spin on an uncleaned record can collect enough gunk to cause noticeable playback problems down the line. With the vinyl market projected to grow, proper cleaning is crucial for preserving collections that can be worth a small fortune. You can dig into the full research on the impact of record maintenance from Archive Market Research.
Key Takeaway: Proper cleaning isn't a chore; it's a fundamental part of the vinyl experience. Think of it as an act of preservation that protects your investment, honors the artist's original sound, and ensures the long-term health of your entire audio setup.
Setting the Stage for Sonic Clarity
Understanding why you need to clean your records is the first step. The next, and most important, is learning how to do it right. The methods we’ll cover range from the essential pre-spin brush-off to a more intense deep clean for those amazing thrift store finds or records that have seen better days. Each technique has its place, and mastering them is your ticket to achieving true sonic clarity and ensuring your collection lasts a lifetime.
Building Your Essential Vinyl Cleaning Toolkit
Before you even think about cleaning a record, you need the right tools for the job. Grabbing an old t-shirt or using tap water might seem like a quick fix, but you'll do more harm than good. Household items can introduce minerals, lint, and even fine scratches, permanently damaging your collection. The first real step to preserving your music is to put together a dedicated, high-quality toolkit.
Think of it like a chef’s knife set—each tool has a specific purpose, and using the right one makes all the difference. You can build this kit piece by piece or go for a convenient all-in-one package. Either way, knowing what each item does is what separates a novice from a pro. This isn’t about spending a fortune; it's about investing in the right gear to protect your vinyl for years to come.
The Foundational Tools for Every Collector
At the heart of any solid cleaning routine are a few non-negotiable items. These are your workhorses, designed to fight the most common enemies of vinyl: dust, static, and grime.
- Carbon Fiber Anti-Static Brush: This is your first line of defense and the tool you’ll reach for most often. A carbon fiber brush has thousands of tiny, conductive bristles that do two jobs at once. They gently get into the grooves to lift loose dust and, just as importantly, they neutralize the static charge that pulls new dust out of the air.
- Velvet Record Brush: When it’s time for a wet clean, a directional velvet brush is a must-have. Its plush, deep fibers are designed to work with a cleaning solution, trapping and lifting stubborn grime that a dry brush just can’t touch. The directional nap is key—it helps pull contaminants out of the record instead of just pushing them around.
- Alcohol-Free Cleaning Solution: Not all cleaning fluids are created equal. Solutions with high concentrations of isopropyl alcohol can, over time, leach essential plasticizers from the vinyl, making it brittle. An alcohol-free solution is the safest bet, formulated to dissolve fingerprints and grime without damaging the record's delicate surface.
These three items are the core of any serious cleaning kit. They work together perfectly, handling everything from daily touch-ups to deeper, restorative cleaning sessions.
Essential Supporting Accessories
Beyond the main brushes and solution, a few other items are critical to getting the job done safely and effectively. These accessories ensure your cleaning process is thorough and doesn't accidentally create new problems.
For example, a stylus brush or gel is absolutely critical. A spotless record won't sound good if your stylus is caked in gunk. Even a tiny bit of debris on the needle can cause distortion and even carve up your records, so cleaning it regularly is a must.
And of course, always use a soft, lint-free microfiber cloth for any wiping or drying. Standard paper towels or kitchen cloths will leave a trail of fibers in the grooves, undoing all your hard work in an instant.
Pro Tip: If a rinse is needed, only use distilled or deionized water. Tap water is full of minerals and impurities that will leave residue on your record surface after it evaporates, creating a fresh batch of pops and crackles.
If you're just starting out, hunting down all these individual pieces can feel like a chore. A great alternative is an all-in-one package, which guarantees you have high-quality, compatible tools right from the start. Exploring a complete option like the EVEO 4-in-1 vinyl record cleaning kit provides all the essentials in one place, taking the guesswork out of building your toolkit and letting you get right to cleaning your records safely.
Mastering Manual Cleaning Techniques
Once you have your toolkit ready, it's time to get hands-on. Learning how to properly clean a vinyl record by hand is probably the most important skill any collector can develop. It’s a process that breaks down into two key methods: the quick daily ritual and the occasional deep clean.
Think of the first as a preventative measure—a simple habit that stops dust from ever getting a real foothold. The second is more of a restorative process, designed to tackle the stubborn grime that a simple brush-off just can't handle. Both are absolutely essential for preserving that crisp sound quality and protecting your investment.
The Daily Ritual: Dry Cleaning With a Carbon Fiber Brush
This is the vinyl equivalent of brushing your teeth; you should do it every single time before you drop the needle. For this, a carbon fiber anti-static brush is your best friend. Vinyl records are notorious for building up a static charge, especially on a spinning turntable, which basically turns them into magnets for airborne dust. A good carbon fiber brush tackles both problems at once.
The key here is technique. Don't just wipe the record—you need to engage with the grooves the right way.
- First, place the record on your turntable's platter and get it spinning.
- Hold the carbon fiber brush by its handle, making sure your fingers are touching the metal part. This is what grounds the static electricity, so don't skip it.
- Gently lower the brush onto the spinning record. You want the bristles to make light contact across the entire surface. Let it ride for two or three full rotations. There's no need to apply pressure; let the brush do its job.
- After a few spins, slowly and smoothly drag the brush from the inside of the record out toward the edge. As you clear the playing surface, lift it off. This motion gathers all the dust into a neat little line on the bristles, which you can then just wipe off.
This entire process takes maybe 15 seconds, but it removes all the surface-level dust that would otherwise get ground into the grooves by your stylus. Making this a consistent habit is the single most effective way to minimize wear and maintain audio clarity from one play to the next.
The Deep Clean: A Guide to Wet Washing
Sometimes, a dry brush just won't cut it. For those great thrift store finds, records covered in fingerprints, or albums that haven't seen the light of day in years, a wet deep clean is the only way to go. This process uses a specialized cleaning solution to dissolve and lift out all the embedded gunk that has bonded to the groove walls.
The following visual guide breaks down the essential tools you'll need for this process.
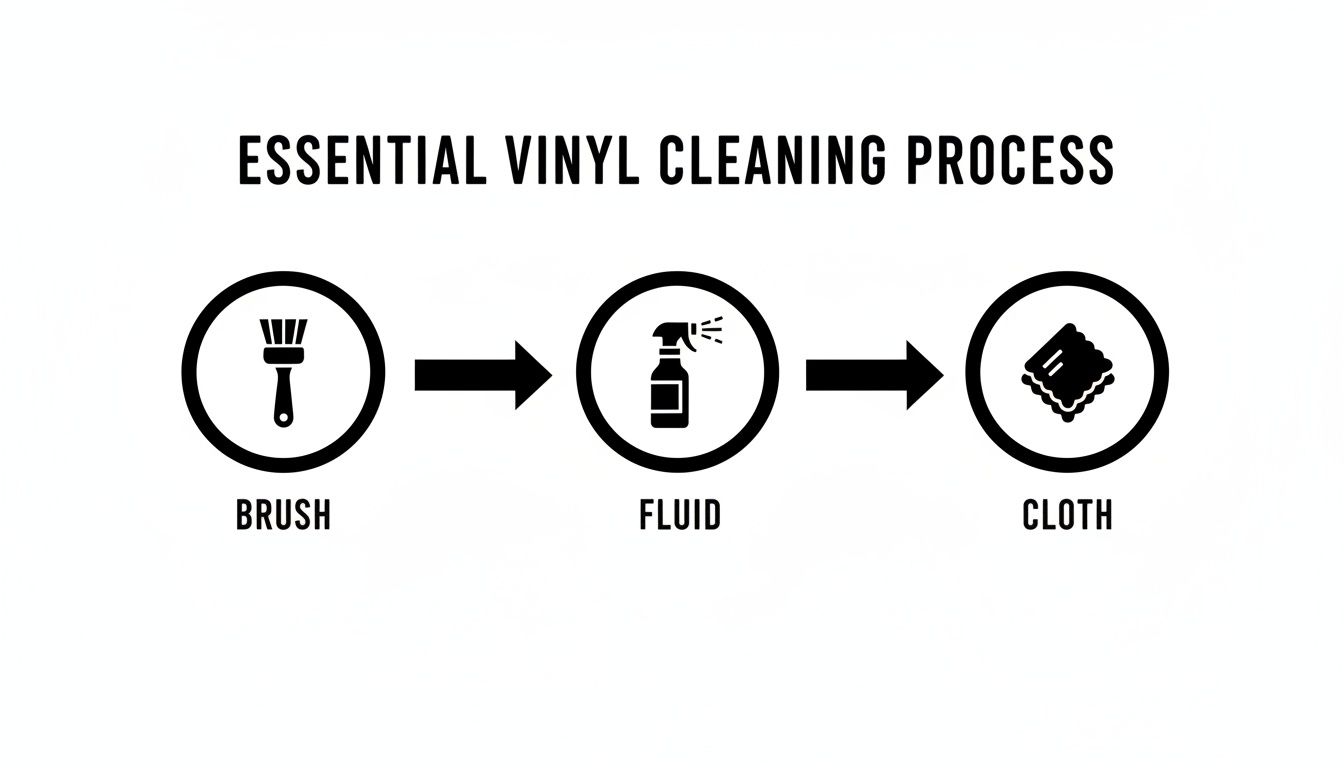
This flow shows the core components of a manual wet clean: a brush to gently agitate the grime, a fluid to dissolve it, and a cloth to safely lift it all away.
To get started, place your record on a clean, stable, and lint-free surface. A dedicated cleaning mat is ideal, but a fresh microfiber towel on a flat table works in a pinch.
Next, apply a small amount of your alcohol-free cleaning solution directly onto the velvet record brush—never spray it directly on the record. This gives you better control and prevents the fluid from pooling or ruining the paper label. With the damp brush, gently wipe the record in a circular motion, always following the direction of the grooves. I like to work my way from the outside in, and then back out again.
Now, grab a separate, clean microfiber cloth to gently wipe away the solution and all the loosened debris. Again, always move with the grooves, never against them. This is critical for avoiding scratches and making sure you’re lifting the grime out instead of just pushing it deeper.
Crucial Insight: The goal of a wet clean isn't to scrub the record. You want to let the solution do the heavy lifting. Gentle, consistent pressure is all you need. Aggressive scrubbing can cause permanent, irreversible damage to the delicate groove walls.
If you're dealing with a particularly dirty record, you might need a second pass or even a final rinse with distilled water to remove any lingering solution residue. After that, it's all about letting it dry completely.
Manual Cleaning Methods At a Glance
To make it even clearer, here’s a quick comparison of the two manual cleaning techniques. Think of this table as your go-to reference for deciding which method to use and when.
| Method | Best For | Frequency | Key Tool |
|---|---|---|---|
| Dry Brush | Removing surface dust and static before each play | Every time you play a record | Carbon fiber brush |
| Wet Clean | Deep cleaning of fingerprints, grime, and stubborn dirt | As needed for dirty records or periodic maintenance | Velvet brush & cleaning solution |
Understanding the purpose of each method helps you build a routine that keeps your collection sounding pristine, whether you’re doing a quick daily dust-off or a full restorative clean.
Common Mistakes to Avoid During Manual Cleaning
Knowing what not to do is just as important as knowing the right technique. A simple mistake can turn a cleaning session into a rescue mission—or worse, cause damage you can't undo.
Here are the most common pitfalls to steer clear of when learning how to clean a vinyl record.
- Using Tap Water: Never, ever use water straight from the faucet. It’s full of minerals and other impurities that will leave a chalky residue deep in the grooves once it evaporates. This will create even more noise than you started with. Always use distilled or deionized water for any wet cleaning or rinsing.
- Using Household Cleaners: Products like Windex, rubbing alcohol, or general-purpose sprays are a huge no-no. Their harsh chemicals can strip the protective coating off a record, making the vinyl brittle and permanently ruining the sound. Stick to dedicated, vinyl-safe cleaning solutions.
- Applying Too Much Pressure: Whether you're using a carbon fiber brush for a dry clean or a velvet brush for a wet one, let the tool do the work. Pressing down too hard can grind existing debris deeper into the grooves or even create micro-scratches on the record's delicate surface. A light touch is always the right approach.
- Wiping Against the Grooves: The grooves are the record. Wiping across them, even with the softest cloth, can cause scratches and push dirt sideways into the groove walls instead of lifting it out. Always follow the circular path of the grooves to work with the record, not against it.
By avoiding these simple mistakes, you can be confident that every cleaning session is actually improving your records' condition, not making it worse. Proper technique is what separates a routine clean from an accidental catastrophe.
When to Upgrade to a Record Cleaning Machine
Manual cleaning with a quality brush and solution is the bedrock of good vinyl maintenance. It’s affordable, gets the job done for routine upkeep, and honestly, it's all many collectors will ever need.
But for the serious enthusiast, the crate digger pulling dusty gems from a forgotten basement, or the audiophile chasing that last ounce of sonic purity, manual methods eventually hit a wall. This is where record cleaning machines come in, offering a deep, restorative clean that your hands simply can't match.
Think of it like washing your car. A hand wash makes it look great, but a professional detailer with specialized tools will always achieve a deeper, longer-lasting result. A record cleaning machine is that professional detailer for your vinyl. It doesn’t replace your daily carbon fiber brush—it’s the heavy machinery you call in for a true sonic restoration.
Understanding Vacuum Record Cleaning Machines
The most common and accessible type of machine works on a simple but incredibly effective principle: vacuum suction. These machines are a massive leap from manual wet cleaning because they solve the single biggest challenge—getting all the dirty cleaning fluid out of the grooves after you've loosened the grime.
The process is pretty straightforward. You apply a cleaning fluid to the record, often with a built-in applicator brush that works the solution deep into the vinyl. After a few rotations to dissolve the gunk, a vacuum arm moves over the record's surface. A powerful motor creates strong suction through a tiny slot in the arm, literally pulling the contaminated fluid, dissolved dirt, and stubborn particles right off the record.
The huge benefit here is the complete removal of contaminants. When you wipe a record dry with a microfiber cloth, no matter how careful you are, you risk leaving behind some residue or microscopic fibers. A vacuum machine all but eliminates that risk, leaving a perfectly clean and dry surface in seconds. This is why they're so popular; they solve the biggest problem with manual kits by extracting nearly all the fluid and grime.
Exploring the Power of Ultrasonic Cleaners
For the absolute ultimate in deep cleaning, nothing beats an ultrasonic machine. These devices take a more scientific approach, using a process called cavitation to get a microscopic-level clean that is impossible any other way.
Here’s how it works: the record is submerged in a tank of distilled water, sometimes with a special additive. The machine then blasts high-frequency sound waves—usually between 35 and 40 kHz—through the water. These sound waves create and then instantly implode millions of microscopic bubbles.
The implosion of these tiny bubbles creates a powerful jet of energy, a scrubbing action that blasts away even the most deeply embedded, hardened grime from the very bottom of the record grooves. The process is incredibly powerful yet surprisingly gentle on the vinyl itself.
Ultrasonic cleaners are the gold standard for restoring incredibly valuable or hopelessly dirty records. They can remove years of caked-on residue, mold release agents from the factory pressing, and microscopic grit that even a vacuum machine might leave behind. The result is often a jaw-dropping reduction in surface noise, revealing detail and clarity you never knew was hiding in the grooves.
Deciding If an Upgrade Is Right for You
Jumping to a machine is a big step, so how do you know if it's the right move for your collection? It might be time to consider an upgrade if you find yourself in one of these situations:
- Your collection is getting big. Manually cleaning hundreds or thousands of records is a monumental task. A machine cuts the time and effort down dramatically, turning a weekend-long chore into a manageable afternoon.
- You're a serious crate digger. Buying used vinyl is one of the great joys of collecting, but those records often come with decades of unknown history and grime. A machine can restore these finds to near-mint playing condition.
- You're an audiophile chasing perfection. If you’ve already invested in a great turntable, amp, and speakers, a record cleaning machine is the final piece of the puzzle. It ensures your source material is as clean as it can possibly be.
- You need to restore valuable pressings. For first pressings or rare records, a machine offers the safest and most effective way to preserve their value and sound quality without the risk of manual error.
While a machine is a serious investment, the improvement in sound quality and convenience is undeniable. For collectors who are just starting out or maintaining a smaller library, a high-quality manual record cleaning kit and accessories will remain the most practical and effective solution for daily care.
The Art of Drying and Storing Records Safely
You can follow a meticulous cleaning process, but if you fumble the last few steps, all that work is for nothing. Drying and storing your vinyl correctly is every bit as crucial as the wash itself. It’s what protects your records from getting dirty all over again and prevents long-term damage like warping.
This is the final leg of the journey, and it’s where you lock in all your hard work.
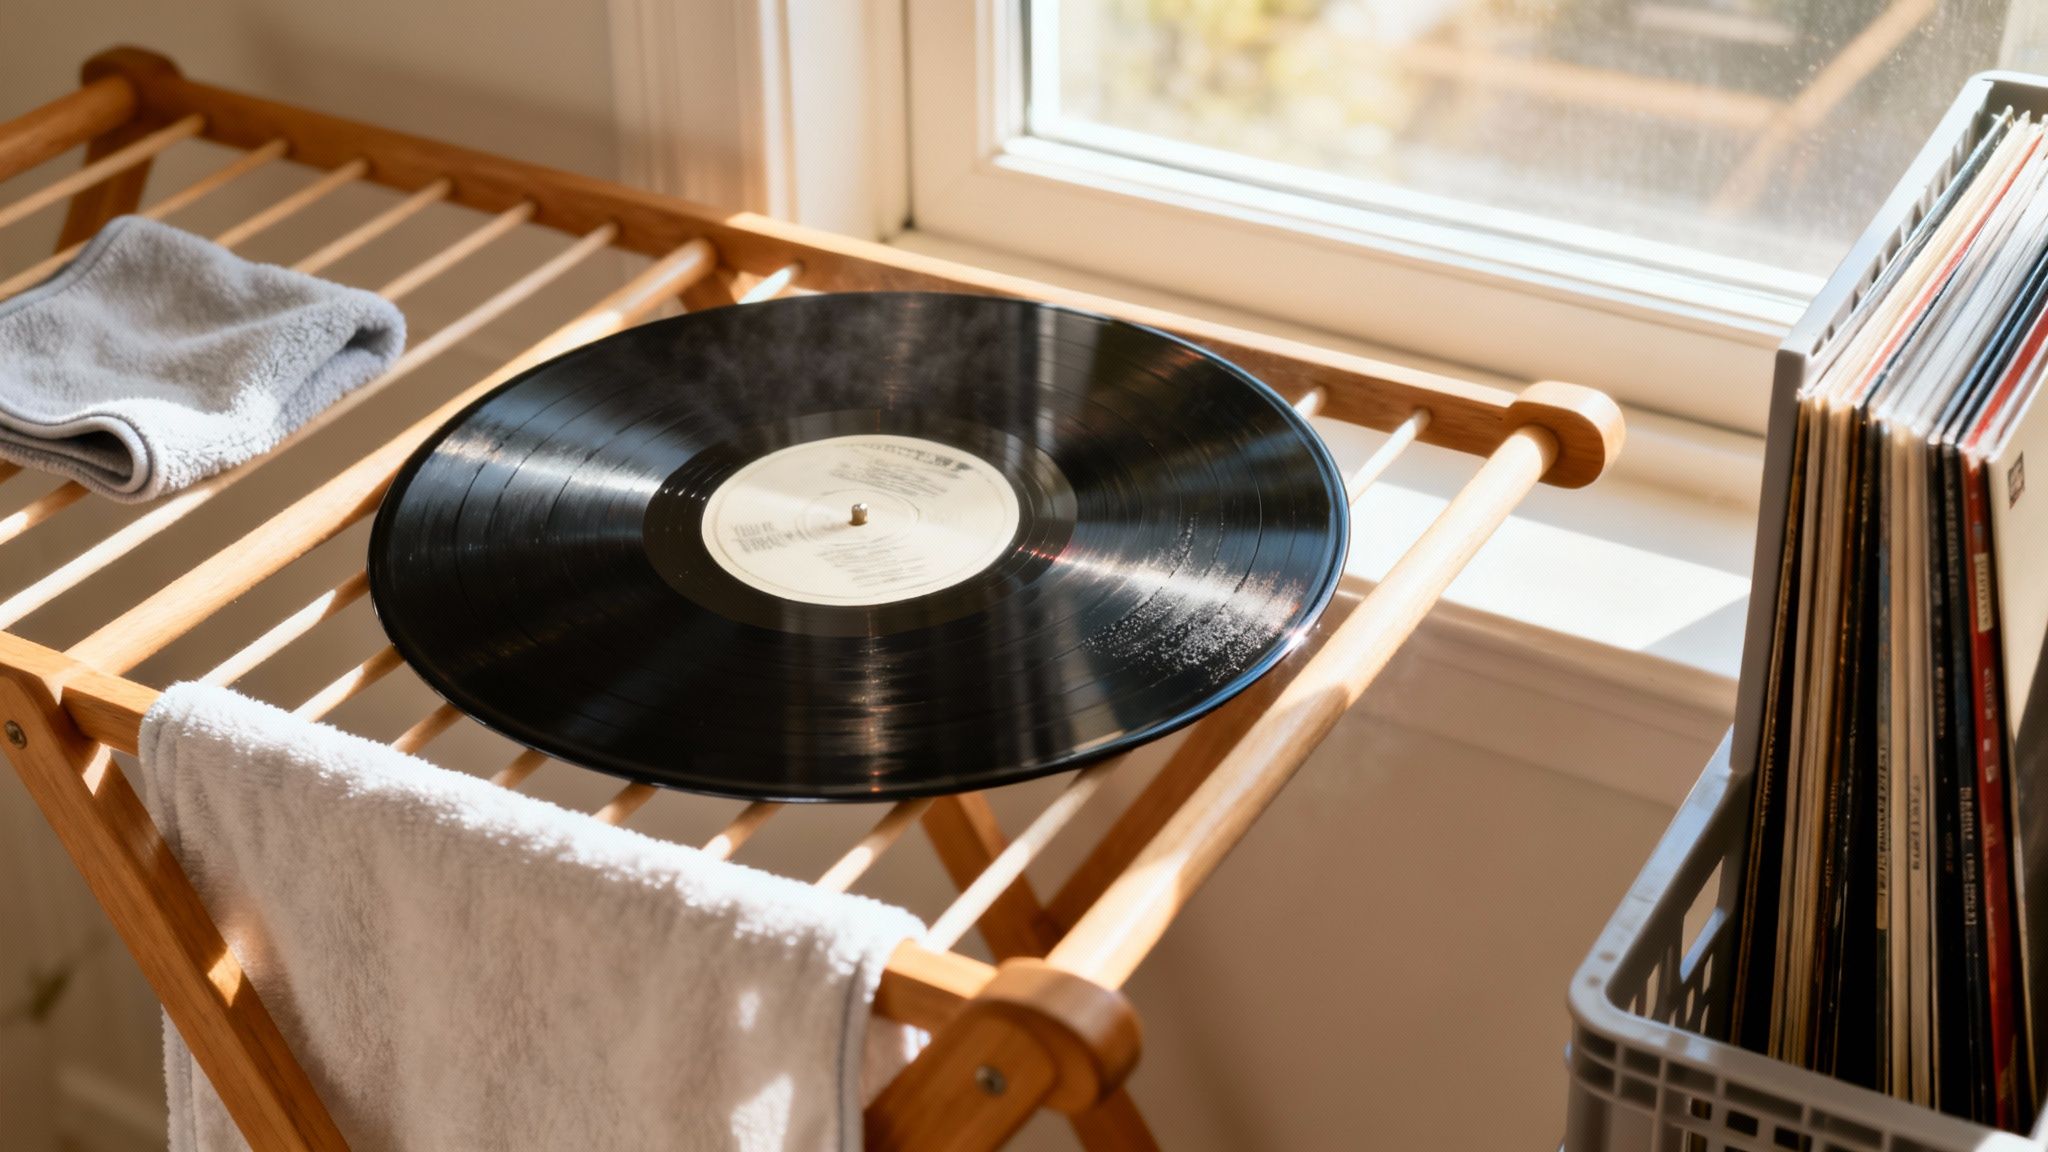
After a wet clean, your first instinct might be to grab a kitchen towel. Don't do it. Household towels are packed with lint that will immediately latch onto those clean, damp grooves. Laying a record flat to air-dry is just as bad—it turns the surface into a perfect dust magnet for every airborne particle in the room.
Proper Drying Techniques
The only truly safe way to dry a record is to let it air-dry vertically. This simple trick minimizes the surface area exposed to falling dust and ensures no moisture gets trapped. A dedicated record drying rack is the best tool for the job, holding multiple LPs securely without putting any pressure on the delicate grooves.
No rack? No problem. You can rig up a temporary solution with a standard dish rack. Just be sure to line any points of contact with a soft microfiber cloth to avoid scratches. Then, you just have to be patient. It can take anywhere from 30 minutes to an hour for a record to dry completely, depending on the humidity. Whatever you do, don't rush it—putting away a slightly damp record is asking for mold growth.
Key Insight: Never try to speed things up with a hairdryer or by leaving records in the sun. The intense heat can cause catastrophic warping in just a few minutes, permanently ruining your record.
The Golden Rules of Record Storage
Once your record is bone-dry, its long-term health comes down to how you store it. This is where you protect your collection from the slow creep of damage from dust, static, and the environment.
First things first: ditch the cheap paper inner sleeves that most records come with. They shed paper fibers and cause micro-scratches over time. Investing in archival-quality, anti-static inner sleeves is one of the single best upgrades you can make for your collection. You can learn more about how anti-static record sleeves protect your vinyl and preserve its sound.
Next, slip the album into a clear, durable outer sleeve. This small step shields the beautiful cardboard jacket from shelf wear, moisture, and fading from UV light.
But the most critical rule of all is to always store your records vertically. Stacking them flat—or "pancaking"—puts a crushing amount of pressure on the records at the bottom. Over time, that weight will cause groove damage and severe warping. Keep them upright on a sturdy shelf or in a dedicated crate, packed just snugly enough that they don't lean, but not so tight that you have to fight to pull one out.
Got Questions About Cleaning Vinyl? We've Got Answers
Even after you've got a solid cleaning routine down, questions always pop up. It's totally normal, especially when you're dealing with a collection you've spent years building. This section is all about tackling those common "what if" scenarios we hear about all the time.
We'll clear up the confusion on some popular (and risky) DIY methods, give you a realistic schedule for cleaning, and offer some advice for those extra-special LPs that need a gentler touch.
Can I Just Use Isopropyl Alcohol to Clean My Records?
This is probably one of the biggest debates in the entire vinyl community. While a tiny bit of isopropyl alcohol can cut through a stubborn fingerprint, going overboard is a really bad idea. The problem is that alcohol can slowly pull the essential plasticizers out of the PVC, leaving the vinyl brittle and prone to cracking over time.
It’s an absolute deal-breaker for older 78 rpm records, which are often made of shellac. Alcohol will literally dissolve shellac on contact, destroying the record forever. For modern LPs, it's just much safer to stick with a professionally made, alcohol-free cleaning solution.
Our Take: Why risk it? A high-quality, dedicated cleaning fluid gives you all the power you need to lift grime without the long-term chemical gamble.
So, How Often Should I Really Deep Clean My Records?
There’s no magic number here. How often you need to do a wet clean really depends on your listening habits, where you live (dusty environments are the enemy!), and the records themselves. Think of a daily dry brush as non-negotiable, but a deep clean is more of an "as-needed" task.
Here’s a practical guide to live by:
- For Brand-New Records: Yep, you need to clean them. Even sealed records can have mold-release agents left over from the factory. A quick wet clean gets rid of that residue, which can gunk up your stylus and attract dust.
- For Second-Hand Finds: Every single used record that comes into your house should get a thorough deep clean before it ever sees your turntable. You have no idea what that record has been through, and you don’t want to introduce mystery gunk to your gear.
- For Your Regular Rotation: For the albums you spin all the time, a good wet clean once or twice a year is a great rule of thumb to keep them sounding fresh and noise-free.
What's the Best Way to Clean a Really Old or Fragile Record?
When you’re handling vintage vinyl, the golden rule is to start with the least invasive method possible. Always, always begin with a gentle pass of a dry carbon fiber brush to lift off any loose surface dust without applying pressure.
If it absolutely needs a wet clean, use a premium, trusted cleaning fluid and a soft velvet brush. Follow the grooves with a light, delicate touch. If you've got something historically significant or incredibly valuable and you're feeling nervous, don't risk it. Look for a professional service that offers ultrasonic cleaning. This method can safely remove decades of embedded dirt and might even boost the record's resale value. For more on how the pros handle it, you can dig into market reports on global record cleaning services.
Does That Wood Glue Cleaning Trick Actually Work?
Ah, the wood glue method. It’s become a viral sensation online, and you've probably seen the videos. The idea is to spread wood glue over a record, let it dry, and peel it off in one satisfying sheet, taking all the dirt with it.
While it looks cool, this is a high-risk, low-reward technique that we strongly advise against. If the glue doesn’t cure perfectly, you're left with a sticky mess deep in the grooves that’s almost impossible to get out. Even worse, you could damage the delicate groove walls or rip off part of the paper label when you peel. It's just not worth the gamble.
For a reliable, all-in-one solution that takes the guesswork out of maintenance, trust EVEO. The 4-in-1 Vinyl Record Cleaning Kit provides everything you need to keep your collection sounding pristine, from the daily brush-off to the essential deep clean.
Anti Static Record Sleeves a Guide to Preserving Your Vinyl
The Ultimate Guide to Dual Monitor Arms for Your Workspace