
When it comes to the best monitor arms for dual monitors, there isn't a one-size-fits-all answer. The perfect arm is the one that fits your specific setup—taking into account your monitor's weight, VESA compatibility, and desk thickness. For most people, a gas spring arm with full articulation (tilt, swivel, and rotation) and a solid clamp mount is the sweet spot, blending flexibility with rock-solid stability.
This is your key to unlocking a truly ergonomic and blissfully clutter-free workspace.
Why a Dual Monitor Arm Is a Game-Changing Upgrade
If your dual monitors are still perched on their original stands, you're essentially working in the cramped economy seat of a long-haul flight. Sure, it gets the job done, but it’s far from comfortable or efficient. Upgrading to a proper dual monitor arm is like getting a complimentary bump to first-class. Suddenly, you have total control over your environment, reclaiming precious desk space and dialing in the perfect ergonomic position.
Think of this guide as your pilot, here to help you navigate all the technical jargon and specs. We'll break down everything from VESA patterns to mounting options, so you can confidently choose the perfect arm for your workspace. It's time to say goodbye to neck strain, tangled cables, and a desk that feels too small. The right arm solves all these problems in one go.

More Than Just an Accessory
A dual monitor arm isn’t just another piece of hardware; it’s a fundamental upgrade to your daily workflow and well-being. By lifting your screens off the desk, you immediately free up a huge amount of real estate. This creates a cleaner, more organized space where you can actually focus on your work without the visual distraction of bulky monitor bases.
This shift toward smarter, ergonomic solutions isn't just a niche trend. The dual monitor arm market was valued at USD 1.5 billion in 2024 and is expected to more than double to USD 3.2 billion by 2034. That kind of growth shows a massive global shift toward prioritizing employee well-being and optimized workspaces. You can learn more about these dual monitor arm market trends on reportsanddata.com.
The real magic of a dual monitor arm is its ability to adapt to you, not the other way around. It lets you position your screens at the perfect height, angle, and distance—a critical factor for maintaining good posture and cutting down on physical strain throughout the workday.
Understanding VESA, Monitor Weight, and Size
Before you start imagining that clean, floating dual-monitor setup, we need to talk about the technical stuff first. Think of it as the foundation of your house—if you get it wrong, everything else will be shaky.
Getting these three specs right is non-negotiable for a perfect fit. Overlook them, and you're headed for a world of frustration, sagging screens, or an arm that just plain doesn't work.
Let’s lock in these three critical factors: VESA compatibility, monitor weight, and screen size.
What Is VESA Compatibility?
That word VESA might look like technical jargon, but it’s actually your best friend here. It stands for the Video Electronics Standards Association, a group that created a universal mounting standard for screens.
In simple terms, VESA just refers to the four screw holes on the back of your monitor. Think of it like a universal phone charger—it ensures your monitor and the arm can connect perfectly, no matter the brand.
The most common patterns for computer monitors are:
- 75x75mm: A square pattern with screw holes 75 millimeters apart.
- 100x100mm: A slightly larger square, with holes 100 millimeters apart.
Your first job is to check your monitor. Just flip it around and look for four screw holes in a perfect square. If you don’t see them, they might be hiding under the factory stand, which you'll need to unscrew and remove.
Key Takeaway: VESA is the standardized language that lets a monitor and an arm talk to each other. Making sure you have a 75x75mm or 100x100mm pattern is the most important first step.
Why Monitor Weight Is a Critical Factor
Just as important as the screw pattern is the actual weight of your monitors. Every monitor arm is built to handle a specific weight limit per arm, and ignoring this is a recipe for disaster.
Imagine hanging a heavy winter coat on a flimsy plastic hanger. It’s going to bend, droop, and eventually drop the coat. A monitor arm's internal springs are calibrated the same way; they're designed for a specific weight range and can't handle more.
For instance, a standard 27-inch office monitor might weigh just 10 pounds. But a 27-inch gaming monitor with more hardware could easily hit 18 pounds. Same size, totally different support needs.
You absolutely must check the weight of your monitors without their stands. You can find this info in the user manual or by searching the model number online. Then, compare it to the arm’s weight capacity.
The Importance of Screen Size Limits
Finally, let's talk about screen size. While weight determines if the arm can hold your monitor up, the size rating is all about positioning and reach. You need an arm with enough wingspan to place two screens side-by-side without them clashing.
An arm made for two 24-inch monitors probably won't have long enough segments to properly arrange two 32-inch ultrawides. You’ll end up with a huge gap between them or won't be able to angle them correctly.
The best arms balance these specs perfectly. For example, the Humanscale M8.1 Dual Monitor Arm handles screens up to 28 inches and 20 pounds per arm, which is a big reason why users report 95% satisfaction with its stability. You can learn more about top-performing monitor arm products to see how different brands stack up.
Nail these three checks—VESA, weight, and size—and you’ll have a rock-solid foundation for the perfect dual monitor setup.
Choosing Your Mounting Style: Clamp, Grommet, or Wall
Alright, you've confirmed your monitor is VESA-ready and you know its weight. The next big decision is how to physically anchor your new dual monitor arm to your workspace. This choice is just as critical as the arm itself—it's the foundation holding everything up. Think of it like choosing the right tires for a car; the wrong set can undermine even the best engine.
The three main ways to mount an arm are with a clamp, a grommet, or by attaching it directly to the wall. Each has its own strengths and is designed for different desks and spaces. Let's break them down so you can pick the perfect one.
The Versatile Clamp Mount
The clamp mount is hands-down the most popular kid on the block, and for good reason. It works like a big C-clamp, gripping the edge of your desk to create a solid anchor point without any drilling or permanent changes. This makes it a no-brainer for renters or anyone who cringes at the thought of putting holes in their furniture.
Installation is usually a breeze and doesn’t require a toolbox full of special gear. Since it's so easy to attach and remove, a clamp mount is perfect if you like to rearrange your setup or think you might move desks down the line.
Just keep a couple of things in mind:
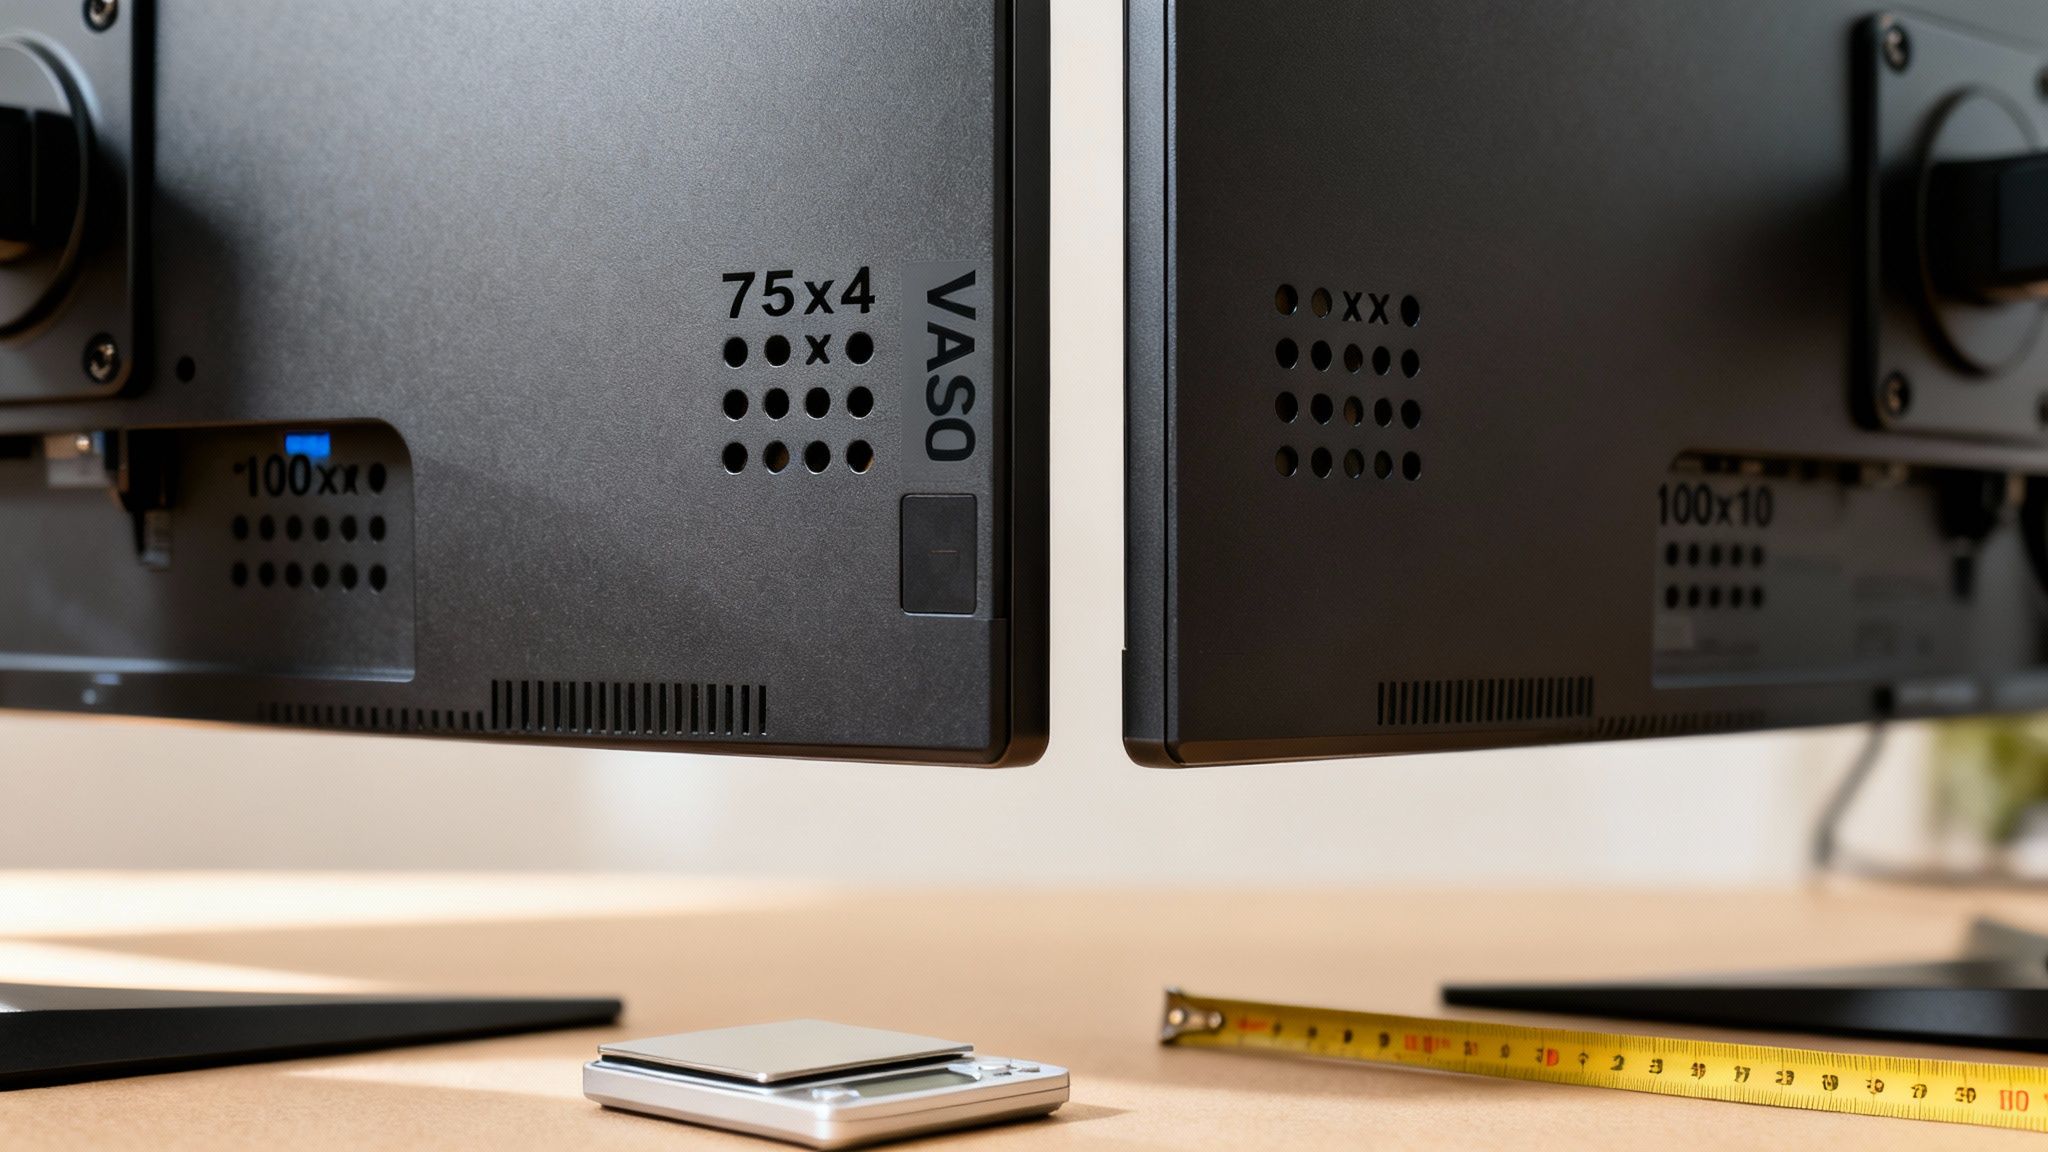
- A Solid Edge: You need a flat, clear edge on the back of your desk for the clamp to grab onto. Desks with funky beveled edges or a thick lip can sometimes be a problem.
- Desk Thickness: Most clamps are built for desks between 0.4 and 3.5 inches thick. Pull out a tape measure and check yours before you buy.
- Desk Material: A clamp is great for solid wood or MDF, but it focuses a lot of pressure on one spot. Be careful with softer materials like particleboard, as it could potentially cause damage.
The Secure Grommet Mount
For a super clean, almost built-in look, the grommet mount is a fantastic choice. This style uses a single bolt that goes through a hole in your desk, securing the arm's base from underneath. The end result is an incredibly stable and sleek setup that looks incredibly professional.
Lots of office desks already have these grommet holes for running cables, making this a simple and elegant solution right out of the box. If your desk doesn't have one, you can easily drill one yourself, which gives you total control over where the arm is positioned. This approach also spreads the pressure out more evenly than a clamp, making it a safer bet for certain desk types.
A grommet mount delivers a clean, integrated aesthetic that makes the monitor arm look like part of the desk itself. It’s the go-to for a minimalist vibe with maximum stability, especially when a clamp just won’t work.
The Space-Saving Wall Mount
When every square inch of desk space counts, nothing beats a wall mount. By attaching the monitor arm directly to the wall behind your desk, you free up your entire work surface. This creates that awesome "floating monitor" effect—perfect for small desks or anyone chasing an ultra-clean, minimalist look.
This option offers unmatched stability, since the arm is anchored right into your wall studs. But, it's also the most permanent and labor-intensive choice. You'll need to find the studs, drill into your wall, and be meticulous about getting it level. For a deeper dive into these options, check out our complete guide on how to choose the right monitor mount for your workspace.
Mounting Options Compared: Clamp vs. Grommet vs. Wall
To help you decide at a glance, here’s a quick comparison of the three mounting styles. Use this table to figure out which one best fits your desk, your room, and your DIY comfort level.
| Mount Type | Best For | Installation Difficulty | Space Saving |
|---|---|---|---|
| Clamp | Renters, flexible setups, and most standard desks. | Easy | Good |
| Grommet | A permanent, clean look and desks with pre-drilled holes. | Moderate | Very Good |
| Wall | Maximum desk space, minimalist setups, and ultimate stability. | Hard | Excellent |
Ultimately, there’s no single "best" mount—only the best one for you. Whether you prioritize flexibility, a clean aesthetic, or pure space-saving, matching the mount to your workspace is the final step in building a truly epic dual-monitor setup.
Mastering Movement for Perfect Ergonomics
Once your monitor arm is securely attached to your desk, you get to the fun part—the movement. This is where the magic of a truly ergonomic setup comes alive, turning a rigid workstation into a space that flexes and adapts to you. A high-quality dual monitor arm isn't just a stand; it’s a tool ready to put your screens exactly where you need them for better focus and comfort.
Every adjustment—tilt, swivel, rotation, and height—is there for a reason. Learning how they work together is the secret to getting through a long workday without that nagging neck or back pain. This isn't just about bells and whistles; it's about making your setup work for you.
Tilt, Swivel, and Rotation Explained
Let's break down what these movements actually do for you day-to-day. Think of them as your primary toolkit for adjusting your view on the fly.
- Tilt (The Glare Buster): This is all about angling your monitors up or down. Its best use? Defeating that annoying glare from a window or overhead light that causes major eye strain. A quick downward tilt can make a world of difference.
- Swivel (The Collaborator): This lets you pivot your screens left or right. It's perfect for when you need to quickly show a coworker what's on your screen without making them lean over your shoulder.
- Rotation (The Game Changer): The ability to spin a monitor from landscape (horizontal) to portrait (vertical) is a huge deal for certain tasks. Coders can see more lines of code, writers can view a full page, and designers can work on vertical layouts without endless scrolling.
Together, these three adjustments give you total control, ensuring your screens are always perfectly set for whatever you’re working on.
Height Adjustment: The Key to a Healthy Neck
If there's one movement that matters most for your long-term health, it’s height adjustment. Here's the golden rule of monitor ergonomics: the top of your screen should be at or just below eye level. When your monitors are too low, you naturally hunch over, putting a ton of strain on your neck and shoulders.
A good dual monitor arm lets you adjust the height effortlessly. This isn’t just for the initial setup; it’s for making tiny adjustments throughout the day as your posture changes. If you go from slouching to sitting up straight, a quick lift of the monitors keeps everything perfectly aligned. That adaptability is the foundation of a pain-free work life.
The infographic below shows the different ways you can anchor your monitor arm, which is the first step before you can master its movement.
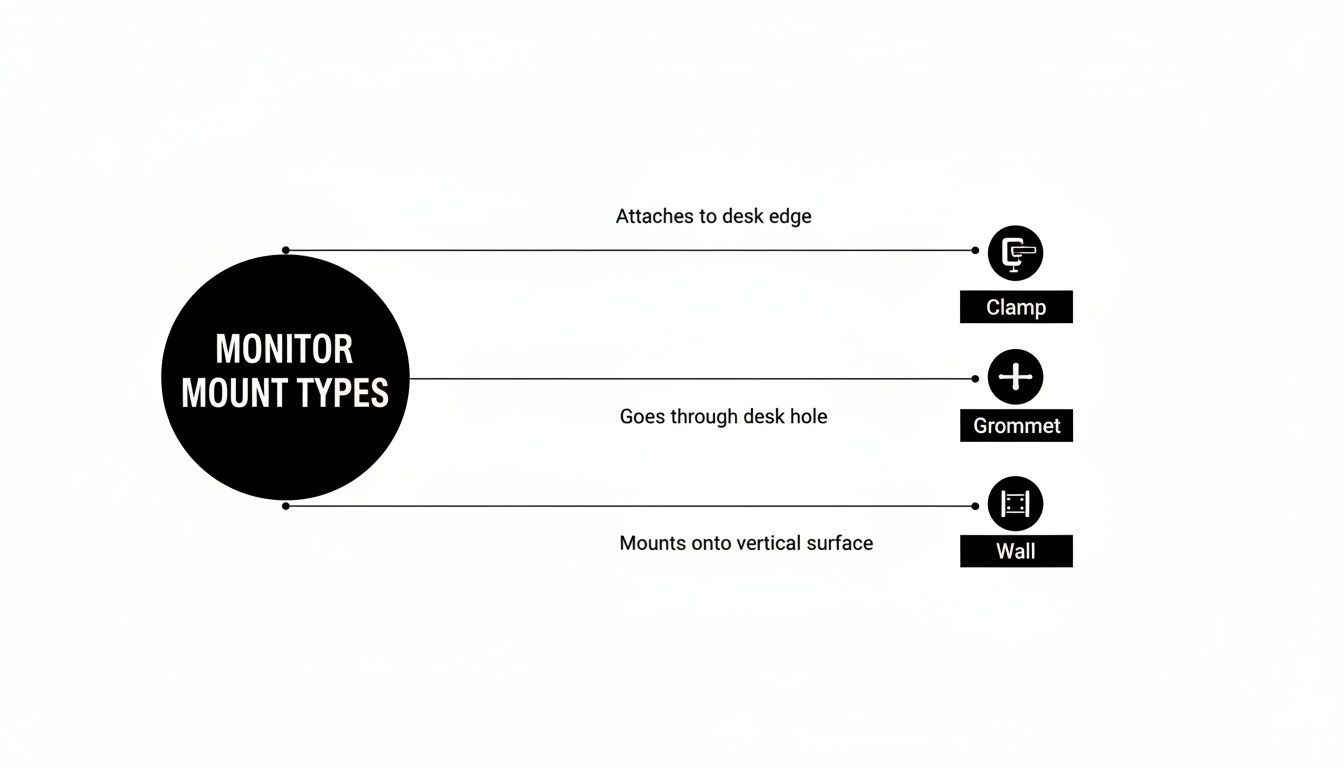
As you can see, the clamp, grommet, and wall mounts all provide a rock-solid base, allowing the arm's ergonomic features to shine.
Articulation and Reach: Navigating Your Space
Articulation is just a fancy word for how many joints or pivot points an arm has. Like your own arm has a shoulder, elbow, and wrist, more joints in a monitor arm mean more flexibility and a longer reach. This is a huge help for tricky desk setups.
Have a really deep desk or one tucked into a corner? An arm with great articulation can easily snake around obstacles to bring your screens to the perfect viewing distance. It also means you can push your monitors completely out of the way when you need your desk for something else, like sketching or reviewing paperwork.
The benefits here are backed by some pretty impressive numbers. For example, using dual monitors has been shown to boost productivity by a massive 42%. What’s more, 68% of professionals now prefer using monitor arms over basic stands, pointing to space savings between 40-60% as a huge plus.
Pro Tip: When setting up your two monitors, try to create a seamless, wraparound view. Place them edge-to-edge with a slight inward angle, like a cockpit. This minimizes how much you have to turn your head and makes the whole experience more immersive.
By mastering these movements, you’re not just setting up a desk—you’re creating a workspace that genuinely supports you. Proper ergonomics is a dynamic process, and a good monitor arm gives you the freedom to make those small, continuous adjustments that keep you feeling great. If you’re looking to dive deeper, check out our article on why using a monitor mount is essential for productivity and health.
Essential Features for a Clutter-Free Workspace
Alright, you’ve sorted out compatibility and picked your mounting style. Now for the fun part—the details that take a dual monitor setup from "good" to "I can't believe I ever worked without this."
These features are the finishing touches, the small things that bring a sense of calm and professionalism to your desk. And the most important one? Integrated cable management.
Seriously, this is the secret weapon for a truly clean, minimalist workspace. A tangled mess of power cords and display cables doesn't just look sloppy; it gets in the way every single time you want to adjust your screens.
The Power of Integrated Cable Management
The best dual monitor arms don't just hold your screens; they hide your wires. Cable management isn't an afterthought—it's built right into the design. They create a dedicated path to guide cables from the back of your monitor all the way down the arm, keeping them totally out of sight.
This is about more than just looking good. It's about function. When cables are managed correctly, they move smoothly with the arm. This prevents strain on the ports of your monitors and computer. Without it, every tilt and swivel is a gamble that you might accidentally unplug something.
You’ll typically see a few types of systems:
- Simple Plastic Clips: These are the most basic option. They clip onto the arm and hold your cables in place. They work, but you'll probably still see parts of the cables.
- Removable Covers: A great middle-ground. These arms have plastic covers that snap onto the arm itself, creating a hollow channel. You tuck your cables inside, snap the cover on, and they disappear.
- Internal Channels: The premium stuff. High-end arms often have channels built directly into the metal, giving you the cleanest and most durable solution out there.
Whichever style you choose, the goal is the same: to create one clean line from your monitor to your desk, keeping that "floating screens" look intact. For a truly professional setup, you can pair this with a comprehensive solution like an under-desk cable management kit to hide wires all the way to the power outlet.
A Quick Guide to Installation and Adjustment
Once your arm is mounted, the final step is getting your monitors perfectly positioned. A few pro tips here can save you a ton of frustration and help you get it right on the first try.
The most critical step is setting the tension. Both gas spring and mechanical arms use an internal mechanism to counteract your monitor's weight. If the tension is too loose, your screen will drift downward. If it's too tight, it’ll be a pain to move.
Pro Tip: Always adjust the tension after the monitor is attached. Most arms have a small adjustment screw. Just turn it with the included Allen key until the monitor stays put but moves up and down with a light touch.
Final Steps for a Perfect Setup
Take a few extra minutes to lock everything in. It makes a huge difference in your daily comfort and focus.
- Level Your Monitors: Grab a small level (or use an app on your phone) and place it on top of each monitor to make sure they're perfectly horizontal. Even a tiny slant can be distracting.
- Align the Bezels: Push your monitors together so their inside edges are touching. I like to angle them inward slightly, like a cockpit, for a more immersive feel.
- Check Your Cable Slack: Before you secure all your cables, move each monitor through its full range of motion—up, down, forward, and back. Make sure the cables have enough slack so they never get pulled tight.
- Final Tension Check: After a day or two, double-check the arm tension. The springs sometimes settle a bit, and a quick micro-adjustment might be needed to keep everything feeling perfect.
By focusing on clean cables and proper tension, you’ve officially transformed your desk into a streamlined, functional, and truly ergonomic command center.
Answering Your Final Questions About Dual Monitor Arms
Even after you've weighed all the options, a few questions tend to pop up right before you commit. That's a good thing—it means you're being thorough.
Let's clear up those last few details so you can feel 100% confident in creating the perfect ergonomic setup.
Can I Use Two Monitors of Different Sizes?
Absolutely. In fact, it’s a very common setup, and a good dual monitor arm is designed for exactly this situation.
The key is that each arm adjusts independently. As long as both monitors fall within the arm's weight and size limits, you can mix and match without a problem. For example, you could easily pair a primary 27-inch display with a 24-inch secondary screen. You’d just tweak the height, depth, and tilt of each one separately until they line up perfectly for a seamless view.
How Do I Know if My Desk Is Strong Enough?
This is a great question, and it really comes down to your desk's material and thickness, especially for a clamp mount. Most desks made from solid wood, MDF, or butcher block are good to go, as long as they are at least one inch thick. This provides a solid, stable base.
A word of caution: be careful with desks made from particleboard, hollow-core materials, or glass. For weaker particleboard, you can add a steel reinforcement plate under the desk to spread the pressure out. You should never, ever use a standard clamp on a glass desk—the focused pressure can easily shatter it.
What’s the Difference Between a Gas Spring and a Mechanical Arm?
It all comes down to how smoothly and easily you can make adjustments.
A gas spring arm is the premium option. It uses a pressurized cylinder that perfectly counterbalances your monitor's weight. This lets you glide the screen up, down, or sideways with just a light touch. Think of it as power steering for your displays.
A mechanical spring arm uses a more traditional coil spring. It works perfectly well, but adjusting the tension usually requires a tool (like an Allen key), especially when you're setting it up or changing monitors.
Both get the job done, but gas spring arms offer a far more fluid, effortless experience. They're the best choice if you plan on regularly moving your monitors for sitting, standing, or showing your screen to a coworker.
Ready to transform your workspace with unmatched flexibility and ergonomic support? The EVEO Dual Monitor Arm offers the premium gas-spring movement and robust build quality you need for a perfectly organized and comfortable setup. Upgrade your desk today at EVEO.store
Organize All That You Value – Why Order Creates Freedom
How to Clean Computer Screen: how to clean computer screen without streaks