
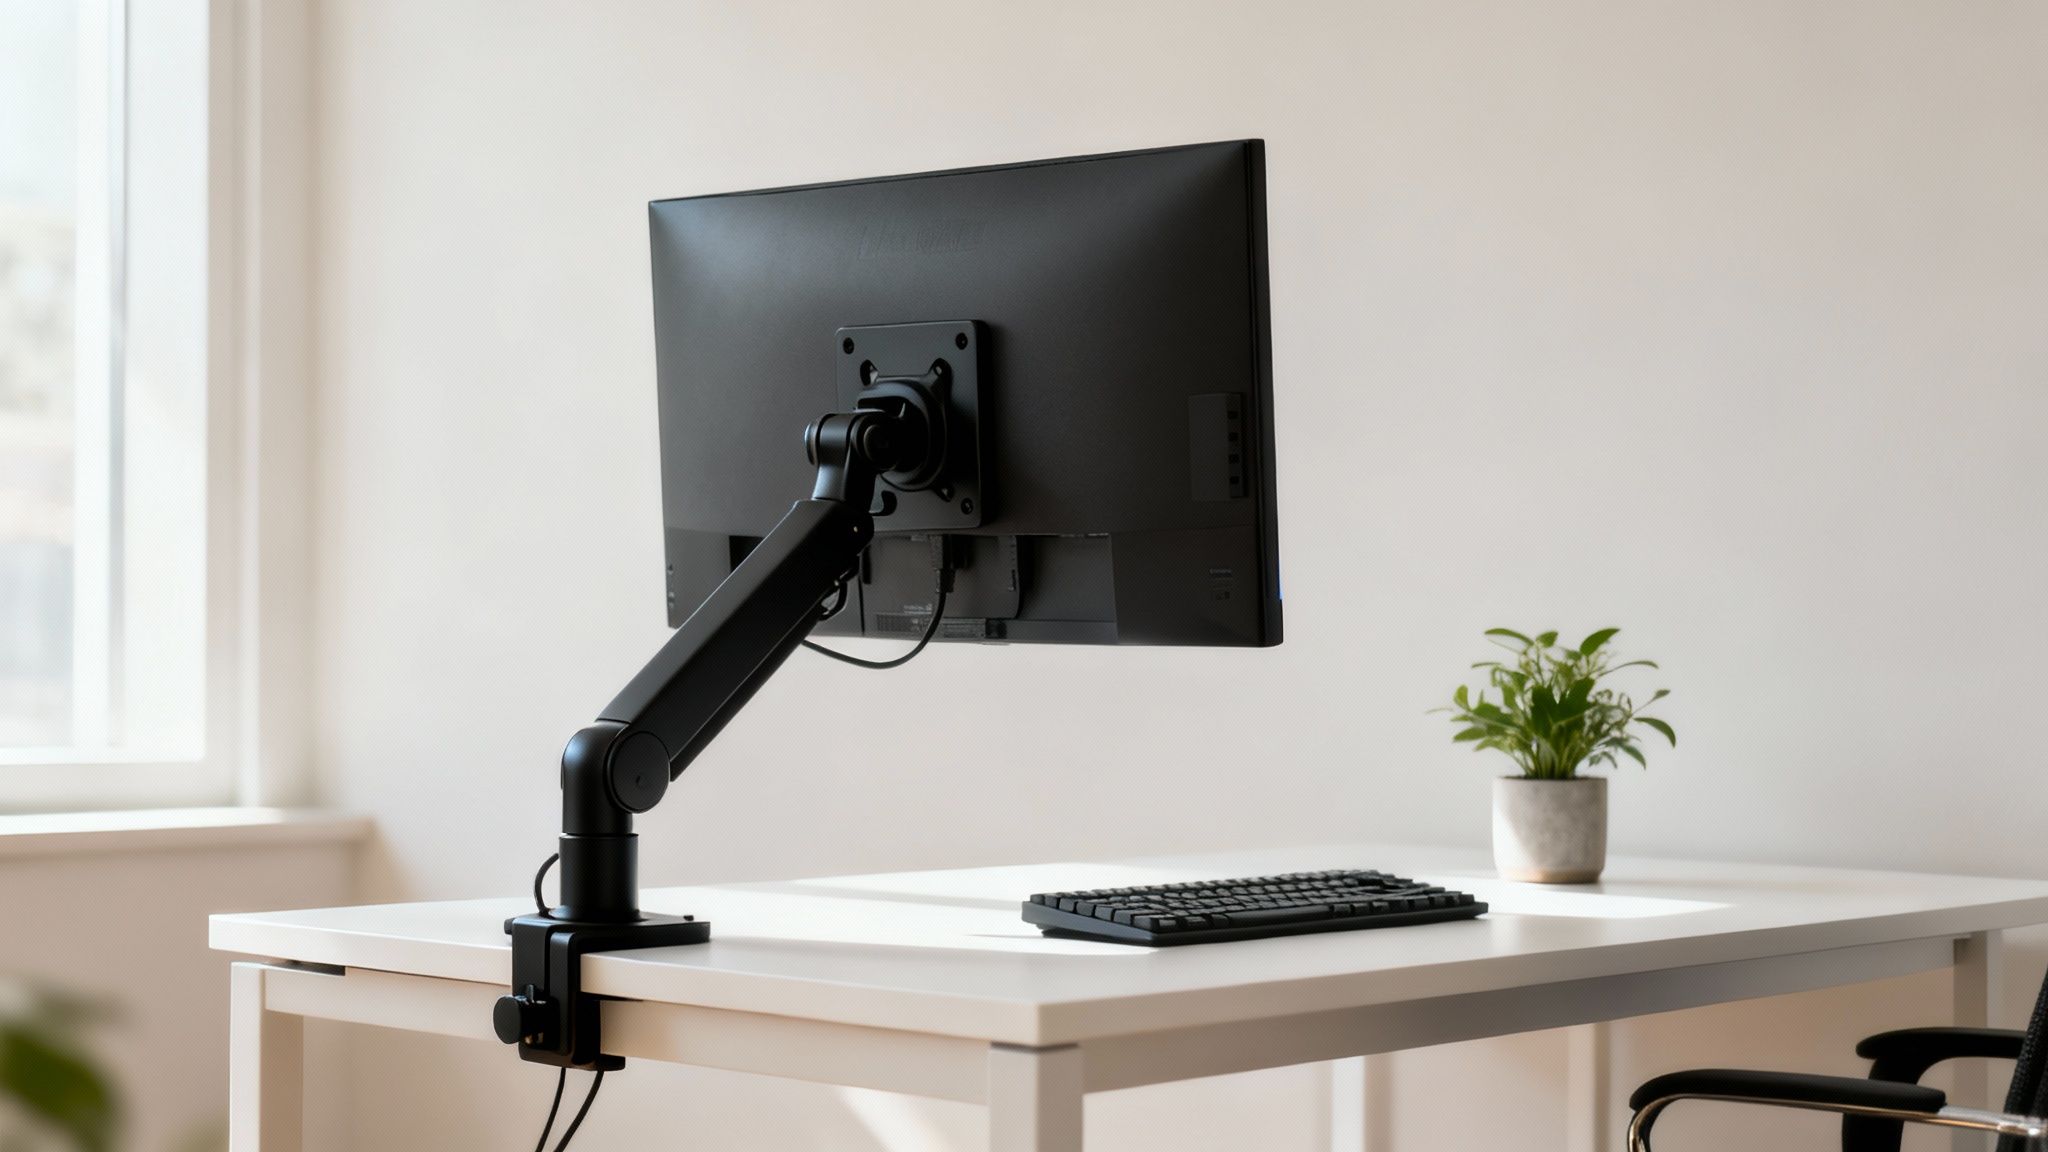
Is your monitor hogging half your desk or forcing you to hunch over just to see the screen? A desk mount VESA setup is the fix you've been looking for. It clamps right onto your desk, lifting your monitor up to free up a ton of valuable space and letting you put it at the perfect height, angle, and distance for your posture and comfort.
Transform Your Workspace with a VESA Desk Mount
Think of your monitor's factory stand as a fixed, uncomfortable stool. A VESA mount, on the other hand, is like a fully adjustable, high-end ergonomic chair for your screen. The moment you lift your display off the desktop, you instantly get a huge chunk of surface area back. You can use that newfound space for documents, gadgets, or just to enjoy a cleaner, more focused setup.
But it's about more than just a tidy desk. A proper monitor setup is the cornerstone of good ergonomics. When your screen is too low—a classic problem with standard stands—you end up craning your neck or slumping your shoulders. Over an eight-hour workday, that leads to nagging neck pain, backaches, and even eye strain. A VESA desk mount tackles these issues head-on by giving you total control.
Why a VESA Desk Mount System Is a Game Changer
The benefits go way beyond just making space and sitting up straighter. A great monitor arm can completely change how you work. For example, the smooth, fluid motion of a gas spring arm lets you make adjustments effortlessly throughout the day. You can flip your monitor from landscape to portrait mode for coding or reading long documents, or swing it around to share your screen with a colleague without missing a beat.
This kind of adaptability makes for a much more dynamic and productive workflow. Just look at the advantages:
- Better Ergonomics: Put your screen right at eye level to slash physical strain and keep you comfortable during long sessions.
- More Desk Space: Get rid of the bulky stand and lift your monitor completely off the desk, creating a cleaner, more organized area.
- Serious Flexibility: Easily tweak your monitor’s height, tilt, swivel, and rotation to fit whatever task you're working on.
- A Sleek, Pro Look: Built-in cable management systems hide all those messy wires, giving you a sharp, modern, and professional setup.
A well-designed workspace isn’t a luxury; it’s a productivity tool. Investing in a desk mount VESA system is one of the single most impactful upgrades you can make for your daily comfort and efficiency.
Ultimately, picking the right desk mount comes down to your specific needs. This guide will walk you through everything that matters—from decoding VESA standards and checking compatibility to choosing the perfect arm style for your monitor and your desk. Armed with the right info, you can turn your workspace into a true hub of comfort and productivity.
Understanding the VESA Standard for Monitor Mounts
When you start shopping for a monitor mount, you'll see the term "VESA compatible" everywhere. But what does that really mean?
Think of it like the USB port on your phone or computer—it's a universal standard that makes sure different devices can connect without a fuss. VESA is the exact same idea, but for attaching a screen to a mount.
This simple but brilliant standard was created by the Video Electronics Standards Association (VESA). They established a universal pattern for the four screw holes you find on the back of most monitors. This takes all the guesswork out of the equation, guaranteeing that a monitor from one brand will fit perfectly on a mount made by another. You get to pick the screen you want and the arm you want, knowing they’ll work together seamlessly.
Decoding Your Monitor's VESA Pattern
Before you buy a mount, the most important step is figuring out your monitor's specific VESA pattern. It’s just the horizontal and vertical distance between the mounting holes, measured in millimeters. Most computer monitors use one of two main sizes.
- 75x75mm: A square pattern where the holes are 75 millimeters (about 3 inches) apart, both across and up-and-down.
- 100x100mm: A slightly larger square where the holes are 100 millimeters (about 4 inches) apart.
These two patterns cover the vast majority of monitors out there, from common 24-inch screens all the way up to many 32-inch models. Keep in mind that bigger or heavier screens, like ultrawides or TVs, might use larger patterns (200x100mm or 200x200mm), so it's always smart to double-check.
Finding this info is easy. Just check your monitor's user manual or look up the model on the manufacturer's website. The VESA spec is almost always listed in the product details.
The VESA standard is the handshake between your monitor and your mount. A successful connection depends on both sides using the same language—in this case, the same measurement.
To make things even simpler, here's a quick reference table that shows which patterns typically match up with certain monitor sizes.
Common VESA Patterns and Compatible Monitor Sizes
| VESA Pattern (mm) | Typical Monitor Size | Typical Monitor Weight Range | Best For |
|---|---|---|---|
| 75x75 | 13" - 24" | 8 - 15 lbs (3.6 - 6.8 kg) | Smaller office monitors and secondary displays. |
| 100x100 | 24" - 32" | 10 - 25 lbs (4.5 - 11.3 kg) | The most common standard for everyday monitors. |
| 200x100 | 30" - 40" | 20 - 45 lbs (9 - 20.4 kg) | Larger widescreen and some smaller ultrawides. |
| 200x200 | 32" - 55" | 25 - 60 lbs (11.3 - 27.2 kg) | Larger monitors, ultrawides, and smaller TVs. |
While this table is a great starting point, always confirm your specific monitor's VESA pattern and weight to ensure a perfect and secure fit with your new mount.
How to Measure Your VESA Pattern Manually
No manual? No problem. You can measure the pattern yourself in less than a minute with a ruler or tape measure.
-
Locate the Holes: Turn your monitor around and look for four screw holes arranged in a square. They might be open, or they could be hiding under the factory stand or a small plastic cover you can pop right off.
-
Measure Horizontally: With a ruler, measure the distance from the center of one top hole to the center of the other top hole. For the best accuracy, measure in millimeters.
-
Measure Vertically: Now, measure the distance from the center of a top hole to the center of the bottom hole directly beneath it.
The two numbers you just found are your VESA pattern. If you measured 100mm across and 100mm down, you’ve got a 100x100mm VESA pattern. Simple as that.
This single measurement is all you need to confirm your monitor will fit your mount flawlessly. If you're planning a more advanced setup, understanding how these standards work across multiple screens is key. Our guide to the best monitor arms for dual monitors dives deeper into that topic.
Once you know your VESA pattern, you've unlocked a world of ergonomic possibilities and can shop for a monitor arm with total confidence.
Checking Monitor and Desk Compatibility
So, you’ve figured out your monitor's VESA pattern. That’s a great start, but it's just one piece of the puzzle. Before you commit to a desk mount VESA system, a few quick checks will make sure your monitor and desk are actually ready for the upgrade.
Think of it like measuring a room before you buy new furniture—a few minutes of prep now will save you a massive headache later.
First up, let’s talk about the monitor itself. Beyond the VESA pattern, its weight is the most critical factor. Every single monitor arm has a specific load capacity, and pushing that limit is just asking for trouble. A mount that can't handle your screen's weight will start to sag, drift out of place, or could even fail completely. That's a risk no one wants to take with their expensive gear.
Always check your monitor's official specs for its weight without the original stand attached. That's the number that really matters. Then, put it up against the weight capacity listed for the desk mount you're looking at.
Your Monitor's Weight: The Deciding Factor
A monitor arm’s weight limit is like a bridge's capacity sign. A small car can zip across without a problem, but a heavy truck is going to cause some serious structural stress. It’s the exact same idea here.
For example, a standard 24-inch office monitor usually weighs around 10-12 pounds, which is well within the range of most basic arms. But if you’ve got a beastly 34-inch ultrawide or a 49-inch super-ultrawide, you could easily be looking at 25-35 pounds or more. Screens like that demand a heavy-duty desk mount specifically built to handle the extra load.
Don't just cross your fingers and hope your monitor will be fine. A sagging arm isn't just an annoyance; it's a clear sign of constant strain that can lead to a total mechanical failure. Always pick a mount with a weight capacity that comfortably exceeds your monitor's weight.
And if you’re planning a dual-monitor setup, you’ve got another layer to consider: the combined weight of both screens. Two 10-pound monitors mean you need a dual mount that can support at least 20 pounds, ideally with a little extra capacity to keep things stable.
Assessing Your Desk's Fitness
Once you've cleared your monitor for duty, it's time to give your desk a good look. The strongest monitor arm on the planet is useless if the surface it’s clamped to is flimsy. The two main mounting methods, C-clamps and grommets, each have their own desk requirements.
1. C-Clamp Mounts and Desk Thickness
The C-clamp is the most common option, grabbing onto the edge of your desk like a vise. For this to work, you need two things: the right desk thickness and a clear, flat edge.
- Measure Your Desk Thickness: Grab a ruler or tape measure and find out how thick your desktop is. Most clamps work within a specific range, usually from 0.4 inches to 3.5 inches. If your desk is too thin or too thick, the clamp just won't get a secure grip.
- Check for Obstructions: Look under your desk edge. Is it flat and clear? Any beams, support frames, or even a decorative lip can stop the clamp from sitting flush. That creates an unstable, wobbly, and unsafe installation.
Desks made from solid wood or high-quality MDF are perfect. If you have a particleboard or hollow-core desk (super common in budget furniture), be careful. The clamping force can actually crush or crack the surface. In that case, adding a steel reinforcement plate can help distribute the pressure and keep your desk in one piece.
2. Grommet Mounts and Desk Holes
A grommet mount offers a super clean, more permanent-looking install by securing the arm straight through a hole in your desk. Many office desks already come with these holes for running cables.
- Measure the Hole Diameter: If you already have a hole, measure its diameter. Grommet mount bolts are made to fit standard sizes, typically between 0.4 inches and 2.4 inches.
- Consider Drilling Your Own: No hole? No problem. You can drill one yourself. This gives you total freedom over where the mount goes, but you'll need a drill and a hole saw bit. Just remember, this is a permanent change to your desk, so measure twice, drill once!
In the end, a successful setup all comes down to these initial checks. By confirming your monitor’s weight and your desk’s thickness and material, you can buy a desk mount with total confidence, knowing every part will work together for a stable, secure, and perfectly ergonomic workspace.
Choosing the Right Type of Desk Mount Arm
Not all monitor arms are built the same, and picking the right one can completely transform your desk experience. The first big decision you’ll face is how the arm actually attaches to your desk. This choice is crucial—it determines the stability of your setup, the final look, and whether it’s even compatible with your furniture.
The two main ways to mount an arm are with a C-clamp or a grommet mount. Think of it like hanging a picture: you could use a temporary adhesive hook or a permanent wall anchor. Each has its place.
C-Clamp vs. Grommet: Which Is Best for You?
The C-clamp mount is easily the most popular and versatile option out there. It works just like a big vise, gripping the edge of your desk to create a super secure anchor point without needing to drill any holes. If you want a straightforward installation or think you might move your setup around later, this is the way to go.
Just be mindful that C-clamps work best on desks made of solid stuff like wood or MDF that are thick enough to handle the pressure. Desks made from particleboard or hollow materials can get damaged, as the focused force might crush the surface.
A grommet mount, on the other hand, gives you a much cleaner, more built-in look. It secures the arm through a hole in your desk—either a pre-existing one for cables or one you drill yourself. This approach spreads the weight more evenly and is often seen as more stable, especially for heavier monitors.
This visual guide can help you figure out the best path forward based on your specific monitor and desk.
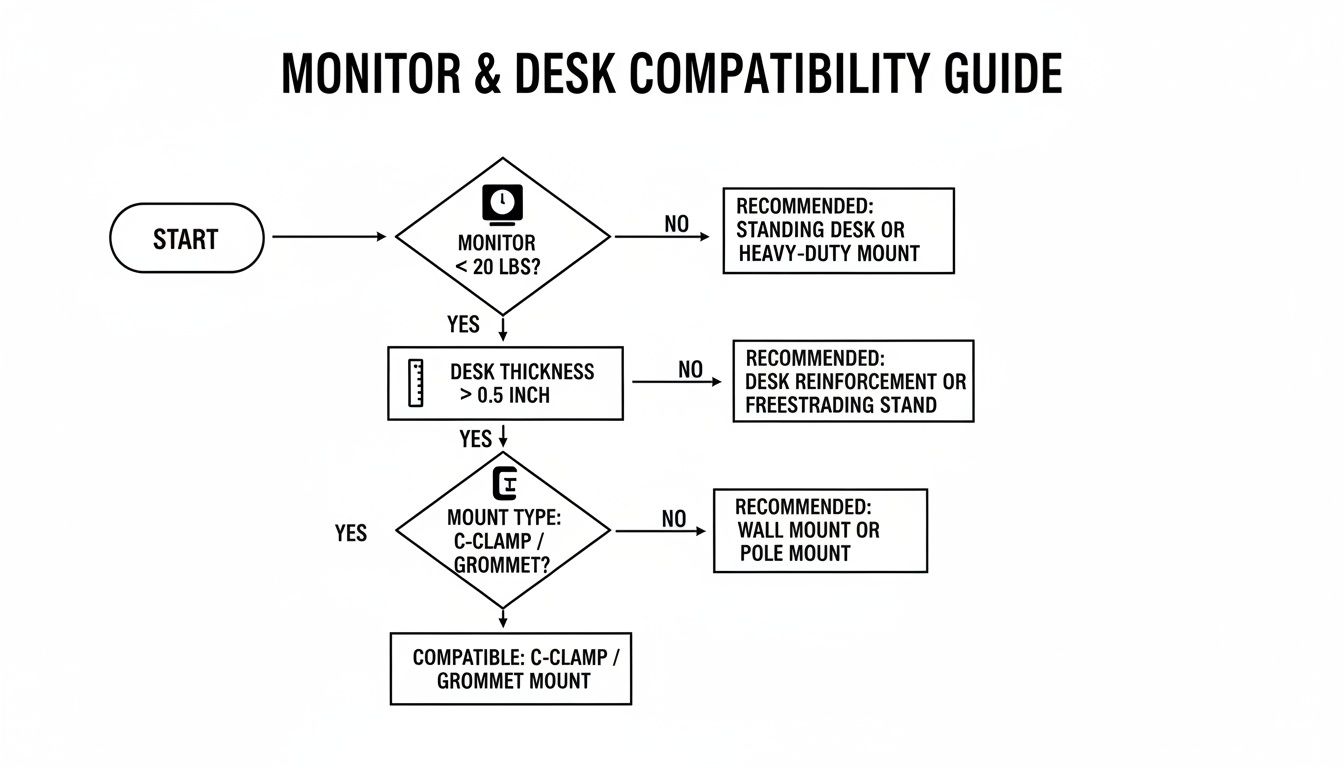
As the flowchart shows, the right choice really comes down to your monitor’s weight, your desk’s thickness, and whether your desk material can safely handle the squeeze of a clamp.
Understanding Arm Mechanisms
Beyond the base, the arm's mechanism is what dictates how you'll interact with your monitor day-to-day. This is where you move from basic stability to effortless, on-the-fly adjustments, matching the hardware to how you actually work. There are three main types to know.
-
Static Arms: Think of these as a fixed-height stool—incredibly sturdy, but not very flexible. They lift your monitor to a set position, and you typically adjust it by sliding the arm up or down a central pole. They’re a great, budget-friendly choice if you find one comfortable spot and stick with it.
-
Mechanical Spring Arms: This type is a lot like a classic adjustable desk lamp. It uses a coiled spring that gives you a solid range of height and depth adjustments. While it takes a little more effort to move than a gas spring, it offers fantastic stability and is a great middle-ground for people who need flexibility every now and then.
-
Gas Spring Arms: This is the top-tier upgrade in monitor arm tech. A gas spring arm uses a pressurized gas cylinder, kind of like what you’d find in a high-end office chair. The result? Smooth, feather-light, one-touch adjustments.
If your work involves constantly sharing your screen, switching between sitting and standing, or flipping your monitor from horizontal to vertical, a gas spring arm is an investment that pays for itself. Its fluid motion makes repositioning your screen completely effortless.
Choosing the right mechanism is all about balancing your daily needs with your budget. For a "set it and forget it" setup, a simple static arm is perfect. But for dynamic workflows that demand constant movement, the smooth articulation of a gas spring system delivers an experience that's second to none. This choice ensures your setup is perfectly tuned to how you work.
Installation and Cable Management Made Simple
You’ve done the research and picked the perfect desk mount. Awesome. Now comes the fun part: putting it all together. A smooth installation isn't just about making sure your monitor is secure; it's about creating that clean, professional workspace you've been picturing. With a few key tips, you can dodge the common frustrations and get it right the first time.
Think of it like building with LEGOs—if you follow the instructions and make sure every piece clicks into place, you'll end up with a rock-solid build. Rushing it only leads to a wobbly, unstable monitor, and nobody wants that.
A Step-by-Step Guide to Secure Installation
While every mount has its own manual, the core process is pretty much the same. Following these steps will help you get a stable, safe setup without any of the usual guesswork.
-
Prep Your Workspace: First things first, clear your desk completely. You’ll need plenty of room to assemble the mount without knocking things over. It's a great idea to lay down a soft towel to protect your screen from any accidental scratches.
-
Assemble the Base: Whether you went with a C-clamp or a grommet mount, start by putting the base together and attaching the main pole or the first part of the arm. Secure it to your desk, but don't crank it down all the way just yet—a snug fit is fine for now.
-
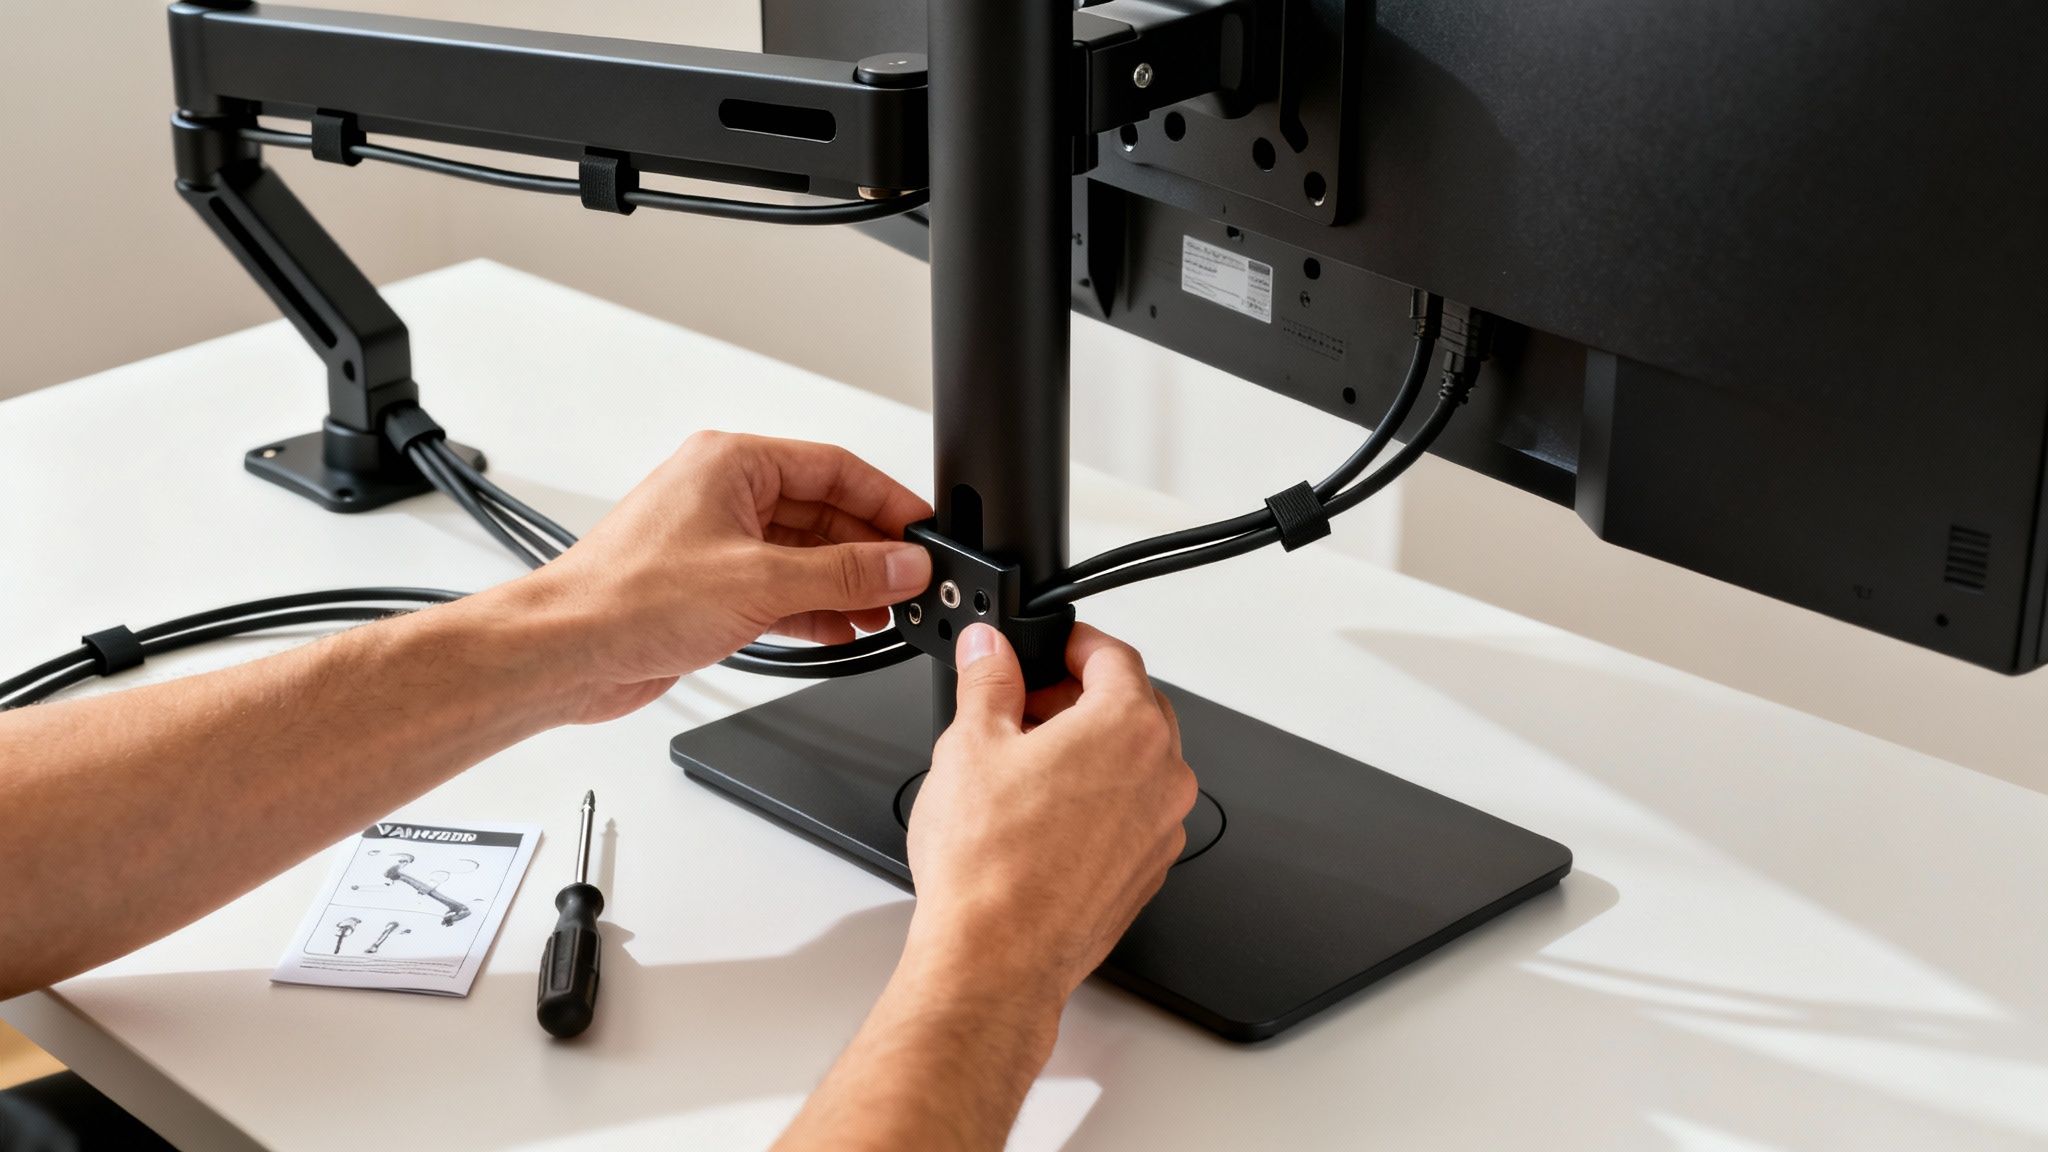
Attach the VESA Plate: Gently lay your monitor face-down on that soft cloth. Screw the VESA plate onto the back of your monitor. A word of caution here: hand-tighten the screws until they're snug, then give them one final quarter-turn. Over-tightening is a fast way to strip the threads or, even worse, damage your monitor.
-
Mount the Monitor: This step is much easier with a friend, especially for bigger screens. Carefully lift the monitor and slide the VESA plate onto the arm. You should hear or feel a solid "click" as it locks in. Once it's secure, you can go back and fully tighten the clamp or grommet base for that final, unshakeable fit.
Fine-Tuning Your Gas Spring Arm
If you chose a gas spring model, there’s one last crucial step: adjusting the tension. This mechanism uses a pressurized cylinder to perfectly counterbalance your monitor's weight, which is what gives you those smooth, one-touch movements.
An improperly tensioned gas spring is the number one reason for a drifting or sagging monitor. The arm must be calibrated to your monitor’s exact weight to hold its position.
Look for a small adjustment screw, usually right on the arm. If your monitor is too heavy and keeps sinking, tighten the screw (typically clockwise) to increase the tension. If it's too light and rises on its own, loosen it (counter-clockwise) to decrease the tension. Make small adjustments until the monitor stays exactly where you put it.
Mastering Your Cable Management
With your monitor mounted and secure, the final touch is wrangling the cables. A tangled mess of wires can completely ruin the clean, minimalist look you've worked for. Luckily, most modern desk mounts come with built-in solutions to help you out.
- Use the Integrated Channels: Look for removable plastic covers or clips running along the arm. These are designed to guide your power and display cables neatly down to the desk, keeping them totally hidden from view.
- Leave Some Slack: When you're routing your cables, make sure to leave a little extra slack at the joints of the arm. This is key to ensuring you can move and adjust your monitor freely without yanking on the cords or accidentally unplugging something.
For a truly pristine setup, you can take cable management to the next level. Hiding the cables that run from your desk to the wall outlet is the final boss of organization. Using accessories like cable raceways helps you nail that completely clutter-free look. To learn more, check out our complete guide on how to master raceway cable management.
By taking a thoughtful approach to installation and cable management, you create more than just an ergonomic setup—you build a focused, efficient, and visually appealing workspace that feels as good as it looks.
Achieve the Ideal Setup with EVEO Solutions
Choosing the right desk mount VESA system is about so much more than just reclaiming a bit of desk space. It’s really an investment in your daily comfort and how productive you feel. At EVEO, we build solutions designed for the real world, whether you have a simple single-screen setup or a complex, multi-monitor command center. Our goal is to make durable, intuitive, and ergonomically sound products that just work, right out of the box.
We know every setup is unique. That’s why our collection isn’t one-size-fits-all. We have a whole range of monitor arms built for specific needs. So, whether you're trying to tame a heavy ultrawide display or get a dual-monitor layout perfectly aligned for multitasking, we have an arm designed to deliver rock-solid stability and buttery-smooth movement.
Engineered for Performance and Durability
At the heart of every single EVEO product is a commitment to quality. Our monitor arms go through intense testing to make sure they don’t just meet industry standards for load capacity and strength—they blow past them. We obsess over the little details that actually matter in day-to-day use.
- Premium Materials: We use high-grade steel and aluminum to build arms that refuse to sag or wobble, even when you've got a heavy monitor stretched out to its full extension.
- Smooth Articulation: Our gas spring systems are fine-tuned for effortless, one-touch adjustments. You can find that perfect ergonomic sweet spot without having to wrestle with your screen.
- Universal Compatibility: All our mounts are designed for the standard VESA patterns (75x75mm and 100x100mm), which guarantees a secure fit for the huge majority of monitors out there.
This focus on tough engineering is why thousands of customers trust EVEO to hold up their most valuable gear. We're proud to see that focus paying off, especially as the global desk-mount market, valued at around USD 902 million recently, continues to grow. It’s a clear sign of a worldwide shift toward more ergonomic and efficient ways of working.
With over 100,000 five-star reviews, our products have become a go-to choice for professionals who need something they can truly rely on. We're not just selling a piece of hardware; we're providing the foundation for a more comfortable and productive workday.
Complete Your Ergonomic Ecosystem
A great monitor arm is the star of the show, but it's the finishing touches that really bring an optimized workspace together. We also offer a lineup of complementary products to help you create a completely streamlined environment. You can tame that mess of unruly wires with our simple cable management kits and keep your screen looking brand new with our specially made screen cleaners.
We believe that building a better workspace should be simple and totally risk-free. That’s why we back everything we make with dedicated customer support and a satisfaction guarantee. When you choose EVEO, you're getting more than a product—you're partnering with a brand that’s committed to helping you nail your ideal setup.
Ready to find the perfect solution for your desk? Explore our full range of EVEO monitor mounts.
Still Have Questions? We've Got Answers.
Even after you’ve measured twice and picked your perfect mount, a few questions can pop up. That’s totally normal. Getting these sorted out now will save you a ton of headaches later and make sure your setup is rock-solid from day one.
Here are a few of the most common things we get asked about.
What If My Monitor Has No VESA Holes?
So you've flipped your monitor around and... nothing. No four-hole VESA pattern. Don't worry, you don't need to buy a new screen. The fix is a simple non-VESA adapter plate.
These smart little kits use adjustable arms to grip your monitor securely from the sides or the top and bottom. Once attached, they give you a standard VESA mounting point, letting you connect to any compatible arm and get all those sweet ergonomic perks.
Is My Desk Strong Enough For a Clamp Mount?
This is a big one, and it's smart to ask. Your desk is the foundation of your entire setup. Most desks made from solid wood, MDF, or bamboo that are at least half an inch thick can handle a clamp mount with no problem at all.
However, clamping directly onto a glass desktop is a definite no-go.
If you have a particleboard desk or one with a hollow honeycomb core, you'll want to be careful. The focused pressure from a clamp can crack or crush these weaker materials. We highly recommend using a steel reinforcement plate to spread the load evenly and keep your desk safe.
Gas vs. Mechanical Spring Arms: What's the Real Difference?
It all comes down to how they work and what that feels like for you.
- Gas Spring Arms: Think of these as the luxury option. They use a pressurized gas cylinder to make adjustments feel buttery smooth and effortless. If you're constantly shifting your monitor—say, for sitting, standing, or sharing your screen—a gas spring arm lets you do it with a single touch.
- Mechanical Spring Arms: These rely on a classic coiled metal spring. Adjustments take a bit more deliberate effort, sometimes requiring you to loosen a knob to reposition the arm. But in return, you get fantastic stability at a more wallet-friendly price.
Is a Dual Monitor Arm Better Than Two Single Arms?
This really depends on your workflow and how much flexibility you need. A single dual-monitor arm is a space-saver, using just one mounting point on your desk. This makes for a cleaner look and a much simpler installation.
On the other hand, using two separate single arms gives you ultimate control. You can place each monitor exactly where you want it, which is perfect for asymmetrical setups or mixing monitors of different sizes and orientations. It’s all about total freedom.
Ready to transform your desk into a powerhouse of comfort and productivity? Find the perfect ergonomic fit for your space with EVEO's industry-leading monitor mounts. Explore the collection now.
A Practical Guide to Raceway Cable Management for a Clean Setup
How to Clean Your Laptop Screen Without Causing Damage