That layer of dust and smudges on your monitor is more than just an eyesore—it’s a direct barrier to your focus and productivity. The best approach for how to clean your monitor screen is a simple, safe process: power everything down, give it a gentle wipe with a dry microfiber cloth to get rid of loose dust, and then use a separate, lightly dampened cloth with a good alcohol-free cleaner for any stubborn smudges.
This method isn’t just about getting a clearer view; it’s about protecting your investment and restoring that perfect, crisp clarity your display was meant to have.
Why a Clean Screen Matters More Than You Think
It’s surprisingly easy to ignore the slow creep of fingerprints and dust on your display. But that gradual buildup has a bigger impact than you might realize. A dirty screen forces your eyes to constantly work harder to focus on text and images, which can lead to eye strain, fatigue, and even headaches after a long day. You're basically trying to look through a hazy filter, which completely undermines the crispness and vibrancy your monitor was designed for.
And it’s not just about visual clarity—it's also about basic hygiene. Think about it: your monitor screen can become a hotspot for germs. Some studies have found that smartphone screens can harbor up to 25,000 germs per square inch, and our computer monitors aren't that far behind. With over 70% of professionals working from home as of 2023, these surfaces are getting touched and sneezed on more than ever, making a proper cleaning routine essential. You can discover more insights about how remote work has impacted the screen cleaner market.
The Hidden Costs of Using the Wrong Cleaning Methods
In a pinch, grabbing the nearest paper towel or a bottle of Windex might seem like a quick fix, but it’s one of the absolute worst things you can do to your monitor. These everyday items can cause permanent, irreversible damage.
Here's exactly what you're risking:
- Permanent Scratches: Paper towels are made from wood pulp. They feel soft, but on a microscopic level, they're abrasive enough to create tiny scratches on your screen's surface. Over time, those micro-scratches build up and create a dull, hazy look that you can't fix.
- Damaged Anti-Glare Coatings: Most modern monitors come with special anti-glare or anti-reflective coatings. The harsh chemicals in window cleaners, especially things like ammonia and alcohol, are notorious for stripping these delicate layers right off. You'll be left with cloudy, permanent blotches that ruin the display.
- Internal Damage: Spraying any liquid directly onto the screen is a huge mistake. Gravity takes over, and that moisture will inevitably drip down into the bezel, where it can easily short-circuit the sensitive internal components.
For anyone who truly values their gear, the right tools are non-negotiable. A proper cleaning routine doesn't just make your viewing experience better—it actively protects the lifespan and functionality of your expensive display.
Once you understand these risks, it’s clear why a dedicated, safe cleaning process is so important. It's about maintaining both your well-being and the health of your hardware.
Gathering the Right Tools for a Perfect Clean
Before you even think about touching your screen, let's talk about your toolkit. Getting the right gear is the single most important step in preventing permanent scratches, streaks, or damage to those delicate screen coatings. It’s what turns a nerve-wracking chore into a simple, two-minute maintenance task.
The good news is you don’t need an entire drawer full of supplies. A flawless, factory-fresh clean really just comes down to two things: a high-quality microfiber cloth and a specially formulated, alcohol-free cleaning solution. That’s it. Anything else is either overkill or just asking for trouble.
Choosing the Right Cloth and Cleaner
Think of a microfiber cloth as your screen’s best friend. Unlike a paper towel or an old t-shirt, which are surprisingly abrasive, microfiber is designed to be incredibly soft. Its split fibers create a natural static charge that lifts and traps dust particles instead of just smearing them around. That means you get a clean finish without leaving behind lint or creating tiny micro-scratches.
Just as critical is the liquid you use. A premium screen cleaner, like EVEO's screen cleaner, is engineered to be powerful on grime but gentle on your display. These formulas are always alcohol-free and ammonia-free, which is non-negotiable for protecting the anti-glare and anti-reflective coatings on most modern monitors. For a deeper dive into what makes a great cleaner, our ultimate screen cleaner buying guide has all the details.
What to Avoid at All Costs
Knowing what not to use is just as important as knowing what to grab. So many common household products can cause irreversible damage to a monitor.
- Paper Towels and Tissues: These seem soft, but they're made from wood pulp. Over time, they’ll leave a web of fine scratches on your screen's surface and a trail of lint.
- Household Cleaners: Products like Windex, bleach, or other all-purpose sprays are loaded with harsh chemicals like ammonia and alcohol. These will strip away your monitor's protective coatings, leaving behind permanent cloudy patches or streaks.
- Tap Water: It might seem harmless, but tap water is full of minerals. Once the water evaporates, those minerals get left behind as chalky white spots on your screen. If you're in a pinch, distilled water is a safer bet, but a proper cleaning solution is always better for cutting through fingerprints and smudges.
To make it simple, here’s a quick-glance table of what to reach for and what to leave on the shelf.
Safe vs Unsafe Screen Cleaning Materials
| Material | Why It's Safe (or Unsafe) | Recommended for Monitor Use? |
|---|---|---|
| Microfiber Cloth | Ultra-soft fibers trap dust and dirt without scratching or leaving lint behind. | Yes, highly recommended. |
| Specialized Screen Cleaner | Formulated to be alcohol and ammonia-free, protecting delicate screen coatings. | Yes, essential for a safe clean. |
| Distilled Water | Mineral-free, so it won't leave spots. Lacks the cleaning power for oily smudges. | Okay, but not ideal. |
| Paper Towels/Tissues | Abrasive wood pulp fibers can cause micro-scratches and leave lint residue. | No, avoid completely. |
| Household Glass Cleaner | Contains harsh chemicals (ammonia, alcohol) that strip anti-glare coatings. | No, this will cause damage. |
| Tap Water | Contains minerals that leave behind chalky residue and streaks when dry. | No, use distilled if you must. |
The takeaway is pretty clear: stick to products designed specifically for your screen.
The rule of thumb is simple: If a product wasn't specifically made for cleaning electronics, keep it far away from your monitor. Sticking to a dedicated cleaner and a clean microfiber cloth eliminates all the guesswork and guarantees a safe, perfect result every single time.
The Best Way to Clean Your Screen Without Streaks
Alright, you’ve got the right gear. Now it’s time for the real magic. Getting a perfectly clear, streak-free monitor isn't about scrubbing harder—it's about using a gentle, proven method that protects your screen while wiping away every last bit of dust and grime.
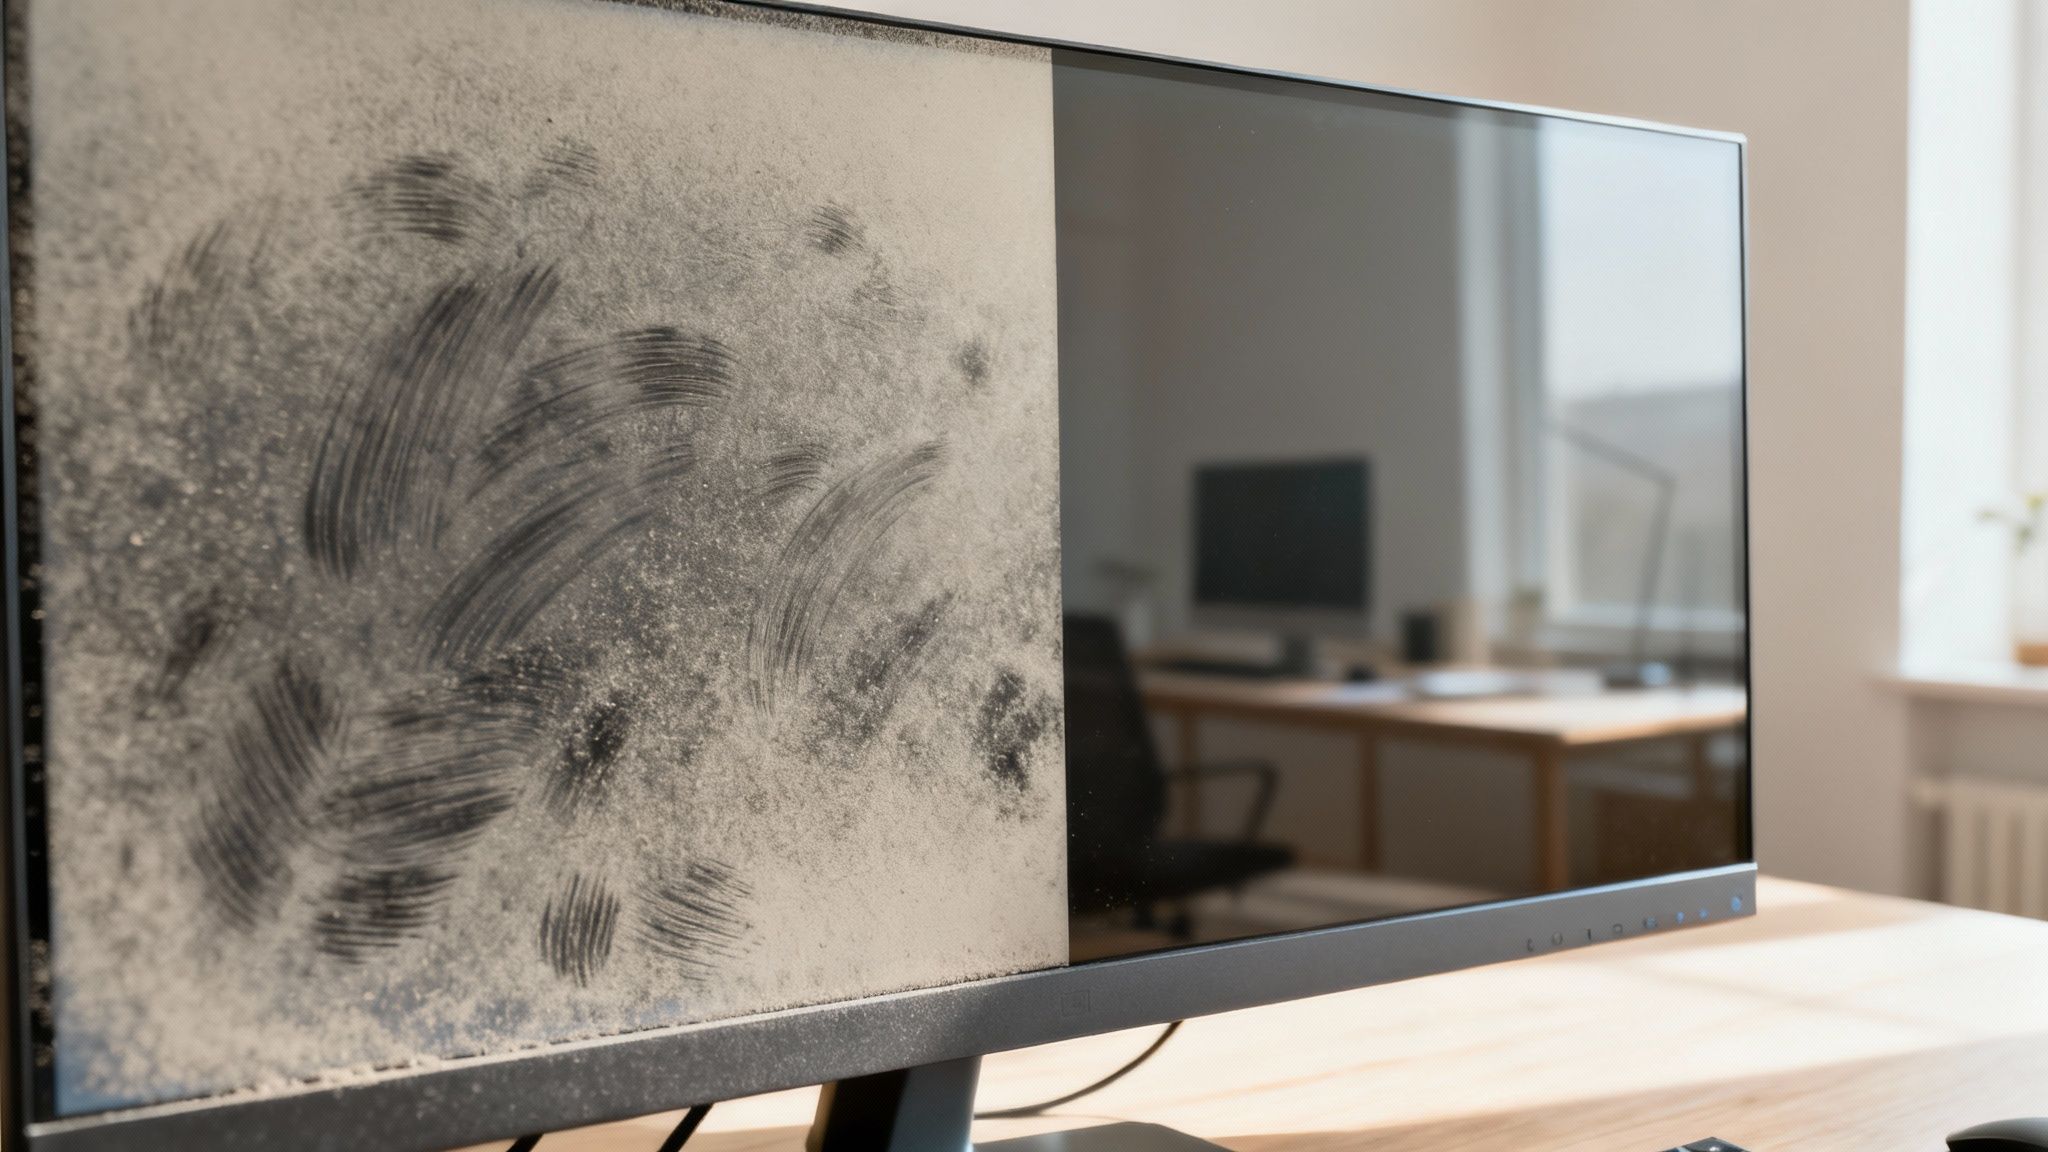
First thing's first, and this is non-negotiable: power down your monitor completely. Go ahead and unplug it from the wall, too. A black screen reveals every single fingerprint and speck of dust, making them impossible to miss. It's also a critical safety measure to avoid any risk of moisture causing electrical damage.
This simple infographic breaks down the core of a safe and effective clean.

As you can see, the essentials are simple: a good microfiber cloth and a proper cleaning solution are your best friends. Abrasive materials like paper towels? Strictly off-limits.
Start With a Dry Wipe to Remove Loose Debris
Before you even think about adding moisture, your first job is to get rid of all the loose dust. If you jump straight to a damp cloth on a dusty screen, you're essentially creating a fine, gritty paste. Wiping that around is a surefire way to cause micro-scratches.
Grab a clean, dry microfiber cloth. Using almost no pressure, gently wipe the screen in a consistent pattern. I find it’s best to start at the top and work my way down in long, even sweeps. This stops you from accidentally dragging dust back over the areas you just cleaned.
Don't forget the corners and the bezel, where dust loves to settle. Just fold your cloth to make a clean edge and carefully trace the screen's perimeter to lift any stubborn buildup. You'd be surprised what a difference this dry pass alone can make.
Applying the Cleaning Solution the Right Way
This is the step where most people trip up. Never, ever spray cleaning solution directly onto your monitor screen. It’s a recipe for disaster. Liquid can easily drip down into the bezel and seep inside, causing permanent damage to the delicate electronics.
The golden rule of screen cleaning: Always apply the cleaner to your cloth, not the screen. This puts you in complete control of the moisture and prevents any catastrophic drips.
Take your second clean microfiber cloth and give it a light misting with a high-quality, alcohol-free screen cleaner. You want the cloth to be just slightly damp, not wet. Two or three sprays are usually plenty. If you're dealing with a really grimy screen or cleaning on the go, specially formulated EVEO’s electronic screen cleaner wipes are a fantastic, safe alternative.
The Professional Wiping Pattern for a Flawless Finish
With your lightly dampened cloth ready, it’s time to banish those smudges for good. The secret to a streak-free finish is a deliberate, methodical wiping pattern. Haphazardly scrubbing in circles just spreads the mess around.
Instead, try this proven technique for lifting dirt off the screen:
- Begin at the top of the screen, starting in one corner.
- Wipe across in a straight, horizontal line to the other side.
- Move down slightly, overlapping your last pass by about an inch, and wipe back across.
- Repeat this pattern all the way to the bottom until you've covered the entire screen.
This methodical motion ensures you’re actually lifting the grime away, not just smearing it. Research backs this up, showing dirty screens can reduce visibility by 25% and drop your focus by 15%. Using the right ammonia-free solution is critical, as excess liquid seeping into the edges is responsible for 40% of monitor failures.
Once you’re done, grab a third dry microfiber cloth (or the dry side of your cleaning cloth) and give the screen one final, gentle buff using the same pattern. This step lifts away any faint moisture residue, leaving behind nothing but a crystal-clear, perfectly clean display.
Cleaning Different Types of Monitor Screens
Not all monitor screens are created equal. The secret to getting a perfect, streak-free clean without causing any damage is knowing exactly what kind of screen you're dealing with. A glossy OLED panel needs a different touch than a matte screen with a delicate anti-glare coating. If you just grab any old cleaner and go for it, you're setting yourself up for disappointment—or worse, permanent damage.
The biggest difference you'll encounter is between matte and glossy finishes. Matte screens are engineered to diffuse light and kill reflections, which is a lifesaver in brightly lit rooms. On the flip side, glossy screens—common on high-end OLED or gaming monitors—give you deeper blacks and more vibrant colors but act like a magnet for fingerprints and smudges.
Protecting Your Matte or Anti-Glare Screen
If you've got a matte screen, your number one job is to protect its anti-glare coating. This microscopically textured surface is incredibly sensitive to harsh chemicals. Alcohol or ammonia-based cleaners will literally strip this coating away, leaving you with permanent cloudy splotches that no amount of scrubbing can ever fix.
For these screens, a gentle approach is non-negotiable:
- Always start dry. A quick, thorough wipe with a dry microfiber cloth often takes care of most of the dust.
- Use minimal moisture. If you still see smudges, the only safe bet is a lightly dampened cloth with a specialized, alcohol-free cleaner like EVEO's Screen Cleaner.
- Don't scrub. Apply light, even pressure. Trying to grind out a stubborn spot will only damage that delicate coating.
Think of the anti-glare coating like the delicate finish on a piece of fine furniture. You wouldn't use a harsh chemical on it, and the same principle applies here. Gentleness is key to preserving its function and appearance for years to come.
This gentle approach isn't just a suggestion; it's backed by manufacturer testing. Studies show that using the wrong household sprays can damage screen coatings in a whopping 65% of cases, potentially shortening a monitor's life by up to two years. Conversely, a simple top-down wipe with a lightly dampened cloth can boost clarity by 40% in an instant. For a deeper dive into screen cleaner trends, you can explore the latest market insights.
Achieving a Streak-Free Shine on Glossy Screens
Glossy screens are all about that visual "wow" factor, but they show every single fingerprint and streak. Your biggest challenge here is getting that flawless, mirror-like finish. While the rule about avoiding harsh chemicals still stands, the technique for a streak-free result is a bit different.
The goal is to lift oils and grime completely without leaving a trace of moisture behind. After your gentle pass with a dampened cloth, immediately follow up with a separate, completely dry microfiber cloth. Use long, straight wiping motions—either vertically or horizontally—to buff away any faint streaks before they get a chance to air-dry.
Tackling Ultrawide and Dual-Monitor Setups
Working with huge ultrawide screens or multiple monitors brings its own set of challenges. It's surprisingly easy to miss spots on a massive display or struggle with the dusty seam where two monitors meet.
Here’s how to handle these setups like a pro:
- For Ultrawide Monitors: Mentally divide the screen into three sections: left, middle, and right. Clean and dry one section completely before moving on to the next. This simple trick prevents the cleaning solution from drying halfway through your wipe and causing streaks.
- For Dual Monitors: Treat each monitor as its own job. Pay extra attention to the inner bezels right where they meet—it's a prime spot for dust to build up. The clean, folded edge of your microfiber cloth is perfect for getting into that seam.
By tailoring your technique to your specific screen and setup, you're not just cleaning your monitor—you're actually caring for it the right way.
Tackling Stubborn Smudges and Long-Term Care

We've all been there. That one stubborn fingerprint or dried-on speck that just laughs at a standard wipe-down. Your first instinct might be to press harder or reach for a stronger cleaner, but both of those can spell disaster for your screen, potentially causing permanent damage.
There's a better way. The solution is a gentle, focused approach. Grab a clean part of your microfiber cloth and give it just one or two quick spritzes of your alcohol-free screen cleaner. You're aiming for a small, damp spot on the cloth—not dripping wet, just a little more concentrated than usual.
Now, gently press that dampened section onto the stubborn mark and just hold it there for a few seconds. This little trick gives the cleaning solution time to work its magic and break down the grime without any scrubbing. After waiting, switch to a clean, dry section of the cloth and wipe the area in a gentle circular motion. That smudge should lift right off.
Creating a Simple Maintenance Routine
Knowing how to clean your screen is half the battle; keeping it that way is about consistency. You don't need a complicated calendar reminder. A simple routine based on your workspace is all it takes to keep things looking sharp.
- For the average home office: A quick dry-dusting once a week and a proper cleaning with solution every two weeks is usually the sweet spot. This keeps dust at bay and handles any accidental smudges.
- For high-traffic or dusty spots: If you've got pets, kids, or love an open window, you'll probably want to do a full cleaning weekly. Dust, pollen, and fingerprints just build up faster in busy environments.
- For the minimalist setup: If your desk is generally clean and you're good about not touching the screen, a full cleaning once a month might be all you need to maintain that crystal-clear view.
The best rule of thumb is simple: clean your monitor when it's dirty enough to distract you. A consistent routine keeps a small task from turning into a major project and ensures your display always looks its best.
Proactive Tips to Prevent Buildup
The easiest mess to clean is the one that never happens. A few simple habits can drastically cut down on how often you need to break out the cleaning kit, saving you time while protecting your screen.
First, get into the habit of adjusting your monitor by its frame or stand, not by pushing on the screen itself. This one small change eliminates the number one cause of annoying smudges: our own fingerprints.
Keeping your desk area tidy also makes a huge difference. When you dust your desk, keyboard, and speakers, you prevent those particles from getting airborne and landing on your screen. If your monitor is near a window or in a busy area, a simple dust cover at the end of the day works wonders.
Finally, having the right tools ready makes maintenance feel effortless. Keep a dedicated kit with high-quality screen cleaners and a fresh microfiber cloth nearby. That way, you're always prepared for a quick touch-up the moment you need it.
Common Questions About Cleaning Your Monitor
Even with a solid cleaning routine, a few questions always seem to surface. Getting these sorted will help you build good habits and handle pretty much any cleaning scenario with confidence. Think of this as your go-to guide for keeping that display looking perfect.
How Often Should I Clean My Screen?
Honestly, it all comes down to your environment. For most of us with a typical home or office desk, a good wipe-down every one to two weeks is plenty. That's usually enough to handle the dust and random fingerprints before they start getting on your nerves.
But if your desk is in a high-traffic spot, you've got furry coworkers, or you live somewhere dusty, you might need to make it a weekly ritual. The best rule of thumb is also the simplest: if the grime is starting to distract you, it's time for a clean.
Can I Just Use Water?
You can use a little distilled water, which is much better than tap water—the minerals in tap water can leave behind chalky residue. But water alone often just smears the oils from fingerprints around, which is incredibly frustrating.
A dedicated, alcohol-free screen cleaner is always your best bet. It’s made specifically to cut through oils and grime without damaging the delicate coatings on your screen. And as always, never spray anything directly onto the monitor itself.
What About Alcohol Wipes? Is That Safe?
That's a hard no. Cleaners with alcohol or ammonia are way too harsh for modern displays. They're known for stripping away the sensitive anti-glare and anti-reflective coatings on your screen, which can lead to permanent cloudy spots and hazy damage.
Always flip the bottle over and check the label. Make sure your cleaner is explicitly marked as alcohol-free and ammonia-free to keep your monitor safe.
How Do I Clean the Monitor Frame and Stand?
Good news—you don't need a different set of tools for this. The same gentle, alcohol-free cleaner and your microfiber cloth are perfectly safe for the plastic bezel, the stand, and the back of the monitor.
For dusty vents or ports, a quick blast from a can of compressed air is a great first step. It dislodges all that hidden debris before you wipe everything down, leaving the whole setup looking brand new.
For a complete care solution that keeps your entire workspace looking pristine and professional, trust EVEO. Our premium screen cleaners and microfiber cloths are designed to deliver a perfect, streak-free shine every time. Explore our collection and upgrade your cleaning routine today at eveo.store.
The Best Way to Organize Wires From Chaos to Calm
How to organize cables under desk: Simple steps for a tidy workspace