An adjustable monitor arm is the secret to a workspace that’s truly tailored to you. It lets you place your screen at the exact height, depth, and angle you need for a comfortable setup. Unlike the static stand that came in the box, an adjustable arm moves with you, promoting healthier posture and kicking physical strain to the curb.
This one simple upgrade can unlock a more comfortable, productive, and seriously organized desk.
Why Your Static Monitor Stand Is Holding You Back
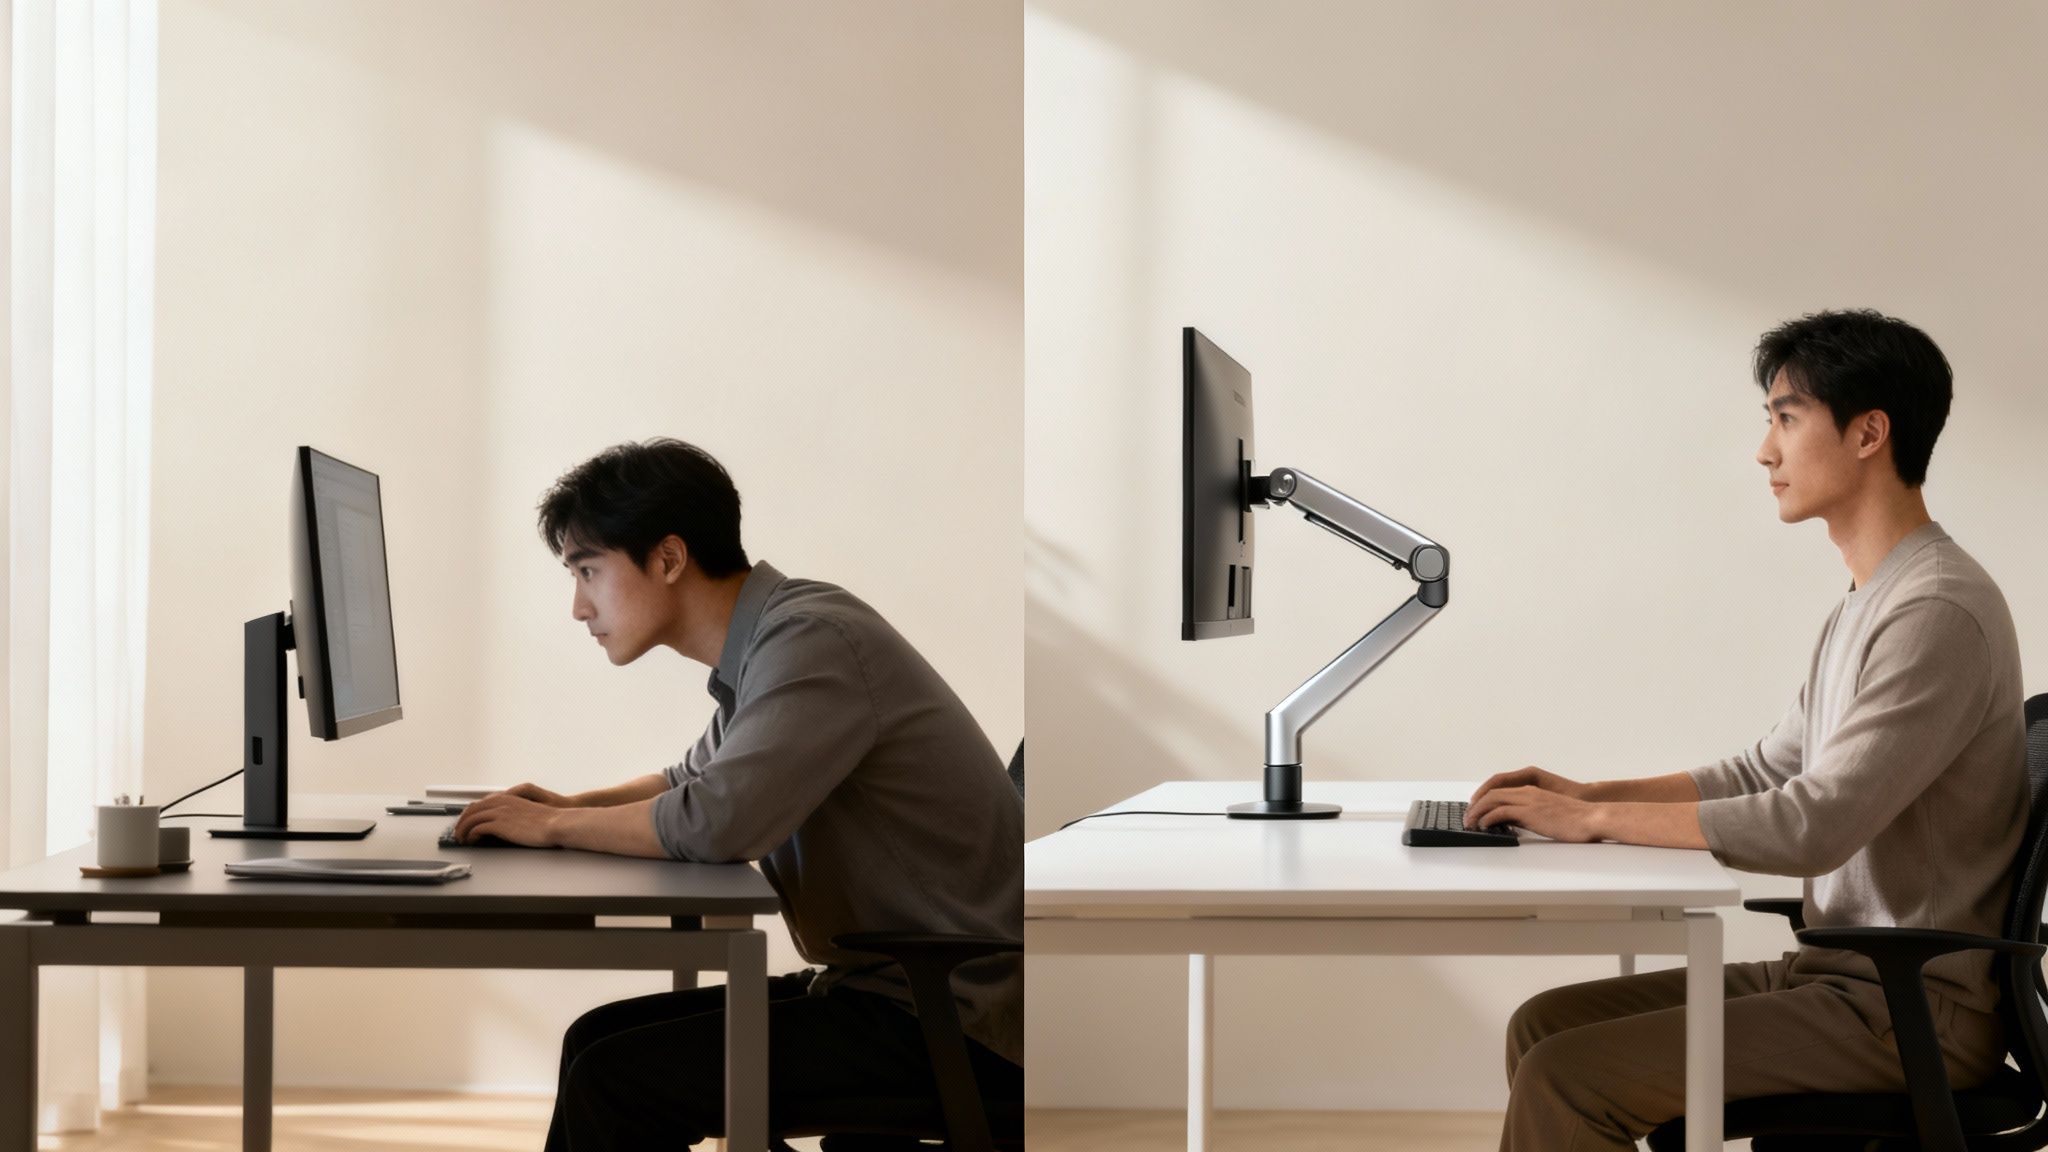
Think of the stand your monitor came with like a pair of "one-size-fits-all" shoes. Sure, it gets the job done, but it’s a long way from a perfect fit. You end up hunched over, craning your neck, or leaning in too close just to see the screen clearly. Over time, all those little unconscious adjustments start to add up to some very real discomfort.
A static stand forces you to adapt to your monitor. An adjustable monitor arm flips that script completely—it makes the monitor adapt to you. That single change is the key to unlocking a genuinely ergonomic workspace.
The Real-World Benefits Of An Ergonomic Upgrade
"Ergonomics" isn't just a buzzword; it's about making tangible improvements to your daily well-being and productivity. When your monitor is positioned correctly, the positive effects ripple through your entire workday.
Instead of thinking in abstract terms like 'proper posture,' think about these real-world results:
- Less Neck and Shoulder Pain: Aligning the top of your screen with eye level keeps your neck in a neutral, relaxed position, stopping the muscle strain that leads to chronic aches.
- Reduced Eye Strain: Placing your monitor about an arm's length away and tilting it to dodge glare makes a huge difference in visual fatigue.
- Fewer Tension Headaches: Bad posture is a classic trigger for tension headaches. By getting rid of the neck craning and shoulder slouching, you can cut down on how often they show up.
- Better Focus and Energy: When your body isn’t constantly fighting discomfort, you can pour that energy into your work, leading to sharper concentration and less of that end-of-day burnout.
This isn’t just a niche idea, either. The global monitor arm market hit around USD 1.66 billion recently and is on track to reach USD 2.10 billion by 2030. That growth shows a massive shift in how companies and individuals are prioritizing tools that support well-being. You can get more insights on this workplace trend from Grand View Research.
A well-adjusted monitor arm does more than just hold up a screen; it supports your health. It’s an investment in your physical well-being that pays dividends in productivity and comfort every single day.
Reclaim Your Most Valuable Asset: Desk Space
Beyond the health perks, one of the most immediate and satisfying wins you get from a monitor arm is all the space it frees up. That bulky, wide-footed stand your monitor came with eats up prime real estate right in the middle of your desk.
By lifting your monitor off the surface, you instantly get all that valuable area back. You can use this newfound space for documents, a notebook, or just to enjoy a cleaner, more minimalist setup. A clutter-free desk isn't just about looks; it helps foster a more organized and focused mindset, turning a chaotic surface into a streamlined productivity zone.
Choosing Your Perfect Monitor Arm
Picking the right monitor arm is a lot like getting a suit tailored—the goal is a perfect, custom fit for your body and your space. You wouldn't buy a suit without knowing your measurements, and you shouldn't grab a monitor arm without knowing your screen's vitals. It’s a straightforward process, but getting it right ensures your new setup is stable, secure, and ready to go from day one.
It all starts with two key numbers: your monitor's weight and its VESA pattern.
Check Your Monitor's Weight and VESA Compatibility
First things first, you need to find your monitor's weight without its original stand. This is the magic number. You can usually find it in the user manual or on the manufacturer's website. If you skip this step, you risk buying an arm that can't hold your screen, leading to that dreaded monitor droop or, even worse, a complete failure.
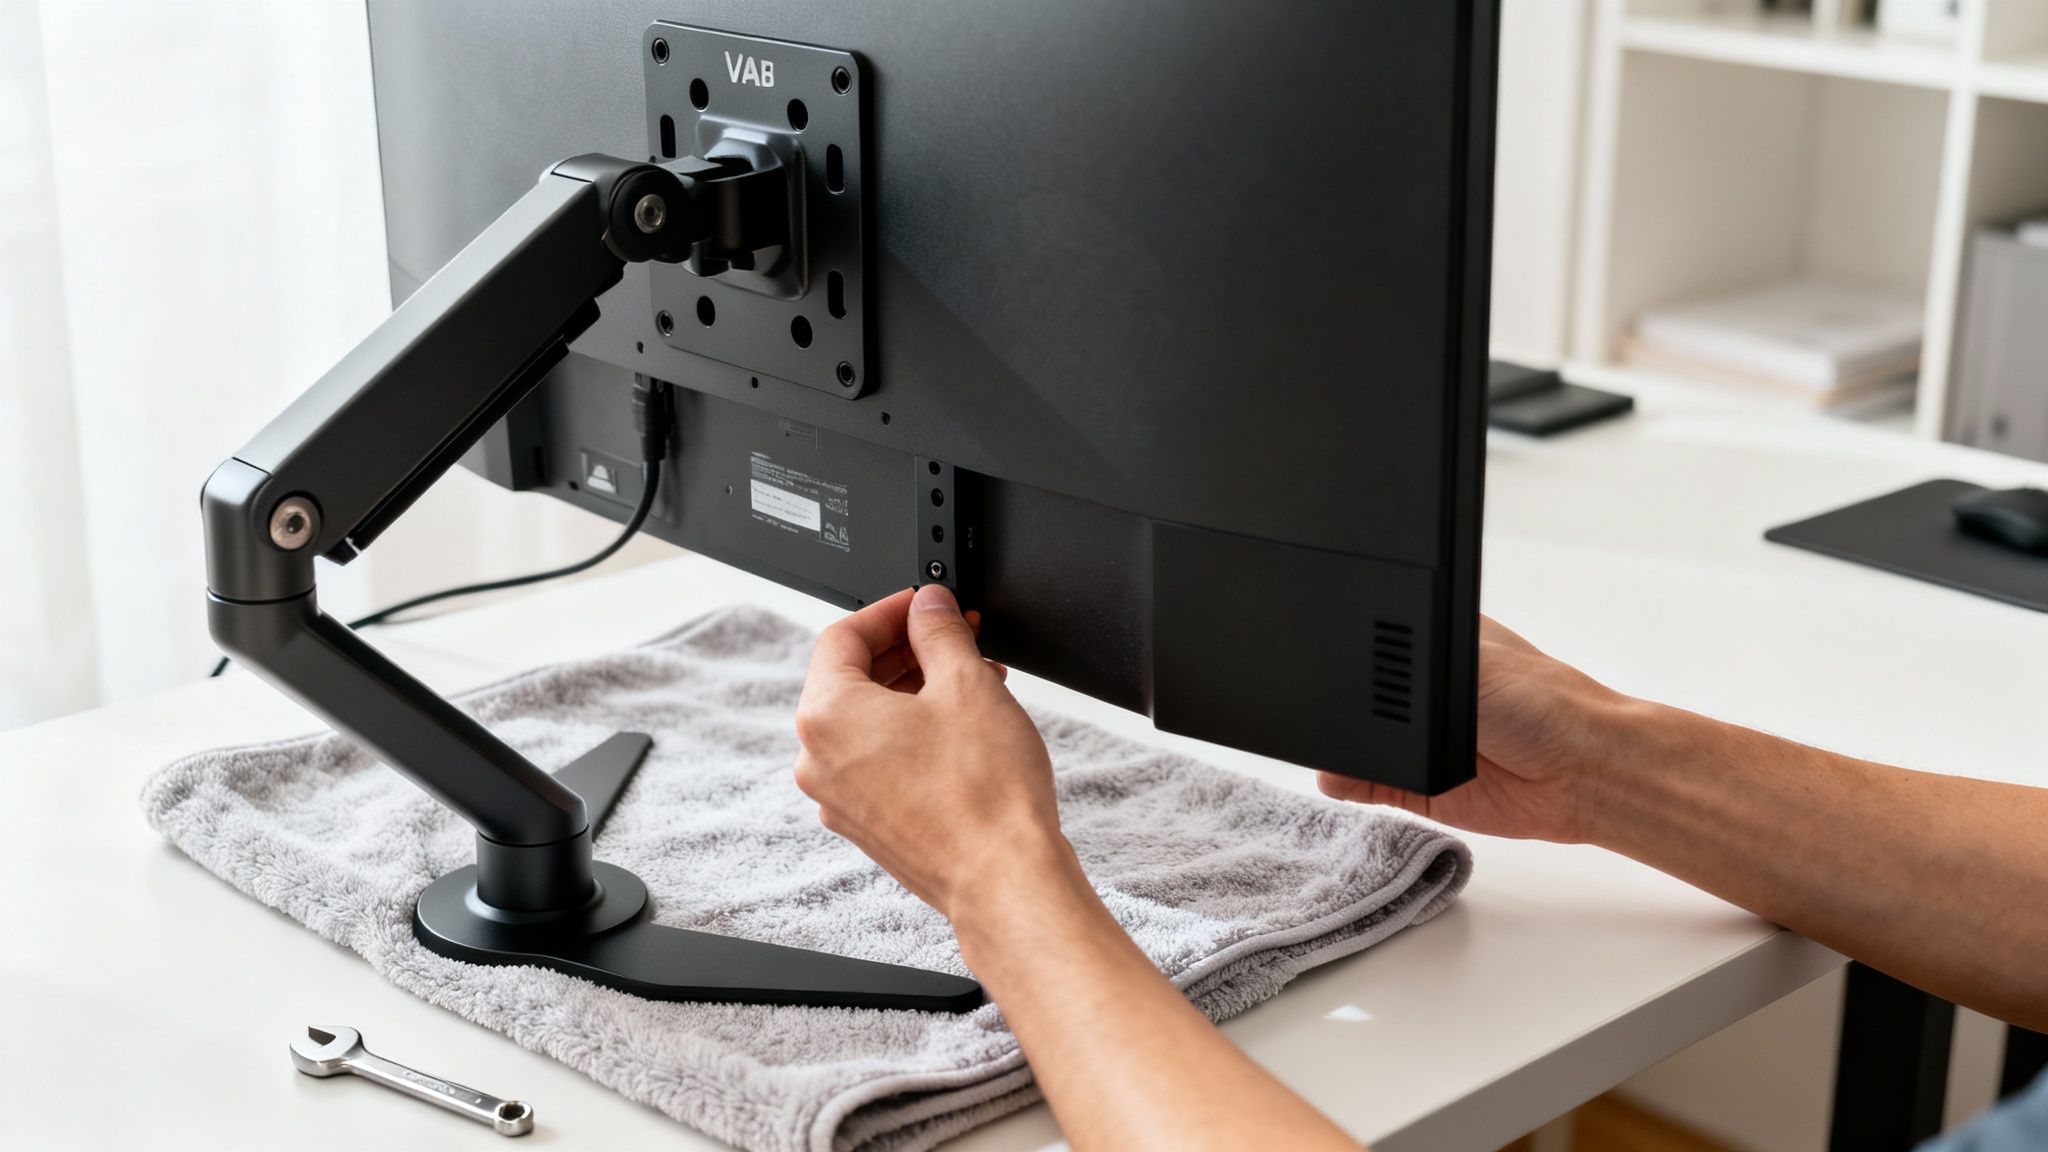
Next up is VESA compatibility. Think of VESA as a universal language for displays and mounts. It’s a standardized screw-hole pattern on the back of your monitor that guarantees an arm from one brand will connect perfectly to a screen from another.
Just look at the back of your monitor, and you'll likely see a square pattern of four screw holes.
- 75x75mm: Typically found on smaller, lighter monitors. The holes are 75 millimeters apart.
- 100x100mm: This is the most common standard, used on most monitors up to 32 inches. The holes are 100 millimeters apart.
Can't see the holes? Don't panic. They're often hiding underneath the bracket that connects the monitor to its factory stand. Just undo a few screws, and the VESA pattern should be waiting for you. The good news is that almost all modern monitors are VESA compliant, making this a simple but critical check.
Key Takeaway: Always confirm your monitor's weight (stand-less) and its VESA pattern (usually 75x75mm or 100x100mm) before you buy an arm. This one step will save you from the biggest and most common compatibility headaches.
Evaluate Your Desk and Mounting Style
Once you know your monitor’s specs, it’s time to look at your desk. The whole setup is only as good as its foundation, and that means making sure the arm is securely attached to your work surface. Most monitor arms give you two ways to do this.
A desk clamp is the most popular kid on the block. It works just like a big C-clamp, gripping the edge of your desk without leaving a permanent mark. It's the perfect solution if you rent, use a company desk, or just don't want to drill holes in your furniture. Just make sure your desk is at least half an inch thick and made from something solid like wood, MDF, or dense particleboard. Trying to clamp onto a flimsy, hollow-core desk is a recipe for disaster.
Your other option is a grommet mount. This gives you a super clean, built-in look by securing the arm through a hole in your desk. You can use an existing cable management hole or drill one yourself. It's an incredibly stable and sturdy method, making it ideal for heavier monitors or for anyone who wants that sleek, minimalist aesthetic.
Match the Arm to Your Unique Workflow
The final piece of the puzzle is you. The best monitor arm isn't just one that fits your screen; it's one that fits how you actually work. Think about your daily grind and how many screens you juggle to find your ideal match. If you want to go even deeper, check out our guide on how to choose the right monitor mount for your workspace.
For the Focused Writer or Analyst (Single Monitor Setup)
If your world revolves around one main screen for writing, crunching numbers, or research, a solid single monitor arm is all you need. You'll want something that gives you smooth, easy adjustments for height and tilt to nail that perfect ergonomic angle. You probably don't need a crazy range of motion, so focus on stability.
For the Multitasking Programmer or Designer (Dual Monitor Setup)
A dual monitor setup is a productivity beast. You can code on one screen while you preview on the other, or keep your design canvas open next to your reference materials. For this, a dual monitor arm is a must. Look for one that lets you adjust each screen independently so you can line them up perfectly or even stack one vertically.
For the Immersive Gamer or Creative Pro (Ultrawide Monitor Setup)
Ultrawide and curved monitors are a whole different ballgame. They're heavy, and their center of gravity is much deeper, so a standard arm just won't cut it. You absolutely need a heavy-duty model built specifically for your monitor's size and weight. These beefed-up arms have stronger components designed to stop that massive screen from sagging or tilting, keeping your immersive view locked in place.
Comparing Monitor Arm Mechanisms And Mounts
Let's get into what really makes a monitor arm tick. The magic is all in the adjustment mechanism—the engine that dictates how your screen moves. The two main players you'll run into are gas-spring and mechanical spring systems, and each has a totally different feel.
Gas-Spring: The Effortless Float
Think of a gas-spring arm as the high-end suspension on a luxury car. It uses a pressurized gas cylinder to perfectly counterbalance your monitor's weight. The result? Incredibly smooth, one-touch adjustments. You can glide your screen into the perfect position with just a fingertip, no stuttering or muscle required.
This fluid motion is a game-changer for anyone who repositions their monitor throughout the day. If you switch from sitting to standing, or often turn your screen to collaborate with a teammate, the effortless feel of a gas-spring arm is a huge quality-of-life upgrade.
Mechanical Springs: The Reliable Workhorse
On the other hand, we have mechanical spring arms. These are the rugged, heavy-duty workhorses of the monitor arm world. Instead of gas, they use a tightly coiled steel spring that you tension with a tool (usually an Allen key) to perfectly match your monitor’s weight.
Once you’ve dialed it in, a mechanical arm is incredibly stable and reliable, holding its position without budging. The trade-off is that adjustments feel more deliberate and less "floaty" than a gas spring. This makes them a fantastic choice for people who find their perfect ergonomic spot and tend to stick with it.
The Bottom Line: If you're after seamless, frequent adjustments and a premium, liquid-smooth feel, a gas-spring arm is your best bet. If you prioritize set-it-and-forget-it stability and rock-solid durability, a mechanical spring system offers unbeatable reliability.
This demand for dynamic, ergonomic control is why height-adjustable arms dominate the market. In fact, projections show this category alone could grow to be worth USD 2.617 billion by 2035, a clear sign that people are investing in their comfort and productivity. You can see more on this trend over at Straits Research.
Desk Clamps vs. Grommet Mounts: Securing Your Foundation
The arm's mechanism handles the movement, but the mount provides the stable foundation. Your choice here comes down to your desk and whether you want a permanent or a more flexible installation.
The desk clamp is the most popular and versatile option. It works just like a C-clamp, gripping the edge of your desk firmly. Padded contact points prevent any scratching, making it a perfect solution if you're renting or just don't want to drill into your furniture. Just make sure your desk has a solid edge for the clamp to grab onto.
For a cleaner, more permanent look, the grommet mount is an awesome choice. This method secures the arm through a hole in your desk—either a pre-existing cable port or one you drill yourself. This provides incredible stability and creates a sleek, built-in aesthetic that’s especially great for heavier monitors. If you want to dive deeper, check out our detailed guide on desk mount VESA standards.
This table breaks down the key differences to help you decide.
Monitor Arm Type Comparison
| Feature | Gas-Spring Arm | Mechanical Spring Arm | Desk Clamp Mount | Grommet Mount |
|---|---|---|---|---|
| Adjustment Feel | Smooth, one-touch floating | Deliberate, tension-based | N/A | N/A |
| Best For | Frequent repositioning | Set-it-and-forget-it setups | Most desks, non-permanent | Clean, integrated look |
| Installation | Quick tension adjustment | Manual tensioning with tool | Clamps to desk edge | Mounts through desk hole |
| Stability | Excellent | Rock-solid once set | Very stable | Extremely stable |
| Desk Modification | None | None | None | Requires a hole |
Ultimately, picking the right mechanism and mount comes down to your daily habits and your specific hardware.
This flowchart can help you visualize the decision process, making it easier to see which path is right for you.

By matching the arm to your workflow, you'll end up with a setup that feels both supportive and completely intuitive.
Your Guide To Installation And Ergonomic Placement
Getting your new monitor arm out of the box and onto your desk shouldn't be a headache. It's not some complex DIY project—in fact, with a few pointers, you can turn a potentially frustrating task into a quick and satisfying upgrade. Let's walk through how to get it installed and, more importantly, how to dial in that perfect ergonomic position to feel the benefits right away.
The whole point is to get your screen floating exactly where you need it, creating a workspace that’s healthier and more productive from the moment you sit down.
A Frustration-Free Installation Process
First things first: before you even think about the monitor, get the arm’s base securely attached to your desk. Whether it's a clamp or a grommet mount, this is your foundation. It needs to be rock-solid.
Once the base is tight, turn your attention to the VESA plate—that small bracket that connects the arm to your monitor. Here’s a pro tip that will save you a world of pain:
Lay a soft towel on your desk to protect the screen. Place your monitor face-down and screw the VESA plate on before you try to lift it onto the arm.
This one simple step prevents you from awkwardly fumbling with screws while trying to hold up the full weight of your monitor. With the plate already attached, you can just lift the screen and slide it onto the arm’s mounting point. It usually clicks or screws into place, and you're done. Brands like EVEO design their arms for exactly this kind of intuitive, hassle-free setup.
Mastering Your Ergonomic Placement
With the arm installed, the real magic begins. This is where you go from a technical setup to a personalized ergonomic sweet spot. Just a few small tweaks can completely change how you feel at the end of a long workday.
You can nail the perfect placement with a simple three-point checklist. Think of these as the golden rules for killing neck strain, eye fatigue, and that dreaded afternoon slouch.
1. Set The Correct Screen Height
This is, without a doubt, the most important adjustment you'll make. The goal is to keep your neck in a neutral, relaxed position and stop that forward-head hunch that causes so much pain.
- What to do: Position your monitor so the top edge of the screen is at, or just slightly below, your eye level.
- Why it works: This naturally encourages you to sit up straight and look forward, instead of craning your neck up or slouching down. It keeps your spine happy.
2. Find The Ideal Viewing Distance
Sticking your monitor too close or pushing it too far away is a one-way ticket to eye strain. The right distance lets your eyes focus comfortably without having to squint or lean in.
- What to do: Sit back comfortably in your chair and extend your arm straight out. Your screen should be roughly an arm's length away.
- Why it works: For most people, this is the sweet spot. It reduces the effort your eyes have to make to focus, minimizing digital eye strain over long hours.
3. Adjust The Screen Tilt
Finally, a little tilt can make a huge difference in both comfort and cutting down annoying glare from windows or overhead lights.
- What to do: Tilt the monitor back just a bit, so the screen angles upward toward your face by about 10 to 20 degrees.
- Why it works: This angle often aligns better with your natural line of sight when you’re sitting upright. It also helps kill those reflections that make you squint or shift around in your seat.
By running through these three steps, you’re doing more than just installing a piece of gear. You're actively designing a workspace that works for you, not against you. An adjustable monitor arm gives you the power to make these micro-adjustments anytime, ensuring your setup is perfectly tailored to you, every single day.
Achieving A Clutter-Free Desk With Cable Management
Getting your monitor to "float" with an arm is a fantastic first step, but the real magic happens when the cables vanish, too. This is how you defeat desk clutter for good, transforming your workspace from just functional to truly professional. Great cable management isn't just about looks; it's about creating a safer, more focused environment free from tangled distractions.
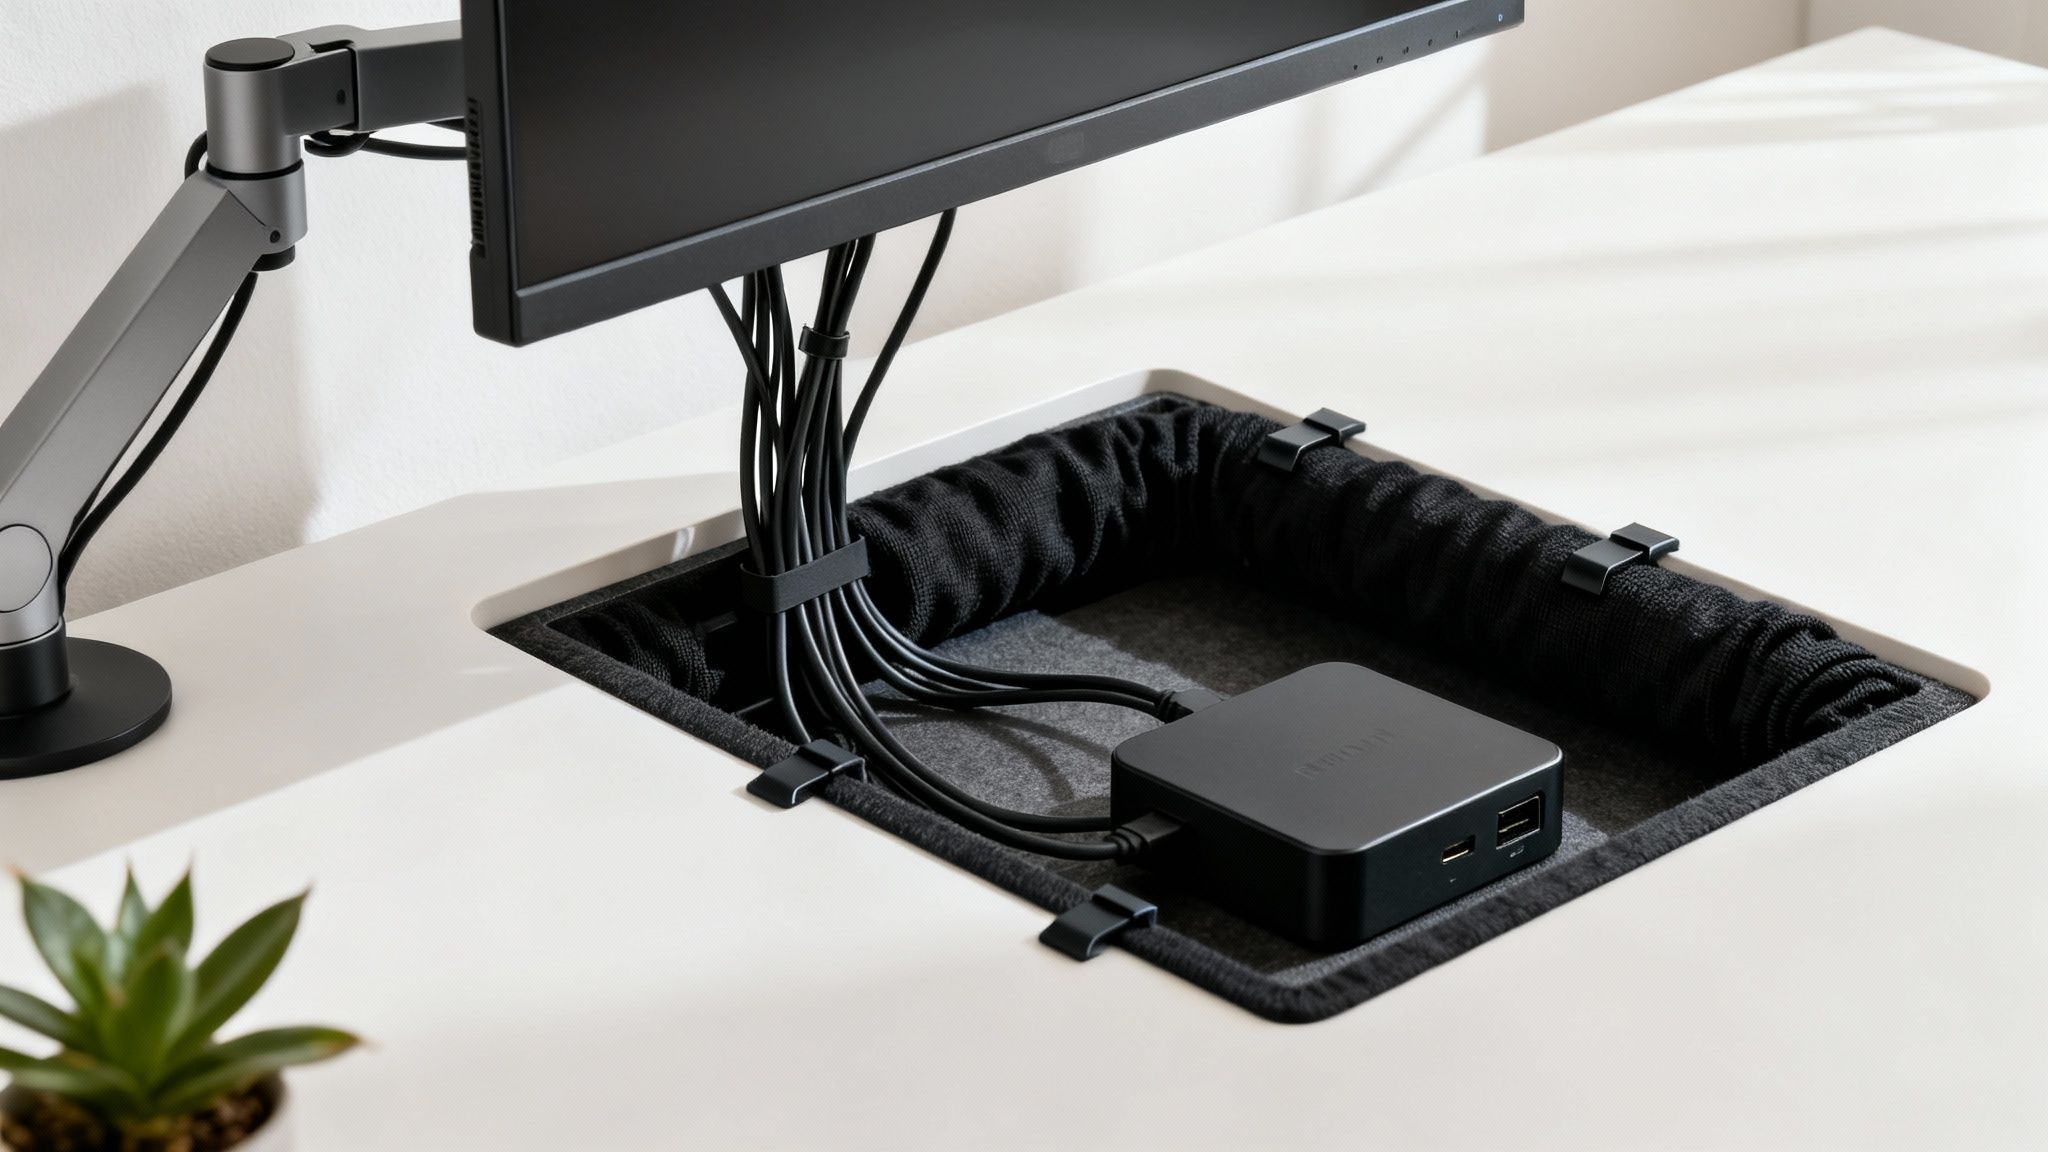
Your journey to a clean setup starts with the tool you already have. Most adjustable monitor arms are designed with built-in channels, clips, or covers made to guide your power and display cords along the arm itself. By simply tucking the cables into these guides, you make them follow the arm's structure, which makes them practically disappear from view.
This one simple action immediately tidies up the most visible part of your setup. To get that truly pristine, minimalist desk, however, you need to think beyond just the arm.
Building a Complete Cable Strategy
A complete cable management system tackles every wire, from your monitor all the way to the wall outlet. This means adding a few complementary tools to your setup that work together to hide every last cord.
Think of it as a total organizational overhaul. Just as office modernization is a global trend, so is the push for cleaner, more efficient workspaces. In the Asia Pacific region, for example, the market for monitor arms is booming with a 5% compound annual growth rate, driven by a focus on employee well-being and workspace upgrades. You can discover more insights about this global trend on fundamentalbusinessinsights.com.
To build your own professional-grade setup, these are the essential tools you'll need:
- Adhesive Cable Raceways: These are slim plastic channels that stick to the underside of your desk. They create a hidden highway for your cables, guiding them from the base of the monitor arm to your power strip without ever being seen.
- Flexible Fabric Sleeves: Got a few cables heading in the same direction? A simple neoprene or fabric sleeve bundles them into a single, tidy package. This is perfect for the group of wires running from your desk to the wall.
- Under-Desk Trays and Hubs: Let's be honest—power bricks, docking stations, and surge protectors are the biggest sources of clutter. A discreet tray or basket mounted under your desk gives these bulky items a hidden home, getting them off the floor and out of sight for good.
By combining these elements, you create a system where every single cable has its own designated, hidden path. Your desk surface stays clear, and the area below becomes just as organized, finally eliminating that dreaded "cable spaghetti."
More Than Just a Pretty Desk
A well-managed desk is a safer and more productive one. With no loose cords to snag or trip over, you cut the risk of accidentally unplugging a critical device or, even worse, pulling expensive hardware right off your desk.
More importantly, visual clutter is directly linked to mental clutter.
When your workspace is clean and organized, your mind can follow suit. It reduces distractions, helps you focus on the task at hand, and just projects a sense of calm and professionalism. By taking the time to implement a full cable management plan, you’re not just cleaning up; you’re optimizing your entire work environment for peak performance and peace of mind. For more ideas, you can also read our dedicated guide to under-desk cable management.
Common Questions About Adjustable Monitor Arms
Even after seeing all the benefits, it's completely normal to have a few questions before you commit. Let's walk through the most common ones that come up, so you can feel confident you're making the right move for your workspace.
Will A Monitor Arm Damage My Desk?
This is easily the biggest worry we hear, but here's the good news: a well-made monitor arm is designed to protect your furniture. High-quality clamps, like the ones you'll find on EVEO arms, have soft rubber or silicone padding everywhere they touch the desk. This creates a super-secure grip that won't leave scratches or scuffs behind.
The real key is making sure your desk itself is up for the job. You'll want a work surface that's at least a half-inch thick and made from a solid material like wood, MDF, or dense particleboard. If you have a more delicate surface like glass, you can slide a small metal or wood reinforcement plate under the clamp to spread the pressure out evenly.
Just be sure to check the monitor arm's specs for its supported desk thickness. As long as your desk is within that range, you can set it up without a second thought.
How Do I Know If My Monitor Is VESA Compatible?
Finding this out is way simpler than it sounds. Just spin your monitor around and look at the back. You're looking for a tell-tale square pattern of four screw holes.
That pattern is the VESA mount. The spacing between the holes tells you the size, and the most common ones for computer monitors are:
- 75x75mm (the holes are 75 millimeters apart)
- 100x100mm (the holes are 100 millimeters apart)
If you don't spot them right away, don't panic. Sometimes they're hiding under the plastic bracket that connects the monitor to its factory stand. A few screws later, the VESA holes are revealed. The overwhelming majority of modern monitors are VESA compliant, so it's pretty much a universal standard.
Gas-Spring Vs. Mechanical Spring: What Is The Real Difference?
It all comes down to the feel and how you like to adjust your screen. Think of it like an automatic vs. a manual car—both get you where you're going, but the experience is totally different.
A gas-spring arm has an internal pneumatic cylinder that perfectly counterbalances your monitor's weight. The result is a buttery-smooth, "floating" adjustment you can guide with a single fingertip. It's perfect if you're constantly changing your monitor's position for sitting, standing, or showing your screen to a coworker.
A mechanical spring arm, on the other hand, uses a tensioned coil. It’s incredibly durable and reliable, but adjustments feel more deliberate and sometimes need a tool to get the tension just right. If you're the type to find your perfect spot and leave it there, a mechanical spring offers that "set-it-and-forget-it" stability.
For everyday ease and a more premium, effortless feel, the fluid motion of a gas-spring system is what most people prefer.
Can I Mount An Ultrawide Or Curved Monitor?
Absolutely, but this is where you need to pick the right tool for the job. Ultrawide and curved monitors are a different beast—they're heavier, and their center of gravity is pushed further out than a flat screen's.
To handle these bigger displays, you need a heavy-duty monitor arm built specifically for their weight and shape. These specialized arms have stronger internal mechanisms and more robust VESA plates to handle the extra load and prevent that dreaded monitor sag you'd get with a standard arm.
Always choose an arm that explicitly says it supports your monitor’s size, weight, and curved design. That's how you guarantee the stability your premium display deserves.
Ready to build a more comfortable, organized, and productive workspace? EVEO offers a range of premium, easy-to-install adjustable monitor arms designed for single, dual, and ultrawide setups. Discover the perfect fit for your desk and experience the ergonomic difference.
How to Hide Computer Cables for a Flawless Workspace
Your Ultimate Work From Home Office Setup Guide